Capturing Decrypted TLS Traffic with Arkime

The latest version of Arkime (The Sniffer Formerly Known As Moloch) can now be fed with a real-time stream of decrypted HTTPS traffic from PolarProxy. All that is needed to enable this feature is to include "pcapReadMethod=pcap-over-ip-server" in Arkime's config.ini file and start PolarProxy with the "--pcapoveripconnect 127.0.0.1:57012" option. PolarProxy will then connect to Arkime's PCAP-over-IP listener on TCP port 57012 and send it a copy of all TLS packets it decrypts.
Note: The required PCAP-over-IP feature is available in Arkime 2.7.0 and PolarProxy 0.8.16.
About ArkimeArkime is an open source packet capture solution that indexes the PCAP data it collects. Arkime also comes with a web frontend for browsing and searching through the captured, and indexed, network traffic. The Arkime project recently changed name from Moloch, probably in an attempt to convince users that the tool doesn't eat children.
How to Install Arkime with PolarProxyThis guide demonstrates how TLS traffic, or more specifically HTTPS traffic, can be decrypted and ingested in real-time into Arkime.
The TLS decryption is performed with PolarProxy, which is a transparent TLS interception proxy that is freely available under a Creative Commons BY-ND 4.0 license.
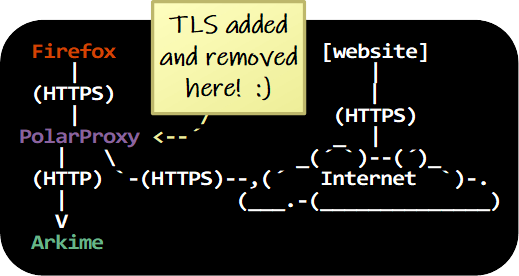
PolarProxy and Arkime can be installed on a server to intercept, decrypt, index and store decrypted TLS network traffic from multiple clients on a network. It is even possible to install PolarProxy and Arkime on separate servers, so that PolarProxy forwards a stream of decrypted traffic to the Arkime server. However, to avoid unnecessary complexity, Arkime and PolarProxy are installed locally on a Linux client in this howto guide. The Linux client is a Ubuntu 20.04.1 machine, but the instructions can also be used on other Linux flavors that use systemd, such as Arch, CentOS, Debian, Fedora, SUSE and Red Hat Linux.
Download and Install Arkime
Arkime can be downloaded as a pre-built installation packages for CentOS and Ubuntu here: https://arkime.com/#download
Note: You can alternatively visit the Arkime GitHub page if there is no pre-built installation package for your Linux distro or you prefer to build Arkime from source.
After installing the Arkime package, configure Arkime by running:
Found interfaces: lo;enp0s3 Semicolon ';' seperated list of interfaces to monitor [eth1] none
- Enter "none" as the interface to monitor (the interface setting will be ignored when Arkime gets configured as a PCAP-over-IP server)
- Install the ElasticSearch server by typing "yes" when prompted
Edit /data/moloch/etc/config.ini and add "pcapReadMethod=pcap-over-ip-server" to configure Arkime to listen for PCAP-over-IP connections.

Next, enable and start the ElasticSearch systemd service.
sudo systemctl start elasticsearch.service
Initiate the Arkime search cluster.
Create a new admin user.
You can now enable and start the Moloch capture and viewer services.
sudo systemctl start molochcapture.service
sudo systemctl enable molochviewer.service
sudo systemctl start molochviewer.service
Verify that Arkime now listens for incoming connections on TCP port 57012.
LISTEN 0 10 0.0.0.0:57012 0.0.0.0:*
Install PolarProxy to Decrypt TLS Traffic
Create a user for PolarProxy's systemd service and download PolarProxy like this:
sudo mkdir /var/log/PolarProxy
sudo chown proxyuser:root /var/log/PolarProxy/
sudo chmod 0775 /var/log/PolarProxy/
sudo su - proxyuser
mkdir ~/PolarProxy
cd ~/PolarProxy/
curl https://www.netresec.com/?download=PolarProxy | tar -xzf -
exit
Copy the default PolarProxy service config to the systemd location.
Modify /etc/systemd/system/PolarProxy.service by adding "--pcapoveripconnect 127.0.0.1:57012" at the end of the ExecStart command.
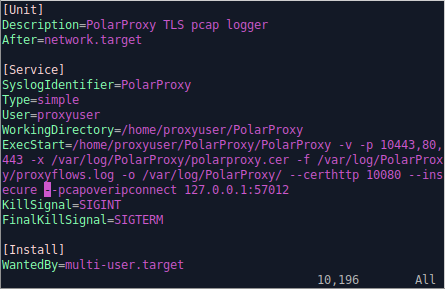
It's now time to enable and start the PolarProxy service.
sudo systemctl start PolarProxy.service
Verify that PolarProxy has connected to Arkime's PCAP-over-IP listener on TCP port 57012.
LISTEN 0 10 0.0.0.0:57012 0.0.0.0:*
ESTAB 0 0 127.0.0.1:40801 127.0.0.1:57012
ESTAB 0 0 127.0.0.1:57012 127.0.0.1:40801
Take it For a Test Run
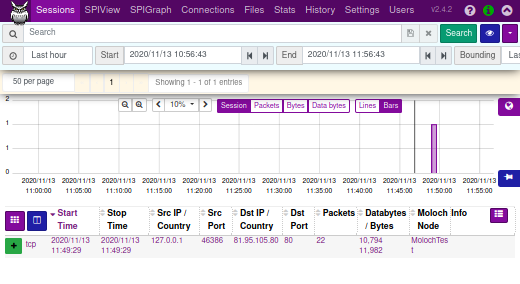
PolarProxy is listening for incoming TLS connections on TCP port 10443. We can therefore run traffic through the TLS decryption proxy with this curl command:
The decrypted traffic will show up in Arkime if everything is working. Open http://localhost:8005/sessions in a browser and look for a connection to www.netresec.com.
Note: The Arkime username and password is admin/THEPASSWORD if you've followed the instructions in this tutorial.
Also: You might have to wait a minute or two for the traffic to appear in Arkime's user interface.
Trust PolarProxy's Root CA Certificate
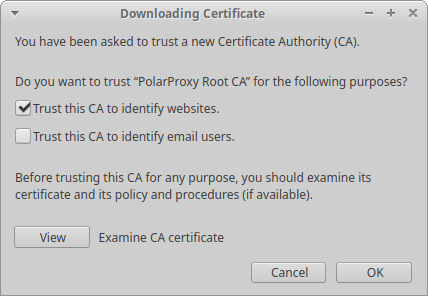
The root CA certificate used by your PolarProxy service must be trusted by both the operating system and browser in order to run TLS traffic through the decryption proxy without errors. Follow these instructions to add trust the root CA:
sudo openssl x509 -inform DER -in /var/log/PolarProxy/polarproxy.cer -out /usr/share/ca-certificates/extra/PolarProxy-root-CA.crt
sudo dpkg-reconfigure ca-certificates
- Select the "extra/PolarProxy-root-CA.crt" Certificate Authority
- Press <Ok>
Start Firefox
- Download the root CA certificate from: http://localhost:10080/polarproxy.cer
- Open: about:preferences#privacy
- Scroll down to "Certificates" and click "View Certificates"
- Import > Select "polarproxy.cer"
- Select: ☑ Trust this CA to identify websites
Configure Firewall Redirect of Outgoing HTTPS Traffic
The final step in this tutorial is to redirect the local user's outgoing HTTPS traffic to the PolarProxy service listening on TCP port 10443. Add the following lines at the top of /etc/ufw/before.rules (before the "*filter" section) to redirect outgoing HTTPS traffic to the local PolarProxy service listening on port 10443.
:OUTPUT ACCEPT [0:0]
-A OUTPUT -m owner --uid 1000 -p tcp --dport 443 -j REDIRECT --to 10443
COMMIT
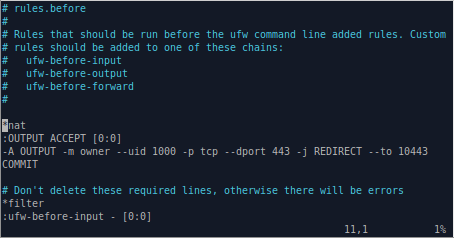
Note: The UFW config in "before.rules" is equivalent to running "iptables -t nat -A OUTPUT -m owner --uid 1000 -p tcp --dport 443 -j REDIRECT --to 10443"
Make sure to modify the uid value (1000) in the firewall rule to match that of the local user that PolarProxy should decrypt the HTTPS traffic for. You can see your uid value by running the command "id -u". You can even redirect traffic from several users to PolarProxy, but it's important that you DON'T forward the outgoing HTTPS traffic from the "proxyuser" account. You will otherwise generate an infinite firewall redirect loop, where outgoing HTTPS traffic from PolarProxy is redirected back to PolarProxy again. You can check the proxyuser's uid with the command "id -u proxyuser".
After saving before.rules, reload UFW to activate the port redirection.
Surf 'n' Snoop
Your Linux machine is now configured to send decrypted HTTPS traffic to Arkime for inspection. Open Firefox and visit some websites, then go back to Arkime and have a look at the traffic. Again, remember that there might be a few minutes' delay before the traffic appears in Arkime's user interface
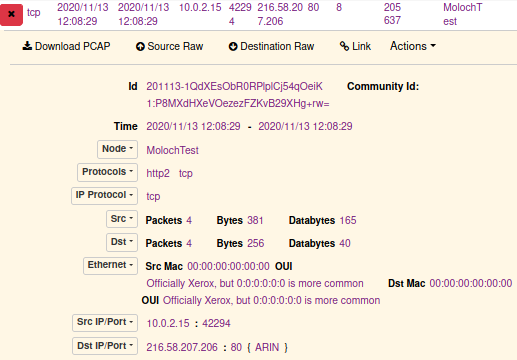
You'll probably notice that the majority of all HTTPS traffic is actually using the HTTP/2 protocol. Unfortunately Arkime's http2 support is still quite limited, but I'm hoping it will improve in future releases.
Luckily, both Wireshark and NetworkMiner (which runs fine in Linux by the way) can be used to parse and extract contents from HTTP/2 traffic. Just hit Arkime's "Download PCAP" button and open the capture file in a tool of your choice.
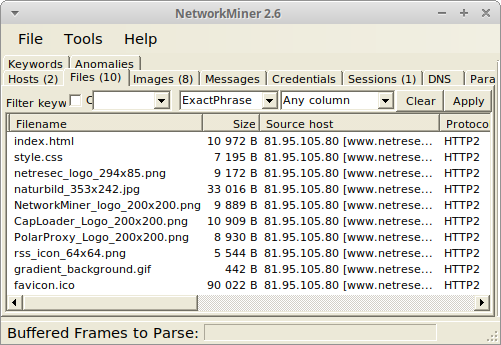
Image: NetworkMiner in Linux with files extracted from decrypted HTTP/2 traffic
Posted by Erik Hjelmvik on Tuesday, 01 December 2020 07:50:00 (UTC/GMT)
Tags: #Arkime #PolarProxy #TLS #HTTPS #decrypt #PCAP #systemd #systemctl #UFW #http2 #HTTP/2 #PCAP-over-IP #pcapoverip #ASCII-art


