NETRESEC Network Security Blog - Tag : Arkime

rss Google News

What is PCAP over IP?

PCAP over IP

PCAP-over-IP is a method for reading a PCAP stream, which contains captured network traffic, through a TCP socket instead of reading the packets from a PCAP file.

A simple way to create a PCAP-over-IP server is to simply read a PCAP file into a netcat listener, like this:

nc -l 57012 < sniffed.pcap

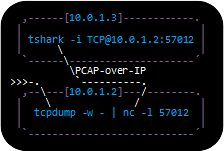
The packets in “sniffed.pcap” can then be read remotely using PCAP-over-IP, for example with tshark like this (replace 192.168.1.2 with the IP of the netcat listener):

nc 192.168.1.2 57012 | tshark -r -

But there’s an even simpler way to read PCAP-over-IP with Wireshark and tshark, which doesn’t require netcat.

wireshark -k -i TCP@192.168.1.2:57012
tshark -i TCP@192.168.1.2:57012

The Wireshark name for this input method is “TCP socket” pipe interface, which is available in Linux, Windows and macOS builds of Wireshark as well as tshark.

PCAP-over-IP in Wireshark's Pipe Interfaces

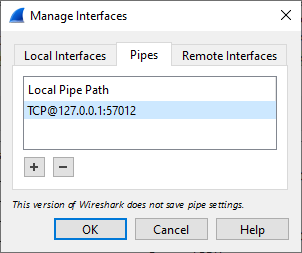
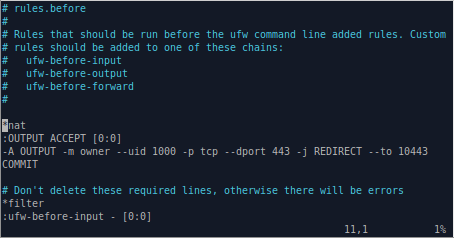
It is also possible to add a PCAP-over-IP interface from Wireshark's GUI. Open Capture/Options, Manage Interfaces, Pipes Tab and then enter a Local Pipe Path such as TCP@127.0.0.1:57012 and click OK. This setting will disappear when you close Wireshark though, since pipe settings don't get saved.

Live Remote Sniffing

Sniffed traffic can be read remotely over PCAP-over-IP in real-time simply by forwarding a PCAP stream with captured packets to netcat like this:

tcpdump -U -w - not tcp port 57012 | nc -l 57012
dumpcap -P -f "not tcp port 57012" -w - | nc -l 57012
PCAP-over-IP with tcpdump, netcat and tshark

Tcpdump is not available for Windows, but dumpcap is since it is included with Wireshark.

Note how TCP port 57012 is purposely filtered out using BPF when capturing in order to avoid a snowball effect, where the PCAP-over-IP traffic otherwise gets sniffed and re-transmitted through the PCAP-over-IP stream, which again gets sniffed etc.

A more sophisticated setup would be to let the service listening on TCP port 57012 spawn the sniffer process, like this:

nc.traditional -l -p 57012 -c "tcpdump -U -w - not port 57012"

Or even better, let the listening service reuse port 57012 to allow multiple incoming PCAP-over-IP connections.

socat TCP-LISTEN:57012,reuseaddr,fork EXEC:"tcpdump -U -w - not port 57012"

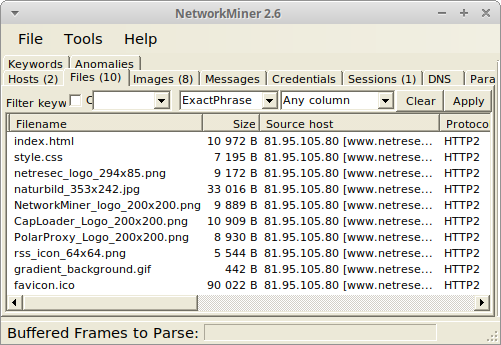
Reading PCAP-over-IP with NetworkMiner

We added PCAP-over-IP support to NetworkMiner in 2011 as part of NetworkMiner 1.1, which was actually one year before the TCP socket sniffing feature was included in Wireshark.

Live remote sniffing with NetworkMiner 2.7.3 using PCAP-over-IP

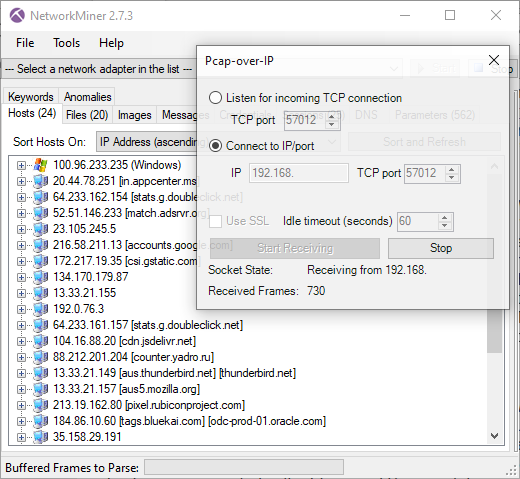
Image: Live remote sniffing with NetworkMiner 2.7.3 using PCAP-over-IP

NetworkMiner can also be configured to listen for incoming PCAP-over-IP connections, in which case the sniffer must connect to the machine running NetworkMiner like this:
tcpdump -U -w - not tcp port 57012 | nc 192.168.1.3 57012

This PCAP-over-IP feature is actually the recommended method for doing real-time analysis of live network traffic when running NetworkMiner in Linux or macOS, because NetworkMiner’s regular sniffing methods are not available on those platforms.

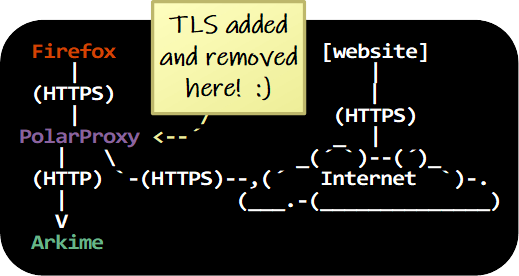
Reading Decrypted TLS Traffic from PolarProxy

PolarProxy

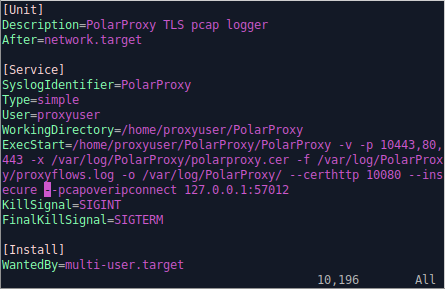
One of the most powerful use-cases for PCAP-over-IP is to read decrypted TLS traffic from PolarProxy. When PolarProxy is launched with the argument “--pcapoverip 57012” it starts a listener on TCP port 57012, which listens for incoming connections and pushes a real-time PCAP stream of decrypted TLS traffic to each client that connects. PolarProxy can also make active outgoing PCAP-over-IP connections to a specific IP address and port if the “--pcapoveripconnect <host>:<port>” argument is provided.

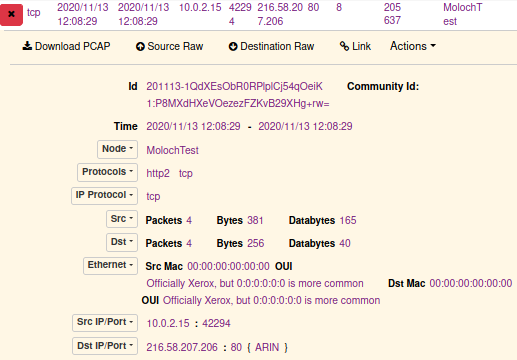
In the video PolarProxy in Windows Sandbox I demonstrate how decrypted TLS traffic can be viewed in NetworkMiner in real-time with help of PCAP-over-IP. PolarProxy’s PCAP-over-IP feature can also be used to read decrypted TLS traffic from PolarProxy with Wireshark as well as to send decrypted TLS traffic from PolarProxy to Arkime (aka Moloch).

Replaying PCAP-over-IP to an Interface

There are lots of great network monitoring products and intrusion detection systems that don’t come with a built-in PCAP-over-IP implementation, such as Suricata, Zeek, Security Onion and Packetbeat, just to mention a few. These products would greatly benefit from having access to the decrypted TLS traffic that PolarProxy can provide. Luckily we can use netcat and tcpreplay to replay packets from a PCAP-over-IP stream to a network interface like this:

nc localhost 57012 | tcpreplay -i eth0 -t -

But for permanent installations we recommend creating a dedicated dummy interface, to which the traffic gets replayed and sniffed, and then deploy a systemd service that performs the replay operation. See our blog post Sniffing Decrypted TLS Traffic with Security Onion for an example on how to deploy such a systemd service. In that blog post we show how decrypted TLS traffic from PolarProxy can be replayed to a local interface on a Security Onion machine, which is being monitored by Suricata and Zeek.

Nils Hanke has also compiled a detailed documentation on how decrypted TLS packets from PolarProxy can be replayed to Packetbeat and Suricata with help of tcpreplay.

In these setups netcat and tcpreplay act as a generic glue between a PCAP-over-IP service and tools that can sniff packets on a network interface, but there are a few drawbacks with this approach. One drawback is that tcpreplay requires root privileges in order to replay packets to an interface. Another drawback is that extra complexity is added to the solution and two additional single point of failures are introduced (i.e. netcat and tcpreplay). Finally, replaying packets to a network interface increases the risk of packet drops. We therefore hope to see built-in PCAP-over-IP implementations in more network monitoring solutions in the future!

FAQ for PCAP-over-IP

Q: Why is it called “PCAP-over-IP” and not “PCAP-over-TCP”?

Good question, we actually don’t know since we didn’t come up with the name. But in theory it would probably be feasible to read a PCAP stream over UDP or SCTP as well.

Q: What is the standard port for PCAP-over-IP?

There is no official port registered with IANA for PCAP-over-IP, but we’ve been using TCP 57012 as the default port for PCAP-over-IP since 2011. The Wireshark implementation, on the other hand, uses TCP port 19000 as the default value.

Q: Which software comes with built-in PCAP-over-IP servers or clients?

The ones we know of are: Arkime, NetworkMiner, PolarProxy, tshark and Wireshark. There is also a PCAP-over-IP plugin for Zeek (see update below).

Q: Is there some way to encrypt the PCAP-over-IP transmissions?

Yes, we recommend encrypting PCAP-over-IP sessions with TLS when they are transmitted across a non-trusted network. NetworkMiner’s PCAP-over-IP implementation comes with a “Use SSL” checkbox, which can be used to receive “PCAP-over-TLS”. You can replace netcat with socat or ncat in order to establish a TLS encrypted connection to NetworkMiner.

Q: Is there a tool that can aggregate multiple PCAP-over-IP streams into one?

No, none that we’re aware of. However, multiple PCAP-over-IP streams can be merged into one by specifying multiple PCAP-over-IP interfaces in dumpcap and then forwarding that output to a netcat listener, like this:

dumpcap -i TCP@10.1.2.3:57012 -i TCP@10.4.5.6:57012 -w - | editcap -F pcap - - | nc -l 57012

Update 2023-04-13

Erich Nahum has published zeek-pcapovertcp-plugin, which brings native PCAP-over-IP support to Zeek.

Erich's plugin can be installed as a zeek package through zkg.

zkg install zeek-pcapovertcp-plugin

After installing the plugin, a command like this reads a PCAP stream from a remote source:

zeek -i pcapovertcp::192.168.1.2:57012

Posted by Erik Hjelmvik on Monday, 15 August 2022 08:05:00 (UTC/GMT)

Tags: #PCAP-over-IP#PCAP#tcpdump#Wireshark#tshark#NetworkMiner#PolarProxy#Suricata#Zeek#Arkime#tcpreplay#netcat#ASCII-art

Share: Facebook   Twitter   Reddit   Hacker News Short URL: https://netresec.com/?b=228fddf


Capturing Decrypted TLS Traffic with Arkime

PolarProxy and Arkime Logo

The latest version of Arkime (The Sniffer Formerly Known As Moloch) can now be fed with a real-time stream of decrypted HTTPS traffic from PolarProxy. All that is needed to enable this feature is to include "pcapReadMethod=pcap-over-ip-server" in Arkime's config.ini file and start PolarProxy with the "--pcapoveripconnect 127.0.0.1:57012" option. PolarProxy will then connect to Arkime's PCAP-over-IP listener on TCP port 57012 and send it a copy of all TLS packets it decrypts.

Note: The required PCAP-over-IP feature is available in Arkime 2.7.0 and PolarProxy 0.8.16.

About Arkime

Arkime is an open source packet capture solution that indexes the PCAP data it collects. Arkime also comes with a web frontend for browsing and searching through the captured, and indexed, network traffic. The Arkime project recently changed name from Moloch, probably in an attempt to convince users that the tool doesn't eat children.

How to Install Arkime with PolarProxy

This guide demonstrates how TLS traffic, or more specifically HTTPS traffic, can be decrypted and ingested in real-time into Arkime.

The TLS decryption is performed with PolarProxy, which is a transparent TLS interception proxy that is freely available under a Creative Commons BY-ND 4.0 license.

TLS decryption with PolarProxy and Arkime. TLS added and removed here.

PolarProxy and Arkime can be installed on a server to intercept, decrypt, index and store decrypted TLS network traffic from multiple clients on a network. It is even possible to install PolarProxy and Arkime on separate servers, so that PolarProxy forwards a stream of decrypted traffic to the Arkime server. However, to avoid unnecessary complexity, Arkime and PolarProxy are installed locally on a Linux client in this howto guide. The Linux client is a Ubuntu 20.04.1 machine, but the instructions can also be used on other Linux flavors that use systemd, such as Arch, CentOS, Debian, Fedora, SUSE and Red Hat Linux.

Download and Install Arkime

Arkime can be downloaded as a pre-built installation packages for CentOS and Ubuntu here: https://arkime.com/#download

Note: You can alternatively visit the Arkime GitHub page if there is no pre-built installation package for your Linux distro or you prefer to build Arkime from source.

After installing the Arkime package, configure Arkime by running:

sudo /data/moloch/bin/Configure
Found interfaces: lo;enp0s3 Semicolon ';' seperated list of interfaces to monitor [eth1] none
  • Enter "none" as the interface to monitor (the interface setting will be ignored when Arkime gets configured as a PCAP-over-IP server)
  • Install the ElasticSearch server by typing "yes" when prompted

Edit /data/moloch/etc/config.ini and add "pcapReadMethod=pcap-over-ip-server" to configure Arkime to listen for PCAP-over-IP connections.

pcapReadMethod=pcap-over-ip-server in Arkime's config.ini

Next, enable and start the ElasticSearch systemd service.

sudo systemctl enable elasticsearch.service
sudo systemctl start elasticsearch.service

Initiate the Arkime search cluster.

/data/moloch/db/db.pl http://localhost:9200 init

Create a new admin user.

/data/moloch/bin/moloch_add_user.sh admin "Admin User" THEPASSWORD --admin
Note: Feel free to pick a more secure password than "THEPASSWORD" for the admin user.

You can now enable and start the Moloch capture and viewer services.

sudo systemctl enable molochcapture.service
sudo systemctl start molochcapture.service
sudo systemctl enable molochviewer.service
sudo systemctl start molochviewer.service

Verify that Arkime now listens for incoming connections on TCP port 57012.

ss -nta | grep 57012
LISTEN 0 10 0.0.0.0:57012 0.0.0.0:*

Install PolarProxy to Decrypt TLS Traffic

Create a user for PolarProxy's systemd service and download PolarProxy like this:

sudo adduser --system --shell /bin/bash proxyuser
sudo mkdir /var/log/PolarProxy
sudo chown proxyuser:root /var/log/PolarProxy/
sudo chmod 0775 /var/log/PolarProxy/
sudo su - proxyuser
mkdir ~/PolarProxy
cd ~/PolarProxy/
curl https://www.netresec.com/?download=PolarProxy | tar -xzf -
exit

Copy the default PolarProxy service config to the systemd location.

sudo cp /home/proxyuser/PolarProxy/PolarProxy.service /etc/systemd/system/PolarProxy.service

Modify /etc/systemd/system/PolarProxy.service by adding "--pcapoveripconnect 127.0.0.1:57012" at the end of the ExecStart command.

PolarProxy.service with --pcapoveripconnect 127.0.0.1:57012

It's now time to enable and start the PolarProxy service.

sudo systemctl enable PolarProxy.service
sudo systemctl start PolarProxy.service

Verify that PolarProxy has connected to Arkime's PCAP-over-IP listener on TCP port 57012.

ss -nta | grep 57012
LISTEN 0 10 0.0.0.0:57012 0.0.0.0:*
ESTAB 0 0 127.0.0.1:40801 127.0.0.1:57012
ESTAB 0 0 127.0.0.1:57012 127.0.0.1:40801

Take it For a Test Run

PolarProxy is listening for incoming TLS connections on TCP port 10443. We can therefore run traffic through the TLS decryption proxy with this curl command:

curl --insecure --connect-to www.netresec.com:443:127.0.0.1:10443 https://www.netresec.com/

The decrypted traffic will show up in Arkime if everything is working. Open http://localhost:8005/sessions in a browser and look for a connection to www.netresec.com.

Note: The Arkime username and password is admin/THEPASSWORD if you've followed the instructions in this tutorial.

Also: You might have to wait a minute or two for the traffic to appear in Arkime's user interface.

Moloch Sessions showing curl connection to www.netresec.com

Trust PolarProxy's Root CA Certificate

The root CA certificate used by your PolarProxy service must be trusted by both the operating system and browser in order to run TLS traffic through the decryption proxy without errors. Follow these instructions to add trust the root CA:

sudo mkdir /usr/share/ca-certificates/extra
sudo openssl x509 -inform DER -in /var/log/PolarProxy/polarproxy.cer -out /usr/share/ca-certificates/extra/PolarProxy-root-CA.crt
sudo dpkg-reconfigure ca-certificates
  • Select the "extra/PolarProxy-root-CA.crt" Certificate Authority
  • Press <Ok>

Start Firefox

  • Download the root CA certificate from: http://localhost:10080/polarproxy.cer
  • Open: about:preferences#privacy
  • Scroll down to "Certificates" and click "View Certificates"
  • Import > Select "polarproxy.cer"
  • Select: ☑ Trust this CA to identify websites

Firefox: Trust this CA to identify websites

Configure Firewall Redirect of Outgoing HTTPS Traffic

The final step in this tutorial is to redirect the local user's outgoing HTTPS traffic to the PolarProxy service listening on TCP port 10443. Add the following lines at the top of /etc/ufw/before.rules (before the "*filter" section) to redirect outgoing HTTPS traffic to the local PolarProxy service listening on port 10443.

*nat
:OUTPUT ACCEPT [0:0]
-A OUTPUT -m owner --uid 1000 -p tcp --dport 443 -j REDIRECT --to 10443
COMMIT

Firefox: Trust this CA to identify websites

Note: The UFW config in "before.rules" is equivalent to running "iptables -t nat -A OUTPUT -m owner --uid 1000 -p tcp --dport 443 -j REDIRECT --to 10443"

Make sure to modify the uid value (1000) in the firewall rule to match that of the local user that PolarProxy should decrypt the HTTPS traffic for. You can see your uid value by running the command "id -u". You can even redirect traffic from several users to PolarProxy, but it's important that you DON'T forward the outgoing HTTPS traffic from the "proxyuser" account. You will otherwise generate an infinite firewall redirect loop, where outgoing HTTPS traffic from PolarProxy is redirected back to PolarProxy again. You can check the proxyuser's uid with the command "id -u proxyuser".

After saving before.rules, reload UFW to activate the port redirection.

sudo ufw reload

Surf 'n' Snoop

Your Linux machine is now configured to send decrypted HTTPS traffic to Arkime for inspection. Open Firefox and visit some websites, then go back to Arkime and have a look at the traffic. Again, remember that there might be a few minutes' delay before the traffic appears in Arkime's user interface

HTTP/2 Session in Moloch

You'll probably notice that the majority of all HTTPS traffic is actually using the HTTP/2 protocol. Unfortunately Arkime's http2 support is still quite limited, but I'm hoping it will improve in future releases.

Luckily, both Wireshark and NetworkMiner (which runs fine in Linux by the way) can be used to parse and extract contents from HTTP/2 traffic. Just hit Arkime's "Download PCAP" button and open the capture file in a tool of your choice.

NetworkMiner 2.6 showing files ectracted from HTTP/2 traffic

Image: NetworkMiner in Linux with files extracted from decrypted HTTP/2 traffic

Posted by Erik Hjelmvik on Tuesday, 01 December 2020 07:50:00 (UTC/GMT)

Tags: #Arkime#PolarProxy#TLS#HTTPS#decrypt#PCAP#systemd#systemctl#UFW#http2#HTTP/2#PCAP-over-IP#pcapoverip#ASCII-art

Share: Facebook   Twitter   Reddit   Hacker News Short URL: https://netresec.com/?b=20C3247

X / twitter

NETRESEC on X / Twitter: @netresec

Mastodon

NETRESEC on Mastodon: @netresec@infosec.exchange