Our TLS inspection proxy PolarProxy has been updated with bug fixes, improved performance and more reliable PCAP output.
The recent PolarProxy 2.0 release added musl/Alpine compatibility and support for unencrypted HTTP proxy requests. But there were a few small, yet very important, updates that unfortunately didn’t make it into that release. The new PolarProxy 2.0.1 release takes care of this.
Bug Fixes
The PolarProxy 2.0.1 release fixes three bugs affecting non-TLS traffic: two that could block non-TLS connections under certain conditions, and one that could corrupt packets in output PCAP data.
Improved Performance
Memory overhead has been reduced as part of a major overhaul of PolarProxy’s data-flow logic. PolarProxy now caches less data, reducing CPU and memory use while supporting more simultaneous sessions.
PCAP vs Throughput
PolarProxy now prioritizes accurate PCAP output over raw proxy throughput. If the consumer of a real-time PCAP-over-IP stream (for example Arkime or Zeek) cannot process encrypted traffic fast enough, PolarProxy may rate-limit proxied traffic to avoid dropping packets in the PCAP output. This preserves every decrypted packet for forensic analysis, unlike many TLS-inspection products that sacrifice decrypted packets to maximize throughput.
A single dropped packet can cause major problems, particularly in forensic investigations. To ensure analysts see every decrypted packet, PolarProxy avoids dropping packets when possible.
Posted by Erik Hjelmvik on Friday, 05 June 2026 06:45:00 (UTC/GMT)
A new major release of PolarProxy is out with a self-contained single-file binary, expanded platform support (musl/ARM64), and improved container and service plumbing.
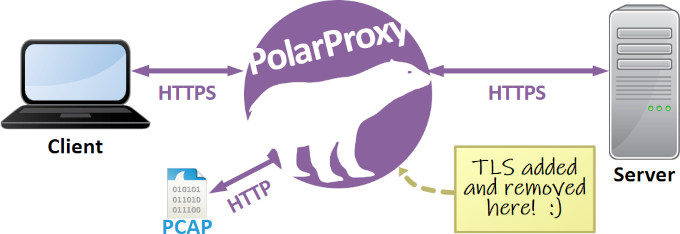
PolarProxy is a transparent TLS/SSL inspection proxy built for incident responders, malware analysts and security researchers. It decrypts and re‑encrypts TLS traffic and writes decrypted sessions to PCAP for analysis in Wireshark or an IDS.
What's new
Packaged as a self-contained, single-file binary for easier installation and management.
Improved HTTP proxy server: support for unencrypted HTTP traffic with --nontls allow
Upgraded runtime: migrated from .NET 8 to .NET 10.
More supported platforms: Linux musl (Alpine) builds for the ARM64 architecture added.
Simplified container deployment: Dockerfile and docker-compose.yml included with all musl/Alpine releases.
Service installer for Linux: systemd unit (polarproxy.service) and install script included in non-musl Linux releases.
New runtime flags:
--tlstimeout <seconds> — sets a TLS handshake/authentication timeout.
--cutoff <bytes> — limits PCAP output to the specified number of bytes per flow.
Why this release matters
Self-contained single binary simplifies deployment and maintenance. This is a breaking change, at least for container/pod deployments, so make sure to validate your deployment before rolling out the new 2.0 release to production.
The .NET 10 upgrade brings improved runtime performance and security updates.
Better container support with musl/Alpine build for ARM64 in addition to existing x64 builds, and simplified container deployments with included config files.
The new timeout for TLS handshakes improves error handling of connections to broken TLS middleboxes and extremely slow web servers.
The flow cutoff CLI option enables users to prevent large downloads from filling up disk volumes. This setting also limits the per-flow size of decrypted traffic that is made available through PCAP-over-IP.
Quick start for Linux (regular user)
Download the appropriate tar archive for your platform (see download links).
Create directory:
mkdir ~/PolarProxy
Change directory:
cd ~/PolarProxy/
Extract the archive:
tar -xzf ~/Downloads/PolarProxy_2.0.0_linux-x64.tar.gz
Download the appropriate tar archive for your platform (see download links).
Create and change into a new temp directory:
cd $(mktemp -d)
Extract the archive:
tar -xzf ~/Downloads/PolarProxy_2.0.0_linux-x64.tar.gz
Run install script:
sudo ./install-polarproxy-service.sh
Show service status:
systemctl status polarproxy.service
Show logs:
sudo journalctl -t polarproxy
The install script creates a system user “polarproxy”, a systemd service called “polarproxy.service”, and then starts that service. You are, of course, free to modify the installation script and polarproxy.service file if you want a different configuration.
Quick start for Alpine Docker
Download the appropriate Linux musl archive for your platform (see download links).
Create and change into a new temp directory:
cd $(mktemp -d)
Extract:
tar -xzf ~/Downloads/PolarProxy_2.0.0_linux-musl-x64.tar.gz
Deploy to docker:
sudo docker compose up -d --build
Show container status:
sudo docker ps --filter "name=polarproxy"
Show logs:
sudo docker logs polarproxy
The docker-compose.yml will create a container named “polarproxy” with a non-root user called “polarproxy” without a password.
Listening services in quick start examples
All three quick start deployments above expose the following TCP ports:
10443 — Transparent TLS proxy
1080 — SOCKS server
8080 — HTTP Proxy server
10080 — Web server hosting the root CA certificate
57012 — PCAP-over-IP server providing decrypted traffic
A port forwarding (DNAT) firewall rule must be configured, which redirects TCP 443 traffic to the transparent TLS proxy, in order to run PolarProxy as a transparent TLS proxy that intercepts outgoing TLS traffic.
See the Routing Option alternatives on the official PolarProxy page for more details.
Decrypted traffic from all proxy services is accessible through the PCAP-over-IP service on TCP port 57012. They are also written to PCAP files in /var/log/polarproxy/.
The new release of PolarProxy generates JA4 fingerprints and enables ruleset to match on specific decryption errors, for example to enable fail-open in case the TLS traffic cannot be decrypted and inspected.
JA4 Fingerprints
JA4 fingerprints provide several improvements over its JA3 predecessor. One advantage is that JA4 fingerprints have a human readable segment that allow humans (as well as computers) to instantly see important features in a client handshake, such as the TLS version and whether or not the SNI and ALPN extensions are used. JA4 is also resilient against TLS extension order randomization.
We added support for rule based matching of JA4 fingerprints in the previous release of PolarProxy. Such a JA4 rule can be used to have PolarProxy take different actions (block, intercept, bypass etc.) based on the JA4 fingerprint of the client’s TLS handshake.
This release additionally includes JA4 fingerprints in the flow metadata that PolarProxy writes to disk when the -f <file> argument is provided.
Flexible Handling of TLS Auth Failures
PolarProxy’s firewall rules now support using TLS authentication error codes as triggers. As an example, the ruleset fail-open.json attempts to inspect (decrypt and re-encrypt) all TLS traffic, except when the client has rejected the server’s certificate at least once during the past 60 seconds. More specifically, it only bypasses decryption if the reason for the rejection was either “bad certificate” or “unknown CA”.
The specific error codes (here 0x0A000412 for “bad certificate” and 0x0A000418 for “unknown CA”) might differ between deployments, since they depend on the underlying TLS library of the PolarProxy machine. The specific values in this example are from a Linux deployment with OpenSSL 3.0.13 installed. Look for the “decrypt_fail_errorcode” messages that PolarProxy prints to stderr to find out what error codes your system is using. You can also run PolarProxy with -v (verbose) or -d (debug) to get even more information about the error codes.
Ruleset Reload on SIGHUP
A PolarProxy ruleset can now be updated on the fly without having to restart PolarProxy. Simply send a SIGHUP signal to PolarProxy, for example pkill -HUP PolarProxy, to have it reload the updated ruleset without affecting sessions that PolarProxy is currently proxying.
If PolarProxy is running as a systemd service, then adding
ExecReload=/bin/kill -HUP $MAINPID
to the unit file allows PolarProxy’s ruleset to be reloaded with:
sudo systemctl reload PolarProxy.service
.NET 8
The .NET version has been bumped from 6 to 8 in the 1.0.1 release, which provides better performance as well as long-term support.
We've also bumped the System.Security.Cryptography.Xml library from version 4.5 to 9.0.
Posted by Erik Hjelmvik on Friday, 07 February 2025 10:10:00 (UTC/GMT)
Over 90 percent of all web traffic is encrypted nowadays, which is great of course. However, as HTTP and DNS traffic gets encrypted, defenders have a more difficult time blocking malicious network traffic. One solution to this problem is to use a TLS firewall, which effectively blocks encrypted connections to known bad websites.
DNS Firewalls and Sinkholes
DNS firewalls and DNS sinkholes, like pihole and RPZ firewalls, are simple yet effective solutions that can prevent users from connecting to malicious websites. They work by acting as recursive name servers that deny clients from resolving known-bad domain names. However, more and more DNS traffic is becoming encrypted with DNS-over-TLS (DoT) and DNS-over-HTTPS (DoH), where clients send DNS queries inside an end-to-end encrypted connection directly to a DNS provider. This prevents many DNS based security solutions, like DNS firewalls, from inspecting the queried hostnames.
One way around this problem is to block the actual connections to known-bad domains instead of preventing clients from resolving them. For outgoing TLS connections, such as HTTPS, this can be done with a TLS Firewall.
TLS Firewalls
A TLS firewall inspects client TLS handshakes and extracts the requested server name from the
Server Name Indication (SNI) extension. This hostname is generally sent unencrypted in HTTPS traffic (even if you use TLS 1.3), which allows the hostname to be inspected without having to break the TLS encryption. The TLS firewall then checks if the hostname is a known bad or malicious website, in which case the connection is either closed or the user gets redirected to a warning page.
Blocklists
There are several blocklists with malicious domain names, including commercial services as well as freely available lists from ThretFox, CERT Polska and others. These blocklists are often created for DNS firewalls and sinkholes, but they can also be leveraged by TLS firewalls to identify and block traffic to malicious websites.
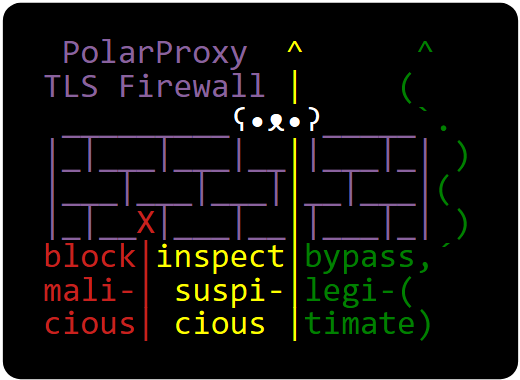
PolarProxy has the capability to decrypt and inspect what’s inside the TLS encryption, but this feature is not needed when acting as a TLS firewall. The hostname the client wants to connect to is generally provided in the SNI without encryption, so PolarProxy doesn’t have to use the “inspect” action when acting as a TLS firewall. When running in “firewall mode” PolarProxy performs the “block” action for connections to known malicious domains and the “bypass” action for all other TLS traffic. Because of this there is no need for configuring clients to trust PolarProxy’s root certificate in TLS firewall deployments, unless you add a custom rule that decrypts and inspects certain traffic. In fact, if PolarProxy is deployed as a transparent forward proxy in this TLS firewall mode, then zero client configuration is required. This means that managed as well as unmanaged devices, including BYOD, embedded devices, appliances etc., will be protected!
Transparent TLS Firewall (Linux)
If your network has a Linux based firewall that uses iptables, then you’ll be able to run PolarProxy as a transparent TLS firewall directly on your Linux firewall with this command:
You then need to configure the iptables firewall to redirect HTTPS traffic from your network to PolarProxy (see "Routing Option #1" in the PolarProxy documentation for more details).
sudo iptables -I INPUT -i eth1 -p tcp --dport 10443 -m state --state NEW -j ACCEPT
Congratulations, your firewall now blocks outgoing HTTPS connections from local clients to known malicious websites!
PolarProxy can also be run in a container using Docker or Podman.
HTTPS Proxy TLS Firewall (Windows)
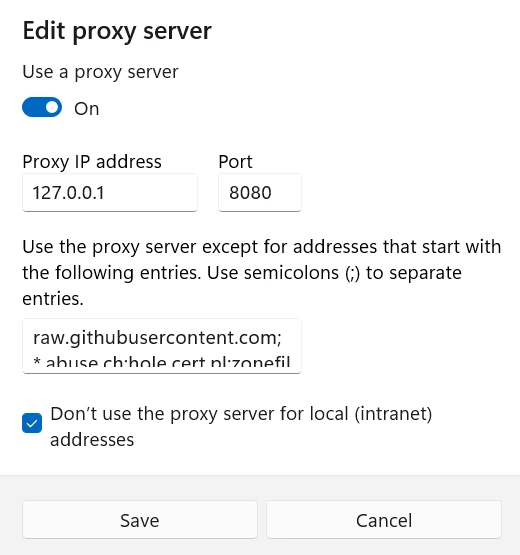
It’s even possible to run PolarProxy directly on a Windows PC and configure the local proxy settings to send outgoing traffic through PolarProxy. Use the following command to start PolarProxy as a HTTP CONNECT proxy server on port 8080 with a TLS firewall ruleset:
One side effect of running PolarProxy as an HTTP connect proxy (with --httpconnect) is that this mode only allows TLS encrypted traffic to pass through the proxy. This means that plaintext HTTP traffic that Windows forwards to PolarProxy on port 8080 will be blocked. You’ll see error messages like “Request method "GET" is not supported by HTTP CONNECT proxy” in PolarProxy’s output if it is started with the “-v” argument.
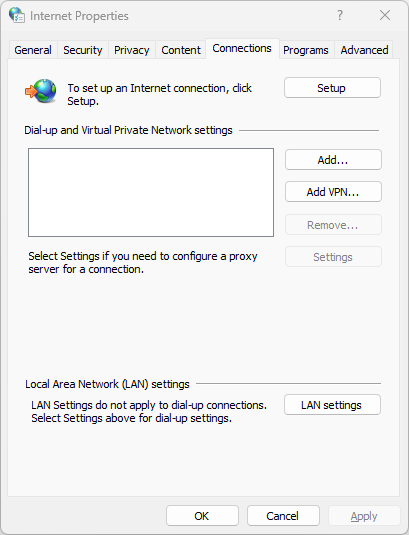
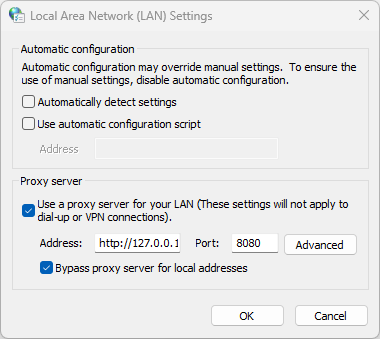
A workaround for this side effect is to run inetcpl.cpl (Window’s old school Internet Properties), select “Connections” tab and click the “LAN settings” button.
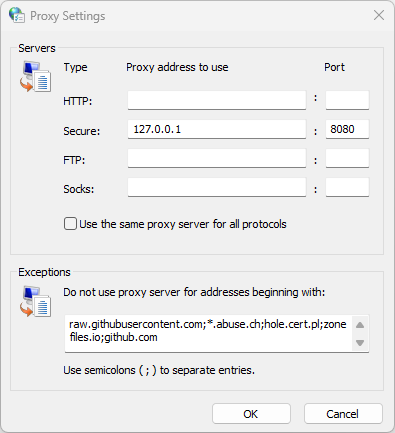
Then click the “Advanced” button in the Proxy server section of the LAN Settings window to configure which protocols that should run through the proxy.
Uncheck “Use the same proxy server for all protocols” and remove the proxy settings for everything except “Secure”, which is HTTPS traffic and clock “OK”.
The Windows PC should now only forward HTTPS traffic to PolarProxy’s TLS firewall.
Finally, I’d like to point out that the Windows proxy settings only affect outgoing traffic from applications that respect the proxy settings configured on the operating system. Pretty much every legitimate application will respect these settings and connect through PolarProxy, but there is no guarantee that malware will. This is why a transparent proxy deployment is recommended, such as the one described for the Linux deployment using iptables.
For more information about using PolarProxy as a TLS Firewall and the ruleset JSON format, please visit our TLS Firewall page.
Posted by Erik Hjelmvik on Monday, 27 January 2025 10:45:00 (UTC/GMT)
Do you want to analyze decrypted TLS traffic in Wireshark or let an IDS, like Suricata, Snort or Zeek, inspect the application layer data of potentially malicious TLS encrypted traffic? There are many different TLS inspection solutions to choose from, but not all of them might be suitable for the specific challenge you’re facing. In this blog post I describe three different methods for decrypting TLS and explain when to use one or the other.
RSA Private Key
TLS Key Log
TLS Inspection Proxy
Works for all ciphers
No (DHE cipher suites not supported)
Yes
Yes
TLS 1.3 supported
No
Yes
Yes
Zero client configuration required
Yes
No (pre-master secrets must be logged or extracted from TLS libraries)
No (root CA certificate must be installed)
Decrypts traffic from any application
No (most applications use modern ciphers with forward secrecy, which RSA doesn’t provide)
No (each method for TLS key extraction typically only supports a specific set of applications or TLS libraries)
No (apps that use certificate pinning or a custom certificate trust store cannot be intercepted without patching the app)
L7 traffic in PCAP files can be analyzed without decrypting TLS
No
No
Yes
Allows decrypted traffic to be mirrored to a network interface
No
No
Yes
RSA Private Key
TLS decryption with a private RSA key was for a long time the preferred method for inspecting SSL and TLS traffic. This approach allowed anyone with access to the server’s private RSA key to decrypt the traffic and inspect the application layer (L7) communication.
The primary drawback with RSA private key decryption is that a stolen or leaked private RSA key can be used by an attacker to decrypt all previously captured traffic from that server, if RSA key exchange is being used. Modern TLS stacks have therefore deprecated such ciphers in favor of ones that support forward secrecy, which typically perform an ephemeral Diffie–Hellman (DHE) key exchange instead of reusing the same private RSA key over and over. This means that the RSA private key decryption method cannot be used if the client and server are using a key exchange algorithm that supports forward secrecy.
RSA private key decryption can only be performed when all these conditions are met:
The protocol version is SSL 3.0, TLS 1.0, TLS 1.1 or TLS 1.2 (RSA was removed in TLS 1.3)
The server has selected a cipher suite that use RSA key exchange, such as
TLS_RSA_WITH_AES_256_GCM_SHA384,
TLS_RSA_WITH_AES_128_GCM_SHA256,
TLS_RSA_WITH_AES_256_CBC_SHA256,
TLS_RSA_WITH_AES_128_CBC_SHA256,
TLS_RSA_WITH_AES_256_CBC_SHA or
TLS_RSA_WITH_AES_128_CBC_SHA
The private key matches the server certificate (traffic cannot be decrypted with a client certificate or an intermediate or root certificate)
The session has not been resumed (the handshake must include a Client Key Exchange message)
This Wireshark display filter can be used to check if the server has selected an RSA cipher:
tls.handshake.type == 2 and tls.handshake.ciphersuite in {10,47,53,60,61,156,157}
You can check for a client key exchange message with:
tls.handshake.type == 16
A private RSA key can be loaded into Wireshark by clicking Edit, Preferences and RSA Keys. Another alternative is to use the command line tool tshark’s -ouat:rsa_keys switch like this:
Wireshark can decrypt the TLS layer in captured network traffic if the pre-master secrets used to establish the encrypted connection are provided. These secrets, or encryption key material, can be loaded into Wireshark from an SSLKEYLOGFILE by clicking Edit, Preferences, Protocols, TLS, and setting the (Pre)-Master-Secret log filename to the path of your SSLKEYLOGFILE.
Another alternative is to encode the key material as metadata in a pcap-ng file with editcap like this:
The primary drawback with the TLS key log decryption method is that only Wireshark and tshark can be used to analyze the decrypted TLS traffic.
You also need to get hold of the keys or pre-master secrets in order to perform the decryption.
Some applications, such as Firefox, Chrome and curl, can be configured to export a key log.
Another alternative is to install an agent that extracts key material from specific TLS libraries.
The limitation of only being able to extract keys from a specific set of applications or TLS libraries makes the TLS key log method unsuitable for analyzing TLS encrypted C2 traffic from malware, which often use custom TLS libraries.
It is also difficult to send decrypted TLS traffic to an IDS or a network security monitoring tool using a TLS key log.
If you, on the other hand, want to analyze network traffic from your own Firefox or Chrome browser in Wireshark, then the TLS key log approach is probably the best solution.
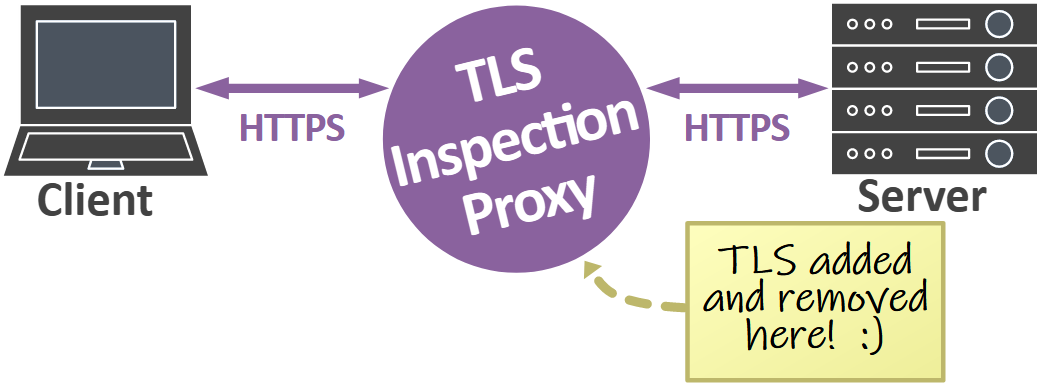
TLS Inspection Proxy
A TLS inspection proxy acts as a man-in-the-middle that intercepts and decrypts TLS traffic for inspection, it then re-encrypts the traffic and forwards it to the intended destination.
A major advantage of using a TLS inspection proxy is that decrypted TLS traffic can be analyzed from applications even if they use modern ciphers with forward secrecy and don’t support logging of TLS keys. The drawback, however, is that clients have to trust the root CA certificate that the proxy is using.
TLS inspection proxies often differ in how they make the decrypted traffic available to external tools, if at all. In fact, many TLS inspection proxies and Next-Generation Firewalls (NGFW) only make the decrypted payload available to the internal application or appliance. Such an approach prevents analysis of the decrypted traffic with an external tool, like Wireshark, Snort, Suricata, Zeek or NetworkMiner.
Another approach, used by proxies like mitmproxy, is to save a TLS key log for all proxied traffic. That approach allows captured TLS traffic to or from the proxy to be decrypted and inspected with Wireshark, but the application layer traffic cannot be inspected with other tools that don’t support TLS decryption using a key log.
The third and most integration friendly approach is to save the decrypted traffic in clear text form, so that other applications can inspect the unencrypted traffic without having to decrypt TLS. Some TLS proxies, like PolarProxy and SSLsplit, can even save the decrypted traffic to a PCAP file. Decrypted TLS traffic in PCAP format can easily be ingested into other tools or be replayed to a network interface for inspection by an external security appliance.
Best Practices
The list below can be used to select the best suited TLS inspection method for the particular challenge you’re tasked with.
Use RSA private key inspection if it is acceptable to use an older TLS version and less secure ciphers.
Use a TLS key log if your web server can be configured to export one or if you have an agent based key extraction solution that supports the TLS library used by the web server.
Use a TLS inspection proxy if you want to inspect the traffic with something other than Wireshark.
Inspect potentially malicious TLS traffic with an IDS or security appliance.
In this video I take a look at a cryptojacking attack against a Kubernetes honeypot.
The attackers were surprisingly quick to discover this unsecured Kubernetes deployment and use it to mine Monero for them.
The capture files named "proxy-", such as the analyzed proxy-220404-162837.pcap, were generated by PolarProxy and contain the decrypted Kubernetes API traffic to the master node.
This traffic was actually TLS encrypted, but since PolarProxy was used as a TLS interception proxy we can see the Kubernetes API traffic in decrypted form.
I am thrilled to announce the release of PolarProxy version 1.0 today!
Several bugs that affected performance, stability and memory usage have now been resolved in our TLS inspection proxy. PolarProxy has also been updated with better logic for importing external root CA certificates and the HAProxy implementation has been improved. But the most significant addition in the 1.0 release is what we call the “TLS Firewall” mode.
TLS Firewall
PolarProxy now supports rule based logic for determining if a session should be allowed to pass through, get blocked or if the TLS encrypted data should be inspected (i.e. decrypted and re-encrypted) by the proxy.
This rule based logic can be used to turn PolarProxy into a TLS firewall. As an example, the ruleset-block-malicious.json ruleset included in the new PolarProxy release blocks traffic to malicious domains in abuse.ch’s ThreatFox IOC database as well as traffic to web tracker domains listed in the EasyPrivacy filter from EasyList. This ruleset also includes an allow list in order to avoid accidentally blocking access to legitimate websites.
PolarProxy’s ruleset logic isn’t limited to just domain names. It is also possible to match traffic based on JA3 or JA4 hashes as well as application layer protocol information provided in the ALPN extension of a client’s TLS handshake.
PolarProxy is constantly being updated with new features, enhanced performance and bug fixes, but these updates are not always communicated other than as a short mention in the ChangeLog. I would therefore like to highlight a few recent additions to PolarProxy in this blog post.
Custom TLS Redirection
One new feature in PolarProxy is the --redirect argument, which can be used to redirect TLS traffic destined for a specific domain name to a different domain. This feature can be used to redirect TLS-encrypted malware traffic going to a known C2 domain to a local HTTPS sandbox instead, for example INetSim.
This --redirect argument will cause PolarProxy to terminate outgoing TLS traffic to malware-c2.com and redirect the decrypted traffic into a new TLS session going to inetsim.local instead. The “--leafcert noclone” argument forces PolarProxy to generate a fake X.509 certificate for “malware-c2.com” rather than sending a clone of the certificate received from the INetSim server to the malware implant.
Note: You also need to specify a proxy mode, such as -p for transparent proxy or --socks for SOCKS proxy, to make the command above work.
The --redirect argument can also be used to perform domain fronting, which is a clever method for hiding the true destination of HTTPS based communication, in order to circumvent censorship or for other reasons conceal who you’re communicating with. The following command can be used to set up a local socks proxy that redirects traffic destined for YouTube to google.com instead:
A browser configured to use PolarProxy as a SOCKS proxy will send HTTPS requests for youtube.com to PolarProxy, which then decrypts the TLS layer and re-encrypts the HTTP communication in a new TLS session directed at google.com instead. Someone who monitors the outgoing traffic from PolarProxy will assume that this is normal Google traffic, since the
SNI as well as certificate will be for google.com. On the server side however, after having decrypted the TLS layer, Google will kindly forward the client’s original HTTP request for youtube.com to an endpoint that serves the content for YouTube.
Dynamic TLS Decryption Bypass
PolarProxy is designed to block TLS connections that it can’t decrypt, except for when the server’s domain name is explicitly marked for decryption bypass with the “--bypass” command line argument. However, as of recently PolarProxy also supports dynamic TLS decryption bypass using a form of fail-open mode. When this fail-open mode is enabled, PolarProxy attempts to intercept and decrypt proxied TLS traffic, but allows connections to bypass decryption if the same client-server pair has previously rejected PolarProxy’s certificate. This method is convenient when monitoring network traffic from applications that enforce certificate pinning or for some other reason can’t be configured to
trust PolarProxy’s root CA – provided that it’s acceptable to let traffic that can’t be decrypted to pass through untouched rather than blocking it, of course.
The following command line option configures PolarProxy to allow new TLS connections to bypass decryption for one hour (3600 seconds) after previously having failed to decrypt traffic between the same client and server.
--bypassonfail 1:3600
A simple way to verify this fail-open feature is to do a simple test with curl. It doesn’t matter if the client you’re testing on is Windows, Linux or macOS, since PolarProxy as well as curl is available for all three platforms.
PolarProxy --bypassonfail 1:3600 --socks 1080
curl --socks4 localhost -I https://example.com curl: (60) SSL certificate problem: unable to get local issuer certificate
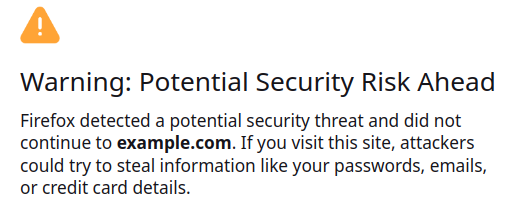
Web browsers that don’t trust PolarProxy’s root CA will display a certificate warning the first time they visit a website that PolarProxy tries to decrypt traffic for.
But once the dynamic bypass has kicked in the user will no longer see a certificate warning when visiting the same website again, since traffic between that client and server is now end-to-end encrypted.
Handling of non-TLS traffic and Better Logging
Other new features in PolarProxy is the “--nontls” argument, which can be used to specify how to handle connections that doesn’t use TLS. The default action is to block non-TLS connections, but they can also be allowed to pass through (if the target host is known) or to forward the connection to a specific host and port. There is even a “--nontls encrypt” argument, which can be used to encrypt traffic that isn’t already TLS-encrypted before forwarding it to a specific host. This feature can be used as an alternative to stunnel to wrap traffic from applications that lack TLS support inside a TLS tunnel.
PolarProxy now also produces less output to stdout, unless -v is used, and error messages have been improved to be more specific and easier to understand.
Posted by Erik Hjelmvik on Tuesday, 28 February 2023 13:42:00 (UTC/GMT)