Showing blog posts from 2011

rss Google News

No more Wine - NetworkMiner in Linux with Mono

UPDATE
See our blog post HowTo install NetworkMiner in Ubuntu Fedora and Arch Linux for a more up to date installation guide.

British Street, E3 sticker close-up by George Rex NetworkMiner is a network forensics tool that is primarily designed to run under Windows. But it is now (as of version 1.2 of NetworkMiner) also possible to run NetworkMiner on non-Windows OS's like Linux, Mac, FreeBSD etc. with help of Mono. This means that there is no longer any need to run NetworkMiner under Wine, since Mono is a much better alternative.

So what is Mono? Here is a description from the mono-project's website:

“Mono is a software platform designed to allow developers to easily create cross platform applications. Sponsored by Xamarin, Mono is an open source implementation of Microsoft's .NET Framework based on the ECMA standards for C# and the Common Language Runtime. A growing family of solutions and an active and enthusiastic contributing community is helping position Mono to become the leading choice for development of Linux applications.”
(emphasis added)

Here are some of the features in NetworkMiner that work better under Mono compared to Wine:

  • Drag-and-drop pcap files onto NetworkMiner works under Mono
  • Extracted/reassembled files are put in OS-native folders (under the NetworkMiner/AssembledFiles folder)
  • Right-clicking an extracted file or image and selecting “Open file” or “Open containing folder” works under Mono
  • No big Wine install required, the Mono framework only requires 32 MB to install

Here are the commands required to install Mono and NetworkMiner on Ubuntu Linux:

sudo apt-get install libmono-winforms2.0-cil
wget www.netresec.com/?download=NetworkMiner -O /tmp/networkminer.zip
sudo unzip /tmp/networkminer.zip -d /opt/
cd /opt/NetworkMiner_*
sudo chmod +x NetworkMiner.exe
sudo chmod -R go+w AssembledFiles/
sudo chmod -R go+w Captures/
mono NetworkMiner.exe
The reason for setting write permission to the AssembledFiles folder is because this is the directory to where extracted files are written. If you prefer to instead have the files extracted to /tmp or the user's home directory, then simply move the AssembledFiles directory to your desired location and create a symlink to it in the NetworkMiner directory (hat tip to Lenny Zeltser for this idea).


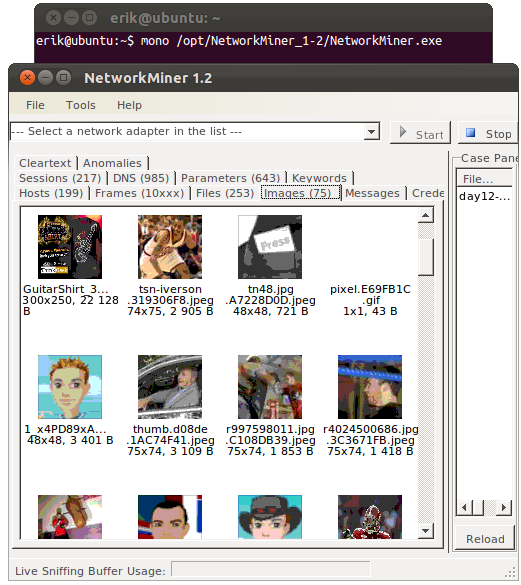
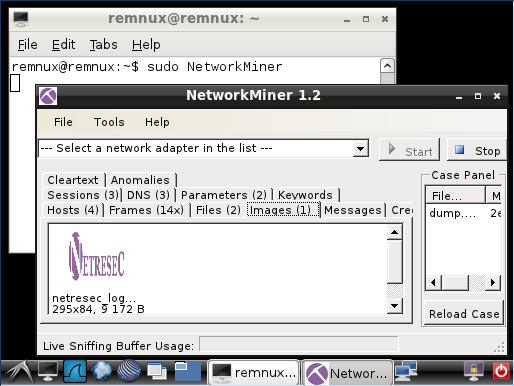
NetworkMiner 1.2 running under Ubuntu Linux with Mono, with “day12-1.dmp” from the M57-Patents Scenario loaded.

Update: See our blog post HowTo install NetworkMiner in Ubuntu Fedora and Arch Linux for an installation guide for other linux flavors.


Posted by Erik Hjelmvik on Monday, 26 December 2011 20:30:00 (UTC/GMT)

Tags: #NetworkMiner#Mono#Wine#Linux#Ubuntu

Share: Facebook   Twitter   Reddit   Hacker News Short URL: https://netresec.com/?b=11C135E


REMnux now includes NetworkMiner

REMnux logo

Lenny Zeltser recently released version 3 of his Reverse-Engineering Malware Linux distro REMnux.

Here are a few of the improvements in REMnux 3 compared to the previous version:

  • The REMnux distro is now based on Ubuntu
  • Updated versions of Volatility and Origami
  • NetworkMiner is included for forensic analysis of network traffic

As of version 1.2 of NetworkMiner it is possible to use mono to run it on non-Windows OS's like Linux, Mac and FreeBSD. Lenny used this functionality in order to run NetworkMiner under mono instead of using Wine, which I think is a great decision since NetworkMiner integrates much better with the OS when it is run with mono.

NetworkMiner running on REMnux

NetworkMiner running on REMnux

There is, however, one caveat to be aware of when running NetworkMiner under REMnux; you either have to run it as root (as in the screenshot above) or add write permissions to the AssembledFiles directory with:

sudo chmod -R go+w /usr/local/NetworkMiner/AssembledFiles

NetworkMiner will otherwise not be able to extract any files from the analyzed pcap files to disk since it won't have right to write them to the AssembledFiles folder.

Luckily, Lenny has already confirmed to me that he will have this fixed in the next release of REMnux.

Posted by Erik Hjelmvik on Friday, 16 December 2011 21:46:00 (UTC/GMT)

Tags: #Linux#NetworkMiner#mono

Share: Facebook   Twitter   Reddit   Hacker News Short URL: https://netresec.com/?b=11CCD67


Richard, Russ and Adrian trying NetworkMiner Professional

I recently sent out a copy of NetworkMiner Professional to three persons, who I respect for their contributions to different parts of the IT security community.

NetworkMiner USB flash drive
NetworkMiner Professional USB flash drive

All three persons have now publicly shared their experiences from analyzing network traffic with NetworkMiner Professional.

Richard Bejtlich Richard Bejtlich

First out was Richard Bejtlichblogger, black hat instructor and CSO at Mandiant.

Richard wrote a blog post titled “Trying NetworkMiner Professional 1.2”, where he analyzes a pcap file from his TCP/IP Weapons School class. Richard also shared some new ideas on new features that he'd like to see in NetworkMiner.

Russ McRee

Russ McRee

Russ McRee is a hard-working vulnerability discoverer, blogger and journal author, who also is team leader of Microsoft Online Service’s Security Incident Management team. Russ published his blog post titled “Tool review: NetworkMiner Professional 1.2” shortly after Richard's blog post.

In his blog post Russ looks closer at the features of NetworkMiner Professional that are not included in the free version of NetworkMiner. These features include:

Adrian Crenshaw Adrian Crenshaw

Adrian Crenshaw, the guy behind Irongeek.com and co-founder of Derbycon, went one step further by recording a video titled “NetworkMiner Professional for Network Forensics”.

In the video Adrian shows features such as:

Posted by Richard Bejtlich on Friday, 09 December 2011 18:45:00 (UTC/GMT)

Tags: #NetworkMiner Professional

Share: Facebook   Twitter   Reddit   Hacker News Short URL: https://netresec.com/?b=11CAD32


NetworkMiner 1.2 Released

NetworkMiner 1.2 is now available!

For those who are not familiar with the network forensics tool NetworkMiner, it's a portable Windows application that analyzes network traffic. NetworkMiner comes in two flavors; a free open source version and a commercial version called “NetworkMiner Professional”.

Some of the new features in version 1.2 of NetworkMiner (free as well as pro version) are:

  • NetworkMiner is now platform independent and can be run on Linux, Mac etc. with help of Mono.
  • Better parsing of emails sent with SMTP.
  • Content extraction of emails went with AOL webmail as in ”The L33t Pill” from the Network Forensics Puzzle Contest.
  • Content extraction from unencrypted SquirrelMail webmail posts.
  • Content extraction of comments sent to Wordpress and Blogspot blogs.
  • Support for GRE encapsulation.
  • Better handling of truncated pcap files that are cut in the middle of a frame.
  • Updated "Details" column in "Files" tab to display the HTTP host name as well as the URI from where the file was retrieved.

NetworkMiner 1.2 Hosts tab

NetworkMiner 1.2 with the Hosts tab open

Upgrading from NetworkMiner Professional 1.x

We offer free upgrades for users running older versions of NetworkMiner Professional. Just send an email to info [at] netresec.com with your current version number as well as license number (which you can find under the menu “Help” > “About Network Miner”) and say that you'd like to upgrade to version 1.2.

Posted by Erik Hjelmvik on Saturday, 19 November 2011 16:00:00 (UTC/GMT)

Tags: #Netresec

Share: Facebook   Twitter   Reddit   Hacker News Short URL: https://netresec.com/?b=11B629A


Passive OS Fingerprinting

Fingerprint picture 1 by glennji

Network traffic from a computer can be analyzed to detect what operating system it is running. This is to a large extent due to differences in how the TCP/IP stack is implemented in various operating systems. We will in this blog post explain the different methods that can be used to identify what operating a computer is running by analyzing the packets it generates on the network.

Active approaches

The popular port scanner Nmap can identify the operating system (OS) of a remote computer by sending six packets with specially crafted option combinations in the TCP layer (for example window scale, NOP and EOL options). Nmap then watches how the scanned host responds to these odd packets. Fyodor (author of Nmap) gives a good overview of these techniques in issue 54 of phrack magazine from way back in 1998.

Passive OS identification

Active measures, like those employed by Nmap, are unfortunately not available when doing passive analysis of live traffic or when analyzing previously captured network traffic. Passive analysis requires much more subtle variations in the network traffic to be observed, in order to identify a computer's OS. A simple but effective passive method is to inspect the initial Time To Live (TTL) in the IP header and the TCP window size (the size of the receive window) of the first packet in a TCP session, i.e. the SYN or SYN+ACK packet.

Below are some typical initial TTL values and window sizes of common operating systems:

Operating System (OS)IP
Initial TTL
TCP
window size
Linux (kernel 2.4 and 2.6)645840
Google's customized Linux645720
FreeBSD6465535
Windows XP12865535
Windows 7, Vista and Server 20081288192
Cisco Router (IOS 12.4)2554128

One reason for why the TTL and window size values varies between different OS's is because the RFC's for TCP and IP do not require implementations to use any particular default value for these fields. There is, however, a recommendation in RFC 1700 saying:

The current recommended default time to live (TTL) for the Internet Protocol (IP) is 64
This recommendation is obviously not followed in many IP implementations.

The initial TTL value is often a bit tricky to analyze since the TTL value of a sniffed packet will vary depending on where you sniff it from. The sending host will set the TTL value to the OS's default TTL value, but this value will then be decremented by one for every router the packet passes on its way to the destination IP address. An observed IP packet with a TTL value of 57 can therefore be expected to be a packet with an initial TTL of 64 that has done 7 router hops before it was sniffed.

The TTL and window size table above can be used in order to do manual OS fingerprinting of network traffic. Here is an example showing how to display relevant fields of the first few packets from the publicly available pcap file for the 2009-M57-Patents scenario with tshark:

$ tshark -r day12-1.dmp -R "tcp.flags.syn eq 1" -T fields -e ip.src -e ip.ttl -e tcp.window_size -c 16 | sort -u
192.168.1.105  128  8192
192.168.1.106  128  65535
74.125.19.139  54   5720
87.106.12.47   45   5840
87.106.12.77   45   5840
87.106.13.61   45   5840
87.106.13.62   45   5840
87.106.1.47    45   5840
87.106.1.89    45   5840
87.106.66.233  45   5840

The first column here is the IP address (ip.src), the second is the TTL (ip.ttl) and the third the TCP window size (tcp.window_size). Note that the TTL value is only at the initial value for the hosts on the local network (192.168.1.0/24), while the packets from the other hosts seem to have performed 10 or 19 router hops. We can, just by matching the TTL and window sizes of these hosts with the table above, easily determine that 192.168.1.106 is running Windows XP (TTL=128, window_size=65535) and 192.168.1.105 is running some more modern flavor of Windows (TTL=128, window_size=8192). The google machine (with IP 74.125.19.139) can also easily be singled out due to its characteristic window size of 5720. The other machines (87.106.x.x) all seem to be running Linux.

Do you feel manual OS classification would take too much time? There are, luckily, multiple tools like ettercap, p0f, Satori and NetworkMiner which all automate the OS identification task. Just feed these tools with some live network traffic or a pcap file and they'll fingerprint the OS's for you.

DHCP Fingerprinting

An alternative to fingerprinting the TCP/IP stack implementation of an OS is to look at its DHCP implementation. Eric Kollmann (the creator of Satori) has written a great paper on DHCP fingerprinting titled Chatter on the Wire: A look at DHCP traffic. Eric's DHCP fingerprinting database is used in his tool Satori as well as in NetworkMiner.

There is also a project titled Fingerbank, which maintains another DHCP fingerprinting database.

Application Layer

Even more info about the operating system of a host can be extracted by inspecting the application layer data in traffic, such as server banners in HTTP, SSH and FTP as well as HTTP client User-Agent strings. All these layer 7 banner types are displayed in NetworkMiner's Hosts tab under the “Host Details” node.

NetworkMiner with OS identification results

A User-Agent string showing “Windows NT 5.1” (like in the screen shot above) means that the client is running Windows XP. Microsoft provides an article titled Understanding User-Agent Strings, which provides this mapping between User-Agent strings and operating system:

Platform tokenDescription
Windows NT 6.1Windows 7
Windows NT 6.0Windows Vista
Windows NT 5.2Windows Server 2003; Windows XP x64 Edition
Windows NT 5.1Windows XP

Happy fingerprinting!

Posted by Erik Hjelmvik on Saturday, 05 November 2011 14:45:00 (UTC/GMT)

Tags: #Satori#NetworkMiner

Share: Facebook   Twitter   Reddit   Hacker News Short URL: https://netresec.com/?b=11B99BD


Automatic Flushing in RawCap

Decorative toilet seat

The “-f” switch can now be used to force RawCap to immediately flush sniffed packets to disk.

I've received multiple emails from RawCap users who run into problems when they want to look at a pcap file from RawCap without terminating the program. What usually happens in this case is that the output pcap file will be empty until they terminate RawCap with “Ctrl-C”. The reason for this is that RawCap has a 1MB data buffer, which is used in order to maximize performance by reducing unnecessary disk operations. RawCap will therefore not write any data to disk until it is terminated or has filled the buffer with 1MB of network traffic.

We've now released a new version (1.4.0.0) of RawCap in order to solve the needs of these users. The new version supports WriteThrough, which forces the data to be written directly to disk without being buffered. The automatic flushing functionality is enabled by supplying the “-f” switch from the command line when launching RawCap.

There is, however, one downside with the new version of RawCap; the size of RawCap.exe has increased from 17kB to 18kB. Sorry for that fellow minimalists... ;)

Here is an example command showing how to sniff traffic from localhost with automatic flushing (i.e. no buffer):

RawCap.exe -f 127.0.0.1 LiveLoopback.pcap

Happy live sniffing!

Posted by Erik Hjelmvik on Sunday, 23 October 2011 16:24:00 (UTC/GMT)

Tags: #Netresec#RawCap#loopback#PCAP

Share: Facebook   Twitter   Reddit   Hacker News Short URL: https://netresec.com/?b=11A24E0


Running NetworkMiner on Linux with Wine

UPDATE : We no longer recommend running NetworkMiner under Wine, please see our blog post on HowTo install NetworkMiner in Ubuntu Fedora and Arch Linux instead.

Joshua Smith has written a great blog post on toastresearch.com about how to get NetworkMiner running on BackTrack Linux. C. S. Lee (a.k.a. geek00l) has also written a blog post a couple of years ago explaining how to install NetworkMiner on Ubuntu Linux.

Unfortunately both these blog posts point to URLs with old versions of NetworkMiner (now that version 1.1 is released). I'm therefore posting a simple walkthrough of the required commands in order to install the latest version of NetworkMiner on an Ubuntu machine:

sudo apt-get install winetricks
winetricks corefonts dotnet20 gdiplus
cd /opt
wget www.netresec.com/?download=NetworkMiner
unzip latest
cd NetworkMiner_1-1/
wine NetworkMiner.exe
NetworkMiner in Linux with Wine

I hope this will help you get NetworkMiner running on your Ubuntu analyst station!

We will also be looking into having NetworkMiner fully compatible with mono in a future release. This would allow you to run NetworkMiner “natively” on Linux, Mac OS X as well as BSD (OpenBSD, FreeBSD, NetBSD).

Posted by Erik Hjelmvik on Thursday, 13 October 2011 16:51:00 (UTC/GMT)

Tags: #Netresec#Linux#Wine#Ubuntu

Share: Facebook   Twitter   Reddit   Hacker News Short URL: https://netresec.com/?b=11A3324


Identifying suspects through browser language

Swedish keyboard by Håkan Nylén

A new feature in version 1.1 of NetworkMiner aids the task of identifying a suspect user by extracting information about browser language and screen resolution sent to Google Analytics.

Google Analytics is the most popular website statistics service and is used by roughly half of all websites on the Internet. This means that a user surfing the Internet will most likely send data to Google Analytics. The data being sent to Google's servers include Flash version, screen resolution, color depth and browser language. This data isn't very intrusive on the privacy of Internet users, but can still provide some value to an investigator who wants to gain more information about a computer with a particular IP address as well as the user of that computer.

The browser language can, for example, be used to gain more information about the nationality of a particular user. In the screenshot below we can see that the user was running a web browser with Swedish language (look at “Browser Language” under “Host Details” and you'll see “sv” for “svenska”).

Observant blog readers might also notice the odd screen resolution used by this particular user, namely “971x779”. The most common reason for having such an odd resolutions is that the web browser is run in a virtual machine (likely VMware with VMware tools installed). This assumption is in this case enforced by the fact that the MAC address starts with 000c29, which is a VMware OUI. The MAC address will, however, not be visible as soon as the network traffic from the suspect's computer passes the first router hop. The screen resolution parameter sent to Google will, on the other hand, be visible all the way from the suspect's computer to google-analytics.com.

Information like this about the screen resolution can be used as evidence for an investigator in order to better prove that a particular computer was being used from a particular IP address at some specific point in time.

More information about Google Analytics can be found here: http://www.christopher-parsons.com/blog/privacy/google-analytics-privacy-and-legalese/

Posted by Erik Hjelmvik on Monday, 03 October 2011 21:54:00 (UTC/GMT)

Tags:

Share: Facebook   Twitter   Reddit   Hacker News Short URL: https://netresec.com/?b=11ADE66

2011 September

NetworkMiner 1.1 Released

Pcap-over-IP in NetworkMiner

2011 August

Herr Langner advises against Intrusion Detection

Monitor those Control System Networks!

2011 July

Find PCAP files with Google

How to detect reverse_https backdoors

2011 June

Solution to the Nitroba case

2011 May

Dont miss SEC-T in September

Split or filter your PCAP files with SplitCap

2011 April

PCAP is now a valid MIME type

RawCap sniffer for Windows released

2011 March

Network Forensic Analysis of SSL MITM Attacks

Sniffing Tutorial part 2 - Dumping Network Traffic to Disk

Sniffing Tutorial part 1 - Intercepting Network Traffic

Command-line Network Forensics with NetworkMinerCLI

Hak5 Crack the Code Challenge

2011 February

Criminal Justice Degree Schools

NetworkMiner Video Tutorials on the Intertubes

Webmail Information Leakage

Name the Chazwazza in IPv6

2011 January

Facebook, SSL and Network Forensics

DFRWS 2009 Network Forensics

Proxocket - A Winsock Proxy Sniffer

Analyzing the TCP/IP Weapons School Sample Lab

The Netresec Blog is now Online!

X / twitter

NETRESEC on X / Twitter: @netresec

Mastodon

NETRESEC on Mastodon: @netresec@infosec.exchange