NETRESEC Network Security Blog - Tag : ASCII-art

rss Google News

TLS Redirection and Dynamic Decryption Bypass in PolarProxy

PolarProxy is constantly being updated with new features, enhanced performance and bug fixes, but these updates are not always communicated other than as a short mention in the ChangeLog. I would therefore like to highlight a few recent additions to PolarProxy in this blog post.

Custom TLS Redirection

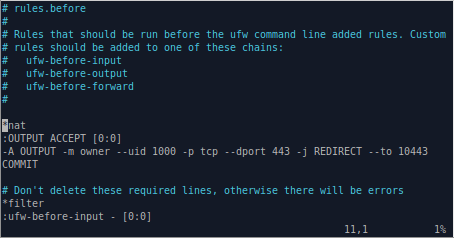
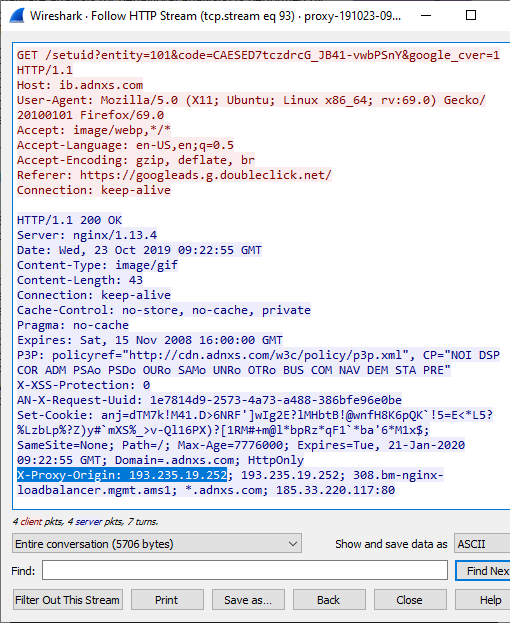
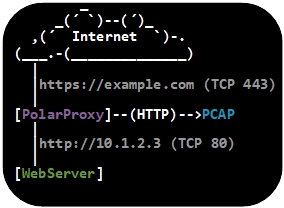
One new feature in PolarProxy is the --redirect argument, which can be used to redirect TLS traffic destined for a specific domain name to a different domain. This feature can be used to redirect TLS-encrypted malware traffic going to a known C2 domain to a local HTTPS sandbox instead, for example INetSim.

PolarProxy --redirect malware-c2.com:inetsim.local --leafcert noclone

This --redirect argument will cause PolarProxy to terminate outgoing TLS traffic to malware-c2.com and redirect the decrypted traffic into a new TLS session going to inetsim.local instead. The “--leafcert noclone” argument forces PolarProxy to generate a fake X.509 certificate for “malware-c2.com” rather than sending a clone of the certificate received from the INetSim server to the malware implant.

Note: You also need to specify a proxy mode, such as -p for transparent proxy or --socks for SOCKS proxy, to make the command above work.
PolarProxy TLS redirect

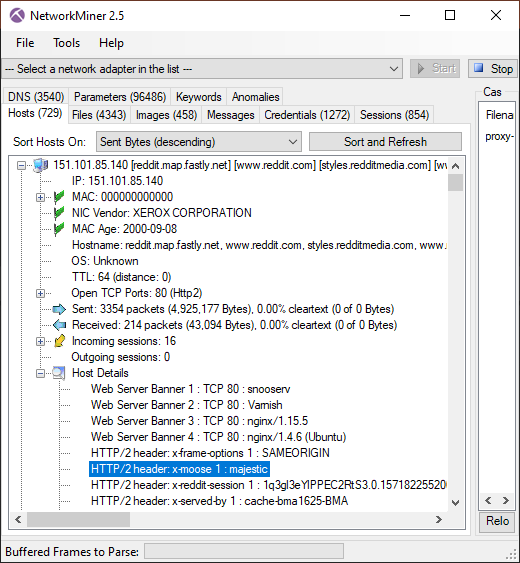
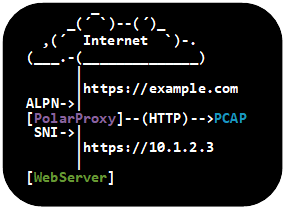
The --redirect argument can also be used to perform domain fronting, which is a clever method for hiding the true destination of HTTPS based communication, in order to circumvent censorship or for other reasons conceal who you’re communicating with. The following command can be used to set up a local socks proxy that redirects traffic destined for YouTube to google.com instead:

PolarProxy --socks 1080 --redirect youtube.com,www.youtube.com,youtu.be:google.com

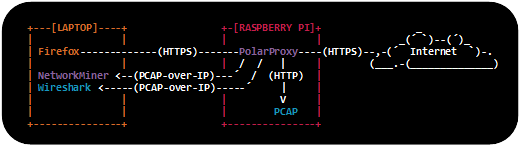
A browser configured to use PolarProxy as a SOCKS proxy will send HTTPS requests for youtube.com to PolarProxy, which then decrypts the TLS layer and re-encrypts the HTTP communication in a new TLS session directed at google.com instead. Someone who monitors the outgoing traffic from PolarProxy will assume that this is normal Google traffic, since the SNI as well as certificate will be for google.com. On the server side however, after having decrypted the TLS layer, Google will kindly forward the client’s original HTTP request for youtube.com to an endpoint that serves the content for YouTube.

Dynamic TLS Decryption Bypass

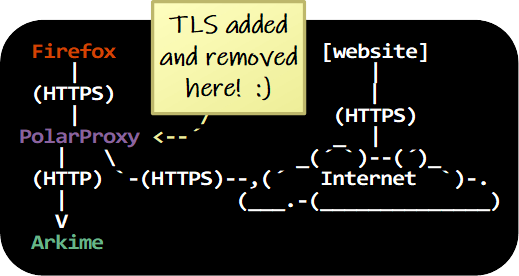
PolarProxy is designed to block TLS connections that it can’t decrypt, except for when the server’s domain name is explicitly marked for decryption bypass with the “--bypass” command line argument. However, as of recently PolarProxy also supports dynamic TLS decryption bypass using a form of fail-open mode. When this fail-open mode is enabled, PolarProxy attempts to intercept and decrypt proxied TLS traffic, but allows connections to bypass decryption if the same client-server pair has previously rejected PolarProxy’s certificate. This method is convenient when monitoring network traffic from applications that enforce certificate pinning or for some other reason can’t be configured to trust PolarProxy’s root CA – provided that it’s acceptable to let traffic that can’t be decrypted to pass through untouched rather than blocking it, of course.

The following command line option configures PolarProxy to allow new TLS connections to bypass decryption for one hour (3600 seconds) after previously having failed to decrypt traffic between the same client and server.

--bypassonfail 1:3600

A simple way to verify this fail-open feature is to do a simple test with curl. It doesn’t matter if the client you’re testing on is Windows, Linux or macOS, since PolarProxy as well as curl is available for all three platforms.

PolarProxy --bypassonfail 1:3600 --socks 1080
curl --socks4 localhost -I https://example.com
curl: (60) SSL certificate problem: unable to get local issuer certificate

curl --socks4 localhost -I https://example.com
HTTP/2 200
content-encoding: gzip
accept-ranges: bytes
age: 593298
cache-control: max-age=604800
content-type: text/html; charset=UTF-8
date: Mon, 27 Feb 2023 14:29:46 GMT
etag: "3147526947"
expires: Mon, 06 Mar 2023 14:29:46 GMT
last-modified: Thu, 17 Oct 2019 07:18:26 GMT
server: ECS (nyb/1DCD)
x-cache: HIT
content-length: 648

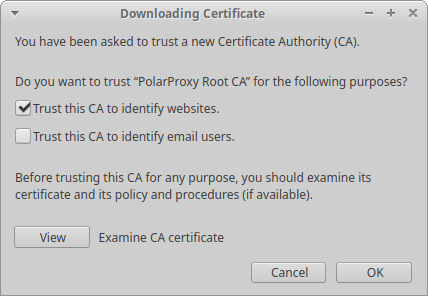
Web browsers that don’t trust PolarProxy’s root CA will display a certificate warning the first time they visit a website that PolarProxy tries to decrypt traffic for.

Firefox certificate warning

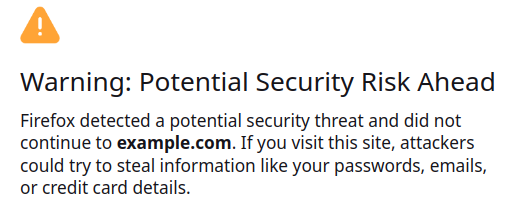
But once the dynamic bypass has kicked in the user will no longer see a certificate warning when visiting the same website again, since traffic between that client and server is now end-to-end encrypted.

Handling of non-TLS traffic and Better Logging

Other new features in PolarProxy is the “--nontls” argument, which can be used to specify how to handle connections that doesn’t use TLS. The default action is to block non-TLS connections, but they can also be allowed to pass through (if the target host is known) or to forward the connection to a specific host and port. There is even a “--nontls encrypt” argument, which can be used to encrypt traffic that isn’t already TLS-encrypted before forwarding it to a specific host. This feature can be used as an alternative to stunnel to wrap traffic from applications that lack TLS support inside a TLS tunnel.

PolarProxy now also produces less output to stdout, unless -v is used, and error messages have been improved to be more specific and easier to understand.

Posted by Erik Hjelmvik on Tuesday, 28 February 2023 13:42:00 (UTC/GMT)

Tags: #PolarProxy#TLS#redirect#bypass#SNI#ASCII-art

Share: Facebook   Twitter   Reddit   Hacker News Short URL: https://netresec.com/?b=23275c9


What is PCAP over IP?

PCAP over IP

PCAP-over-IP is a method for reading a PCAP stream, which contains captured network traffic, through a TCP socket instead of reading the packets from a PCAP file.

A simple way to create a PCAP-over-IP server is to simply read a PCAP file into a netcat listener, like this:

nc -l 57012 < sniffed.pcap

The packets in “sniffed.pcap” can then be read remotely using PCAP-over-IP, for example with tshark like this (replace 192.168.1.2 with the IP of the netcat listener):

nc 192.168.1.2 57012 | tshark -r -

But there’s an even simpler way to read PCAP-over-IP with Wireshark and tshark, which doesn’t require netcat.

wireshark -k -i TCP@192.168.1.2:57012
tshark -i TCP@192.168.1.2:57012

The Wireshark name for this input method is “TCP socket” pipe interface, which is available in Linux, Windows and macOS builds of Wireshark as well as tshark.

PCAP-over-IP in Wireshark's Pipe Interfaces

It is also possible to add a PCAP-over-IP interface from Wireshark's GUI. Open Capture/Options, Manage Interfaces, Pipes Tab and then enter a Local Pipe Path such as TCP@127.0.0.1:57012 and click OK. This setting will disappear when you close Wireshark though, since pipe settings don't get saved.

Live Remote Sniffing

Sniffed traffic can be read remotely over PCAP-over-IP in real-time simply by forwarding a PCAP stream with captured packets to netcat like this:

tcpdump -U -w - not tcp port 57012 | nc -l 57012
dumpcap -P -f "not tcp port 57012" -w - | nc -l 57012
PCAP-over-IP with tcpdump, netcat and tshark

Tcpdump is not available for Windows, but dumpcap is since it is included with Wireshark.

Note how TCP port 57012 is purposely filtered out using BPF when capturing in order to avoid a snowball effect, where the PCAP-over-IP traffic otherwise gets sniffed and re-transmitted through the PCAP-over-IP stream, which again gets sniffed etc.

A more sophisticated setup would be to let the service listening on TCP port 57012 spawn the sniffer process, like this:

nc.traditional -l -p 57012 -c "tcpdump -U -w - not port 57012"

Or even better, let the listening service reuse port 57012 to allow multiple incoming PCAP-over-IP connections.

socat TCP-LISTEN:57012,reuseaddr,fork EXEC:"tcpdump -U -w - not port 57012"

Reading PCAP-over-IP with NetworkMiner

We added PCAP-over-IP support to NetworkMiner in 2011 as part of NetworkMiner 1.1, which was actually one year before the TCP socket sniffing feature was included in Wireshark.

Live remote sniffing with NetworkMiner 2.7.3 using PCAP-over-IP

Image: Live remote sniffing with NetworkMiner 2.7.3 using PCAP-over-IP

NetworkMiner can also be configured to listen for incoming PCAP-over-IP connections, in which case the sniffer must connect to the machine running NetworkMiner like this:
tcpdump -U -w - not tcp port 57012 | nc 192.168.1.3 57012

This PCAP-over-IP feature is actually the recommended method for doing real-time analysis of live network traffic when running NetworkMiner in Linux or macOS, because NetworkMiner’s regular sniffing methods are not available on those platforms.

Reading Decrypted TLS Traffic from PolarProxy

PolarProxy

One of the most powerful use-cases for PCAP-over-IP is to read decrypted TLS traffic from PolarProxy. When PolarProxy is launched with the argument “--pcapoverip 57012” it starts a listener on TCP port 57012, which listens for incoming connections and pushes a real-time PCAP stream of decrypted TLS traffic to each client that connects. PolarProxy can also make active outgoing PCAP-over-IP connections to a specific IP address and port if the “--pcapoveripconnect <host>:<port>” argument is provided.

In the video PolarProxy in Windows Sandbox I demonstrate how decrypted TLS traffic can be viewed in NetworkMiner in real-time with help of PCAP-over-IP. PolarProxy’s PCAP-over-IP feature can also be used to read decrypted TLS traffic from PolarProxy with Wireshark as well as to send decrypted TLS traffic from PolarProxy to Arkime (aka Moloch).

Replaying PCAP-over-IP to an Interface

There are lots of great network monitoring products and intrusion detection systems that don’t come with a built-in PCAP-over-IP implementation, such as Suricata, Zeek, Security Onion and Packetbeat, just to mention a few. These products would greatly benefit from having access to the decrypted TLS traffic that PolarProxy can provide. Luckily we can use netcat and tcpreplay to replay packets from a PCAP-over-IP stream to a network interface like this:

nc localhost 57012 | tcpreplay -i eth0 -t -

But for permanent installations we recommend creating a dedicated dummy interface, to which the traffic gets replayed and sniffed, and then deploy a systemd service that performs the replay operation. See our blog post Sniffing Decrypted TLS Traffic with Security Onion for an example on how to deploy such a systemd service. In that blog post we show how decrypted TLS traffic from PolarProxy can be replayed to a local interface on a Security Onion machine, which is being monitored by Suricata and Zeek.

Nils Hanke has also compiled a detailed documentation on how decrypted TLS packets from PolarProxy can be replayed to Packetbeat and Suricata with help of tcpreplay.

In these setups netcat and tcpreplay act as a generic glue between a PCAP-over-IP service and tools that can sniff packets on a network interface, but there are a few drawbacks with this approach. One drawback is that tcpreplay requires root privileges in order to replay packets to an interface. Another drawback is that extra complexity is added to the solution and two additional single point of failures are introduced (i.e. netcat and tcpreplay). Finally, replaying packets to a network interface increases the risk of packet drops. We therefore hope to see built-in PCAP-over-IP implementations in more network monitoring solutions in the future!

FAQ for PCAP-over-IP

Q: Why is it called “PCAP-over-IP” and not “PCAP-over-TCP”?

Good question, we actually don’t know since we didn’t come up with the name. But in theory it would probably be feasible to read a PCAP stream over UDP or SCTP as well.

Q: What is the standard port for PCAP-over-IP?

There is no official port registered with IANA for PCAP-over-IP, but we’ve been using TCP 57012 as the default port for PCAP-over-IP since 2011. The Wireshark implementation, on the other hand, uses TCP port 19000 as the default value.

Q: Which software comes with built-in PCAP-over-IP servers or clients?

The ones we know of are: Arkime, NetworkMiner, PolarProxy, tshark and Wireshark. There is also a PCAP-over-IP plugin for Zeek (see update below).

Q: Is there some way to encrypt the PCAP-over-IP transmissions?

Yes, we recommend encrypting PCAP-over-IP sessions with TLS when they are transmitted across a non-trusted network. NetworkMiner’s PCAP-over-IP implementation comes with a “Use SSL” checkbox, which can be used to receive “PCAP-over-TLS”. You can replace netcat with socat or ncat in order to establish a TLS encrypted connection to NetworkMiner.

Q: Is there a tool that can aggregate multiple PCAP-over-IP streams into one?

No, none that we’re aware of. However, multiple PCAP-over-IP streams can be merged into one by specifying multiple PCAP-over-IP interfaces in dumpcap and then forwarding that output to a netcat listener, like this:

dumpcap -i TCP@10.1.2.3:57012 -i TCP@10.4.5.6:57012 -w - | editcap -F pcap - - | nc -l 57012

Update 2023-04-13

Erich Nahum has published zeek-pcapovertcp-plugin, which brings native PCAP-over-IP support to Zeek.

Erich's plugin can be installed as a zeek package through zkg.

zkg install zeek-pcapovertcp-plugin

After installing the plugin, a command like this reads a PCAP stream from a remote source:

zeek -i pcapovertcp::192.168.1.2:57012

Posted by Erik Hjelmvik on Monday, 15 August 2022 08:05:00 (UTC/GMT)

Tags: #PCAP-over-IP#PCAP#tcpdump#Wireshark#tshark#NetworkMiner#PolarProxy#Suricata#Zeek#Arkime#tcpreplay#netcat#ASCII-art

Share: Facebook   Twitter   Reddit   Hacker News Short URL: https://netresec.com/?b=228fddf


How the SolarWinds Hack (almost) went Undetected

My lightning talk from the SEC-T 0x0D conference has now been published on YouTube. This 13 minute talk covers tactics and techniques that the SolarWinds hackers used in order to avoid being detected.

Video: Hiding in Plain Sight, How the SolarWinds Hack went Undetected

Some of these tactics included using DNS based command-and-control (C2) that mimicked Amazon AWS DNS traffic, blending in with SolarWind’s legitimate source code and handpicking only a small number of targets.

One thing I forgot to mention in my SEC-T talk though, was the speed at which the attackers were working to analyze incoming data from the trojanized installs and selecting organizations to target for stage two operations.

SolarWinds Hack Timeline

For example, just during June 2020 the attackers got more than 1300 new organizations that started beaconing in using the DNS-based C2. The beaconed data only included the organizations’ Active Directory domain name and a list of installed security applications. Based on this information the attackers had to decide whether or not they wanted to target the organization. We have previously estimated that less than 1% of the organizations were targeted, while the malicious backdoor was disabled for all the other 99% who had installed the trojanized SolarWinds Orion update.

SolarWinds C2 IP addresses

The attackers typically decided whether or not to target an organization within one week from when they started beaconing. This means that the attackers probably had several hundred organizations in queue for a targeting decision on any given week between April and August 2020. That's a significant workload!

Posted by Erik Hjelmvik on Monday, 18 October 2021 10:30:00 (UTC/GMT)

Tags: #SolarWinds#SEC-T#video#backdoor#SUNBURST#Solorigate#STAGE2#Stage 2#DNS#C2#ASCII-art

Share: Facebook   Twitter   Reddit   Hacker News Short URL: https://netresec.com/?b=21A27a0


Walkthrough of DFIR Madness PCAP

I recently came across a fantastic digital forensics dataset at dfirmadness.com, which was created by James Smith. There is a case called The Stolen Szechuan Sauce on this website that includes forensic artifacts like disk images, memory dumps and a PCAP file (well, pcap-ng actually). In this video I demonstrate how I analyzed the capture file case001.pcap from this case.

Follow Along in the Analysis

Please feel free to follow along in the analysis performed in the video. You should be able to use the free trial version of CapLoader and the free open source version of NetworkMiner to perform most of the tasks I did in the video.

Here are some of the BPF and Column Criteria filters that I used in the video, so that you can copy/paste them into CapLoader.

  • net 10.0.0.0/8
  • Umbrella_Domain =
  • not ip6 and not net 224.0.0.0/4
  • host 194.61.24.102 or host 203.78.103.109 or port 3389

ASCII Network Flow Chart

References and Links

Timeline

All events in this timeline take place on September 19, 2020. Timestamps are in UTC.

  • 02:19:26 194.61.24.102 performs RDP brute force password attack against DC01.
  • 02:21:47 RDP password brute force successful.
  • 02:22:08 194.61.24.102 connects to DC01's RDP service as Administrator. Duration: 9 sec.
  • 02:22:36 194.61.24.102 connects to DC01's RDP service as Administrator again. Duration: 30 min.
  • 02:24:06 DC01 downloads coreupdater.exe from 194.61.24.102 using IE11.
  • 02:25:18 DC01 establishes Metrepreter reverse_tcp connection to 203.78.103.109. Duration: 4 min.
  • 02:29:49 DC01 re-establishes Metrepreter reverse_tcp connection to 203.78.103.109. Duration: 23 min.
  • 02:35:55 DC01 connects to DESKTOP's RDP service Administrator (username in Kerberos traffic). Duration 16 min.
  • 02:39:58 DESKTOP download coreupdater.exe from 194.61.24.102 using MS Edge.
  • 02:40:49 DESKTOP establishes Metrepreter reverse_tcp connection to 203.78.103.109. Duration: 2h 58 min.
  • 02:56:03 194.61.24.102 connects to DC01's RDP service as Administrator one last time. Duration: 1 min 38 sec.
  • 02:56:38 DC01 re-establishes Metrepreter reverse_tcp connection to 203.78.103.109. Duration: 2h 42 min.

IOC's

  • IP : 194.61.24.102 (Attacker)
  • IP : 203.78.103.109 (C2 server)
  • MD5 : eed41b4500e473f97c50c7385ef5e374 (coreupdater.exe)
  • JA3 Hash : 84fef6113e562e7cc7e3f8b1f62c469b (RDP scan/brute force)
  • JA3 Hash : 6dc99de941a8f76cad308d9089e793d7 (RDP scan/brute force)
  • JA3 Hash : e26ff759048e07b164d8faf6c2a19f53 (RDP scan/brute force)
  • JA3 Hash : 3bdfb64d53404bacd8a47056c6a756be (RDP scan/brute force)

Wanna learn more network forensic analysis techniques? Then check out our upcoming network forensics classes in September and October.

Posted by Erik Hjelmvik on Friday, 09 July 2021 13:20:00 (UTC/GMT)

Tags: #PCAP#NetworkMiner#CapLoader#video#videotutorial

Share: Facebook   Twitter   Reddit   Hacker News Short URL: https://netresec.com/?b=217dfc7


Targeting Process for the SolarWinds Backdoor

The SolarWinds Orion backdoor, known as SUNBURST or Solorigate, has been analyzed by numerous experts from Microsoft, FireEye and several anti-virus vendors. However, we have noticed that many of the published reports are either lacking or incorrect in how they describe the steps involved when a client gets targeted by the threat actors. We have therefore decided to publish this writeup, which is based on the analysis we did of the SolarWinds backdoor when creating our SunburstDomainDecoder tool.

UPDATE March 1, 2021

Fixed errors in the Stage 2 beacon structure and added a CyberChef recipe link.

avsvmcloud.com DNS queries are not DGA related

The DNS communication between the backdoored SolarWinds Orion clients and the authoritative name server for avsvmcloud.com is not caused by a Domain Generation Algorithm (DGA), it's actually a fully functional two-way communication C2 channel. The clients encode information, such as the internal AD domain and installed security applications into the DNS queries and the DNS responses from the name server are used to instruct the clients to continue beaconing, stop beaconing or to target a client by proceeding to what we call Stage 2 operation. Thus, the authoritative name server for avsvmcloud.com was actually the C2 server for Stage 1 and 2 operation of the SolarWinds backdoor.

SolarWinds Backdoor State Diagram

Image: SolarWinds Backdoor State Diagram

Command: Continue Beaconing

The default response from the name server is the "Continue Beaconing" command, which indicates that the threat actors have not yet decided if the SolarWinds client is of interest for further activity. Receiving a DNS A record in any of the following net ranges instructs the SolarWinds backdoor to continue beaconing:

  • 8.18.144.0/23
  • 71.152.53.0/24
  • 87.238.80.0/21
  • 199.201.117.0/24

In "Stage 1" operation the SUNBURST client starts out in the "New" mode where it exfiltrates the internal AD domain name. The AD domain data is often split into multiple DNS queries to reduce the length of each DNS query. The client later proceeds to the "Append" mode when the full AD domain has been exfiltrated. In "Append" mode the client transmits a list of installed or running security applications to the DNS C2 server, as we have described in our Extracting Security Products from SUNBURST DNS Beacons blog post. The client remains in Append mode until it gets either terminated or targeted.

Note: It is also possible to reset a client back to the "New" mode with a so-called "Ipx" command, but that is out of scope for this blog post.

Command: Stop Beaconing

The stop beaconing command terminates the DNS beaconing, so that the client no longer retrieves any commands from the C2 server. The C2 communication is stopped after receiving a DNS DNS A or AAAA record in any of the following ranges:

  • 20.140.0.0/15
  • 96.31.172.0/24
  • 131.228.12.0/22
  • 144.86.226.0/24
  • 10.0.0.0/8
  • 172.16.0.0/12
  • 192.168.0.0/16
  • 224.0.0.0/3
  • fc00:: - fe00::
  • fec0:: - ffc0::
  • ff00::

Command: Target Client

A SUNBURST client that has been "targeted" will change a flag called rec.dnssec in the source code from false to true. We call this flag the "Stage 2" flag, which must be set in order for the client to accept a CNAME record and proceed to Stage 3. Symantec refer to the Stage 2 flag as "a bit flag representing whether the previous DNS response successfully contained partial or full instructions to start the secondary HTTP communication channel".

A DNS A record in any of the following three IP ranges can be used to set the "Stage 2" flag:

  • 18.130.0.0/16
  • 99.79.0.0/16
  • 184.72.0.0/15

The state of the Stage 2 flag is actually signaled in the avsvmcloud.com DNS queries, which is how we managed to identify the AD domains of 23 targeted organizations just by analyzing SUNBURST DNS queries.

Stage 2 DNS Request Structure

The structure of the SUNBURST DNS queries in Stage 1 is pretty well described by Prevasio and Symantec, so we will not cover those in this blog post. Instead we will focus specifically on the structure of the DNS queries transmitted in Stage 2 operation, where the clients request a CNAME record from the name server.

As we have explained previously the exfiltrated data gets base32 encoded, using the custom alphabet "ph2eifo3n5utg1j8d94qrvbmk0sal76c", in order to ensure that only valid domain name characters are used in the DNS beacons.

The structure of the Stage 2 request, before it gets base32 encoded and appended as an avsvmcloud.com subdomain, looks like this:

Field Size Description
XOR Key 8 bits A value between 0x01 and 0x7F used to XOR encrypt the rest of the data.
GUID 64 bits Client ID encrypted using 16 bit rotating XOR with the last 15 bits of Timestamp and the Stage 2 flag.
Packet Type 4 bits A value of 0x1, could in theory be 0x2 but that's very unlikely.
Timestamp 19 bits Number of 30 minute periods since start of 2010 (UTC).
Stage 2 Flag 1 bit A flag set to "1" in Stage 2 operation, otherwise "0".
SolarWinds Backdoor Stage 2 DNS Beacon Structure

Image: Stage 2 beacon structure of the SolarWinds backdoor

The base32 encoding not only uses a custom alphabet, it also employs a reversed endianess and byte order compared to "normal" implementations. We have created a CyberChef recipe that performs this custom base32 decoding, so that the structure can be verified more easily. A list with 45 different Stage 2 avsvmcloud.com subdomains can be found in our Finding Targeted SUNBURST Victims with pDNS blog post. Feel free to replace the input to our CyberChef recipe with any of those subdomains.

Sleep Timers

The DNS responses from the name server not only controls how the SolarWinds backdoor should transition between the various stages, it also controls for how long the backdoor should wait before sending the next DNS beacon.

The delay is assigned by AND-ing the last octet of the received IP address with bitmask 0x54. The result from the AND operation is then used to select a sleep interval in the table below, within which the client picks a random number of minutes to sleep.

AND Result Name Sleep Interval
0x00 1 hour 30-120 minutes
0x04 4 hours 240-300 minutes
0x10 8 hours 480-600 minutes
0x14 1 day 1440-1560 minutes
0x40 3 days 4320-5760 minutes
0x44 1 week 10020-10140 minutes
0x50 2 weeks 20100-20220 minutes
0x54 1 month 43140-43260 minutes

An exception to the table above is clients that have entered Stage 2, which will only wait one to three minutes before requesting a CNAME.

Example DNS C2 for a Non-Targeted Client

Below is an example of DNS queries and responses from a SUNBURST client that wasn't targeted by the threat actors. These particular queries and responses come from a post on SolarWinds' community forum.

  • 2020-07-04 00:03 UTC
    Query: if9prvp9o36mhihw2hrs260g12eu1 ⇒ AD domain "omeros.local"
    Response: 8.18.145.139 ⇒ sleep 1h, then Continue
  • 2020-07-04 01:08 UTC
    Query: hnhb3v1b37dvv09icg0edp0 ⇒ Carbon Black is running
    Response: 8.18.145.62 ⇒ sleep 1 day, then Continue
  • 2020-07-05 01:15 UTC
    Query: ea99hr2sfen95nkjlc5g ⇒ Nothing new to report
    Response: 8.18.144.150 ⇒ sleep 1 day, then Continue
  • 2020-07-06 02:42 UTC
    Query: 707gigk9vbc923hf27fe ⇒ Nothing new to report
    Response: 8.18.145.151 ⇒ sleep 1 day, then Continue
  • 2020-07-07 03:52 UTC
    Query: 6eivqct649pcg0g16ol4 ⇒ Nothing new to report
    Response: 20.140.84.127 ⇒ Stop DNS beacon

Note: Queried domain names in this list are subdomains of appsync-api.eu-west-1.avsvmcloud.com.

Example DNS C2 for a Targeted Client

Disclaimer: We have very few DNS queries and responses for targeted victims, hence the transactions below are improvised based on data from VriesHd, Joe Słowik and FireEye. Please view these transactions as an example of what the communication might look like for a targeted victim rather than what actually happened to this particular target.

  • 2020-06-11 04:00 UTC
    Query: r8stkst71ebqgj66ervisu10bdohu0gt ⇒ AD domain, part 1 "central.pima.g"
    Response: 8.18.144.1 ⇒ Sleep 1h, then Continue
  • 2020-06-11 05:00 UTC
    Query: ulfmcf44qd58t9e82w ⇒ AD domain, part 2 "ov"
    Response: 8.18.144.2 ⇒ Sleep 1h, then Continue
  • 2020-06-11 06:00 UTC
    Query: p50jllhvhmoti8mpbf6p2di ⇒ Nothing to report
    Response: 8.18.144.16 ⇒ Sleep 8h, then Continue
  • 2020-06-11 14:00 UTC
    Query: (?) ⇒ Nothing new to report
    Response: 8.18.144.17 ⇒ Sleep 8h, then Continue
  • 2020-06-11 22:35 UTC
    Query: j5uqlssr1hfqnn8hkf172mp ⇒ Nothing to report
    Response: 184.72.181.52 ⇒ Target client for Stage 2 operation (1-3 minutes sleep)
  • 2020-06-11 22:37 UTC
    Query: 7sbvaemscs0mc925tb99 ⇒ Client in Stage 2 operation, requesting CNAME
    Response: deftsecurity.com ⇒ CNAME for Stage 3 HTTPS C2 server

Note: Queried domains in this list are subdomains of appsync-api.us-west-2.avsvmcloud.com.

Conclusions

We hope this blog post clears up any misunderstandings regarding the targeting process of the SolarWinds backdoor and highlights the significance of the Stage 2 flag.

We warmly welcome any feedback or questions you might have regarding this writeup, please feel free to contact us or reach out to us through Twitter.

Posted by Erik Hjelmvik on Wednesday, 17 February 2021 20:22:00 (UTC/GMT)

Tags: #SolarWinds#backdoor#SUNBURST#Solorigate#FireEye#Microsoft#CNAME#STAGE2#Stage 2#DNS#avsvmcloud.com#C2#CyberChef#ASCII-art

Share: Facebook   Twitter   Reddit   Hacker News Short URL: https://netresec.com/?b=212a6ad


Capturing Decrypted TLS Traffic with Arkime

PolarProxy and Arkime Logo

The latest version of Arkime (The Sniffer Formerly Known As Moloch) can now be fed with a real-time stream of decrypted HTTPS traffic from PolarProxy. All that is needed to enable this feature is to include "pcapReadMethod=pcap-over-ip-server" in Arkime's config.ini file and start PolarProxy with the "--pcapoveripconnect 127.0.0.1:57012" option. PolarProxy will then connect to Arkime's PCAP-over-IP listener on TCP port 57012 and send it a copy of all TLS packets it decrypts.

Note: The required PCAP-over-IP feature is available in Arkime 2.7.0 and PolarProxy 0.8.16.

About Arkime

Arkime is an open source packet capture solution that indexes the PCAP data it collects. Arkime also comes with a web frontend for browsing and searching through the captured, and indexed, network traffic. The Arkime project recently changed name from Moloch, probably in an attempt to convince users that the tool doesn't eat children.

How to Install Arkime with PolarProxy

This guide demonstrates how TLS traffic, or more specifically HTTPS traffic, can be decrypted and ingested in real-time into Arkime.

The TLS decryption is performed with PolarProxy, which is a transparent TLS interception proxy that is freely available under a Creative Commons BY-ND 4.0 license.

TLS decryption with PolarProxy and Arkime. TLS added and removed here.

PolarProxy and Arkime can be installed on a server to intercept, decrypt, index and store decrypted TLS network traffic from multiple clients on a network. It is even possible to install PolarProxy and Arkime on separate servers, so that PolarProxy forwards a stream of decrypted traffic to the Arkime server. However, to avoid unnecessary complexity, Arkime and PolarProxy are installed locally on a Linux client in this howto guide. The Linux client is a Ubuntu 20.04.1 machine, but the instructions can also be used on other Linux flavors that use systemd, such as Arch, CentOS, Debian, Fedora, SUSE and Red Hat Linux.

Download and Install Arkime

Arkime can be downloaded as a pre-built installation packages for CentOS and Ubuntu here: https://arkime.com/#download

Note: You can alternatively visit the Arkime GitHub page if there is no pre-built installation package for your Linux distro or you prefer to build Arkime from source.

After installing the Arkime package, configure Arkime by running:

sudo /data/moloch/bin/Configure
Found interfaces: lo;enp0s3 Semicolon ';' seperated list of interfaces to monitor [eth1] none
  • Enter "none" as the interface to monitor (the interface setting will be ignored when Arkime gets configured as a PCAP-over-IP server)
  • Install the ElasticSearch server by typing "yes" when prompted

Edit /data/moloch/etc/config.ini and add "pcapReadMethod=pcap-over-ip-server" to configure Arkime to listen for PCAP-over-IP connections.

pcapReadMethod=pcap-over-ip-server in Arkime's config.ini

Next, enable and start the ElasticSearch systemd service.

sudo systemctl enable elasticsearch.service
sudo systemctl start elasticsearch.service

Initiate the Arkime search cluster.

/data/moloch/db/db.pl http://localhost:9200 init

Create a new admin user.

/data/moloch/bin/moloch_add_user.sh admin "Admin User" THEPASSWORD --admin
Note: Feel free to pick a more secure password than "THEPASSWORD" for the admin user.

You can now enable and start the Moloch capture and viewer services.

sudo systemctl enable molochcapture.service
sudo systemctl start molochcapture.service
sudo systemctl enable molochviewer.service
sudo systemctl start molochviewer.service

Verify that Arkime now listens for incoming connections on TCP port 57012.

ss -nta | grep 57012
LISTEN 0 10 0.0.0.0:57012 0.0.0.0:*

Install PolarProxy to Decrypt TLS Traffic

Create a user for PolarProxy's systemd service and download PolarProxy like this:

sudo adduser --system --shell /bin/bash proxyuser
sudo mkdir /var/log/PolarProxy
sudo chown proxyuser:root /var/log/PolarProxy/
sudo chmod 0775 /var/log/PolarProxy/
sudo su - proxyuser
mkdir ~/PolarProxy
cd ~/PolarProxy/
curl https://www.netresec.com/?download=PolarProxy | tar -xzf -
exit

Copy the default PolarProxy service config to the systemd location.

sudo cp /home/proxyuser/PolarProxy/PolarProxy.service /etc/systemd/system/PolarProxy.service

Modify /etc/systemd/system/PolarProxy.service by adding "--pcapoveripconnect 127.0.0.1:57012" at the end of the ExecStart command.

PolarProxy.service with --pcapoveripconnect 127.0.0.1:57012

It's now time to enable and start the PolarProxy service.

sudo systemctl enable PolarProxy.service
sudo systemctl start PolarProxy.service

Verify that PolarProxy has connected to Arkime's PCAP-over-IP listener on TCP port 57012.

ss -nta | grep 57012
LISTEN 0 10 0.0.0.0:57012 0.0.0.0:*
ESTAB 0 0 127.0.0.1:40801 127.0.0.1:57012
ESTAB 0 0 127.0.0.1:57012 127.0.0.1:40801

Take it For a Test Run

PolarProxy is listening for incoming TLS connections on TCP port 10443. We can therefore run traffic through the TLS decryption proxy with this curl command:

curl --insecure --connect-to www.netresec.com:443:127.0.0.1:10443 https://www.netresec.com/

The decrypted traffic will show up in Arkime if everything is working. Open http://localhost:8005/sessions in a browser and look for a connection to www.netresec.com.

Note: The Arkime username and password is admin/THEPASSWORD if you've followed the instructions in this tutorial.

Also: You might have to wait a minute or two for the traffic to appear in Arkime's user interface.

Moloch Sessions showing curl connection to www.netresec.com

Trust PolarProxy's Root CA Certificate

The root CA certificate used by your PolarProxy service must be trusted by both the operating system and browser in order to run TLS traffic through the decryption proxy without errors. Follow these instructions to add trust the root CA:

sudo mkdir /usr/share/ca-certificates/extra
sudo openssl x509 -inform DER -in /var/log/PolarProxy/polarproxy.cer -out /usr/share/ca-certificates/extra/PolarProxy-root-CA.crt
sudo dpkg-reconfigure ca-certificates
  • Select the "extra/PolarProxy-root-CA.crt" Certificate Authority
  • Press <Ok>

Start Firefox

  • Download the root CA certificate from: http://localhost:10080/polarproxy.cer
  • Open: about:preferences#privacy
  • Scroll down to "Certificates" and click "View Certificates"
  • Import > Select "polarproxy.cer"
  • Select: ☑ Trust this CA to identify websites

Firefox: Trust this CA to identify websites

Configure Firewall Redirect of Outgoing HTTPS Traffic

The final step in this tutorial is to redirect the local user's outgoing HTTPS traffic to the PolarProxy service listening on TCP port 10443. Add the following lines at the top of /etc/ufw/before.rules (before the "*filter" section) to redirect outgoing HTTPS traffic to the local PolarProxy service listening on port 10443.

*nat
:OUTPUT ACCEPT [0:0]
-A OUTPUT -m owner --uid 1000 -p tcp --dport 443 -j REDIRECT --to 10443
COMMIT

Firefox: Trust this CA to identify websites

Note: The UFW config in "before.rules" is equivalent to running "iptables -t nat -A OUTPUT -m owner --uid 1000 -p tcp --dport 443 -j REDIRECT --to 10443"

Make sure to modify the uid value (1000) in the firewall rule to match that of the local user that PolarProxy should decrypt the HTTPS traffic for. You can see your uid value by running the command "id -u". You can even redirect traffic from several users to PolarProxy, but it's important that you DON'T forward the outgoing HTTPS traffic from the "proxyuser" account. You will otherwise generate an infinite firewall redirect loop, where outgoing HTTPS traffic from PolarProxy is redirected back to PolarProxy again. You can check the proxyuser's uid with the command "id -u proxyuser".

After saving before.rules, reload UFW to activate the port redirection.

sudo ufw reload

Surf 'n' Snoop

Your Linux machine is now configured to send decrypted HTTPS traffic to Arkime for inspection. Open Firefox and visit some websites, then go back to Arkime and have a look at the traffic. Again, remember that there might be a few minutes' delay before the traffic appears in Arkime's user interface

HTTP/2 Session in Moloch

You'll probably notice that the majority of all HTTPS traffic is actually using the HTTP/2 protocol. Unfortunately Arkime's http2 support is still quite limited, but I'm hoping it will improve in future releases.

Luckily, both Wireshark and NetworkMiner (which runs fine in Linux by the way) can be used to parse and extract contents from HTTP/2 traffic. Just hit Arkime's "Download PCAP" button and open the capture file in a tool of your choice.

NetworkMiner 2.6 showing files ectracted from HTTP/2 traffic

Image: NetworkMiner in Linux with files extracted from decrypted HTTP/2 traffic

Posted by Erik Hjelmvik on Tuesday, 01 December 2020 07:50:00 (UTC/GMT)

Tags: #Arkime#PolarProxy#TLS#HTTPS#decrypt#PCAP#systemd#systemctl#UFW#http2#HTTP/2#PCAP-over-IP#pcapoverip#ASCII-art

Share: Facebook   Twitter   Reddit   Hacker News Short URL: https://netresec.com/?b=20C3247


Discovered Artifacts in Decrypted HTTPS

We released a PCAP file earlier this year, which was recorded as part of a live TLS decryption demo at the CS3Sthlm conference. The demo setup used PolarProxy running on a Raspberry Pi in order to decrypt all HTTPS traffic and save it in a PCAP file as unencrypted HTTP.

Laptop, Raspberry Pi, PolarProxy, Internet ASCII

This capture file was later used as a challenge for our twitter followers, when we made the following announcement:

PCAP CHALLENGE!
The capture file released in this blog post contains a few interesting things that were captured unintentionally. Can you find anything strange, funny or unexpected in the pcap file? (1/2)

Followed by this message:

The person to submit the most interesting answer wins a “PCAP or it didn’t happen” t-shirt. Compete by including your discovery in a retweet or reply to this tweet, or in an email to info(at)netresec.com. We want your answers before the end of January. (2/2)

We'd like to thank everyone who submitted answers in this challenge, such as David Ledbetter, Christoffer Strömblad, RunΞ and Chris Sistrunk.

We're happy to announce that the winner of our challenge is David Ledbetter. Congratulations David!

So what were the interesting thing that could be found in the released capture file? Below is a short summary of some things that can be found.

Telemetry data sent to mozilla.org

A surprising amount of information about the Firefox browser was sent to incoming.telemetry.mozilla.org, including things like:

  • Active browser addons
  • Active browser plugins
  • Firefox profile creation date
  • Browser search region
  • Default search engine
  • Regional locales
  • Screen width
  • Screen height
  • CPU vendor, family and model
  • HDD model, revision and type
  • Installed RAM
  • Operating system
  • Etc..

Here's an excerpt showing a part of the data sent to Mozilla:

"build": { "applicationId": "{ec8030f7-c20a-464f-9b0e-13a3a9e97384}", "applicationName": "Firefox", "architecture": "x86-64", "buildId": "20191002194346", "version": "69.0.2", "vendor": "Mozilla", "displayVersion": "69.0.2", "platformVersion": "69.0.2", "xpcomAbi": "x86_64-gcc3", "updaterAvailable": false }, "partner": { "distributionId": "canonical", "distributionVersion": "1.0", "partnerId": "ubuntu", "distributor": "canonical", "distributorChannel": "ubuntu", "partnerNames": [ "ubuntu" ] }, "system": { "memoryMB": 3943, "virtualMaxMB": null, "cpu": { "count": 1, "cores": 1, "vendor": "GenuineIntel", "family": 6, "model": 42, "stepping": 7, "l2cacheKB": 256, "l3cacheKB": 4096, "speedMHz": null, "extensions": [ "hasMMX", "hasSSE", "hasSSE2", "hasSSE3", "hasSSSE3", "hasSSE4_1", "hasSSE4_2", "hasAVX", "hasAES" ] }, "os": { "name": "Linux", "version": "5.0.0-31-generic", "locale": "en-US" }, "hdd": { "profile": { "model": null, "revision": null, "type": null }, "binary": { "model": null, "revision": null, "type": null }, "system": { "model": null, "revision": null, "type": null } }, "gfx": { "D2DEnabled": null, "DWriteEnabled": null, "ContentBackend": "Skia", "Headless": false, "adapters": [ { "description": "llvmpipe (LLVM 8.0, 256 bits)", "vendorID": "0xffff", "deviceID": "0xffff", "subsysID": null, "RAM": 3942, "driver": null, "driverVendor": "mesa/llvmpipe", "driverVersion": "19.0.8.0", "driverDate": null, "GPUActive": true } ], "monitors": [ { "screenWidth": 681, "screenHeight": 654 } ], "features": { "compositor": "basic", "gpuProcess": { "status": "unavailable" }, "wrQualified": { "status": "blocked-vendor-unsupported" }, "webrender": { "status": "opt-in" } } }, "appleModelId": null }, "settings": { "blocklistEnabled": true, "e10sEnabled": true, "e10sMultiProcesses": 8, "telemetryEnabled": false, "locale": "en-US", "intl": { "requestedLocales": [ "en-US" ], "availableLocales": [ "en-US", "en-CA", "en-GB" ], "appLocales": [ "en-US", "en-CA", "en-GB", "und" ], "systemLocales": [ "en-US" ], "regionalPrefsLocales": [ "sv-SE" ], "acceptLanguages": [ "en-US", "en" ] }, "update": { "channel": "release", "enabled": true, "autoDownload": false }, "userPrefs": { "browser.cache.disk.capacity": 1048576, "browser.search.region": "SE", "browser.search.widget.inNavBar": false, "network.trr.mode": 2 }, "sandbox": { "effectiveContentProcessLevel": 4 }, "addonCompatibilityCheckEnabled": true, "isDefaultBrowser": false, "defaultSearchEngine": "google", "defaultSearchEngineData": { "name": "Google", "loadPath": "[distribution]/searchplugins/locale/en-US/google.xml", "origin": "default", "submissionURL": "https://www.google.com/search?client=ubuntu&channel=fs&q=&ie=utf-8&oe=utf-8" } }, "profile": { "creationDate": 18183, "firstUseDate": 18183 }

You can use the following Wireshark display filter to find all the data sent to Mozilla:

http.request.method eq POST and http.host contains telemetry

Public IP Revealed in PCAP

The client's IP address was 192.168.4.20, which is part of the RFC 1918 192.168/16 private address space. It's therefore safe to assume that the client was behind a NAT (the client was in fact behind a double NAT). However, we noticed that the public IP of the client was revealed through multiple services in the captured network traffic. One of these services is the advertising exchange company AppNexus (adnxs.com), which sent the client's public IP address 193.235.19.252 in an X-Proxy-Origin HTTP header.

X-Proxy-Origin HTTP header in Wireshark

You can use the following Wireshark/tshark display filter to find X-Proxy-Origin headers:

http.response.line matches "x-proxy-origin" or http2.header.name matches "x-proxy-origin"

We are using the "matches" operator here instead of "contains" or "==" because we want to perform case insensitive matching. You might also notice that we need a completely different display filter syntax to match HTTP/2 headers compared to what we are used to with HTTP/1.1.

Monty Python "Majestik møøse" reference in reddit x-header

The reddit server 151.101.85.140 sends an HTTP/2 header called "x-moose" with a value of "majestic".

x-moose 1 : majestic header from reddit

This header refers to the opening credits of Monty Python and the Holy Grail.

Wi nøt trei a høliday in Sweden this yër?

Posted by Erik Hjelmvik on Tuesday, 17 March 2020 09:00:00 (UTC/GMT)

Tags: #HTTP/2#http2#TLS#decrypt#TLSI#PolarProxy#NetworkMiner#Wireshark#CS3Sthlm#CS3#Forensics#PCAP#ASCII-art

Share: Facebook   Twitter   Reddit   Hacker News Short URL: https://netresec.com/?b=2030e17


Reverse Proxy and TLS Termination

PolarProxy is primarily a TLS forward proxy, but it can also be used as a TLS termination proxy or reverse TLS proxy to intercept and decrypt incoming TLS traffic, such as HTTPS or IMAPS, before it is forwarded to a server. The proxied traffic can be accessed in decrypted form as a PCAP formatted data stream, which allows real-time analysis of the decrypted traffic by an IDS as well as post incident forensics with Wireshark.

PolarProxy version 0.8.15 and later can import an existing X.509 server certificate (aka leaf certificate or end-entity certificate) in order to perform the TLS decryption using a valid certificate signed by a trusted certificate authority. If no server certificate is provided, then PolarProxy falls back to generating server certificates on the fly and signing them with its own root CA certificate.

There are two principal ways to run PolarProxy as a reverse proxy, either as a TLS termination proxy or as a reverse proxy that decrypts and re-encrypts the traffic.

PolarProxy as a TLS Termination Proxy

TLS Termination Proxy

The TLS termination proxy mode is useful in order to offload the task of performing TLS encryption to PolarProxy instead of doing the decryption on the web server. This mode can also be used when the proxied services don’t support TLS encryption, such as legacy web servers or servers hosting other unencrypted services that you want to secure with TLS.

The following command sequence shows how to create a Let’s Encrypt SSL certificate, convert it to the PKCS#12 format, and load the server certificate into PolarProxy to terminate incoming HTTPS connections. In this setup PolarProxy decrypts the TLS traffic and relays the HTTP traffic to the web server on TCP port 80.

sudo certbot certonly --manual --preferred-challenges dns -d example.com,www.example.com

sudo openssl pkcs12 -export -out /etc/example.p12 -inkey /etc/letsencrypt/live/example.com/privkey.pem -in /etc/letsencrypt/live/example.com/fullchain.pem --passout pass:PASSWORD

sudo mkdir /var/log/TlsTerminationProxy/

sudo ./PolarProxy --terminate --connect 10.1.2.3 --nosni www.example.com --leafcert load:example.com,www.example.com:/etc/example.p12:PASSWORD -p 443,80,80 -o /var/log/TlsTerminationProxy/

Here’s a breakdown of the arguments sent to PolarProxy:

  • --terminate : Terminate incoming TLS sessions and forward proxied traffic in unencrypted form.
  • --connect 10.1.2.3 : Forward all proxied traffic to 10.1.2.3 instead of connecting to the host name provided in the SNI extension of the TLS ClientHello message.
  • --nosni www.example.com : Treat incoming TLS sessions that don’t define a host name with the SNI extension as if they wanna to connect to “www.example.com”.
  • --leafcert load:example.com,www.example.com:/etc/example.p12:PASSWORD : Use the server certificate “/etc/example.p12” for incoming connections to “example.com” and “www.example.com”.
  • -p 443,80,80 : Listen on TCP port 443, save decrypted traffic in PCAP file as if it was directed to port 80, forward decrypted traffic to port 80.
  • -o /var/log/TlsTerminationProxy/ : Save decrypted traffic to hourly rotated PCAP files in “/var/log/TlsTerminationProxy/”.

PolarProxy is a generic TLS proxy that doesn’t care what application layer protocol the TLS tunnel carries. So if you want to terminate the TLS encryption of incoming IMAPS sessions as well, then simply append an additional argument saying “-p 993,143,143” to also forward decrypted IMAP sessions to 10.1.2.3. This method can be used in order to wrap almost any TCP based protocol in a TLS tunnel, which can be useful for privacy reasons as well as to prevent network monitoring tools from detecting the actual application layer protocol.

PolarProxy as a Reverse TLS Proxy

Reverse TLS Proxy

There are setups for which it is preferable to also encrypt the internal sessions between PolarProxy and the final server. One such setup is when the server is hosting a web service with support for the HTTP/2 protocol, which in practice always uses TLS. Luckily PolarProxy is designed to decrypt and re-encrypt proxied traffic while also forwarding important TLS parameters, such as ALPN and SNI, between the internal and external TLS sessions.

To use TLS encryption on the inside as well as outside of PolarProxy, simply do as explained in the previous TLS termination section, but remove the “--terminate” argument and change the port argument to “-p 443,80,443” like this:

sudo ./PolarProxy --connect 10.1.2.3 --nosni www.example.com --leafcert load:example.com,www.example.com:/etc/example.p12:PASSWORD -p 443,80,443 -o /var/log/ReverseTlsProxy/

PolarProxy will save the decrypted traffic as cleartext HTTP (or HTTP/2) to PCAP files in the “/var/log/ReverseTlsProxy/” directory.

Real-Time Analysis of Decrypted Traffic

Both the external (client-to-proxy) and internal (proxy-to-server) TCP sessions, in the reverse TLS proxy example above, are encrypted with TLS. This prevents passive network security monitoring tools, such as IDSs, DPI and DLP appliances, from analyzing the application layer data being sent and received. The PCAP files written to “/var/log/ReverseTlsProxy/” can be a valuable forensic asset when investigating an incident, but a real-time stream of the decrypted data is needed in order to swiftly detect and alert on potential security breaches and other incidents.

PolarProxy’s “--pcapoverip” option can be used to provide such a real-time stream of the decrypted data passing through the proxy. This data can easily be sent to a network interface using tcpreplay, as explained in our blog post “Sniffing Decrypted TLS Traffic with Security Onion”.

Security Considerations

The examples shown in this blog post all run PolarProxy with root privileges using sudo, which can be dangerous from a security perspective. PolarProxy is actually designed to be run without root privileges, but doing so prevents it from listening on a port below 1024. Luckily, this issue can easily be overcome with a simple port forwarding or redirect rule. The following iptables redirect rule can be used if PolarProxy is listening on TCP port 20443 and incoming HTTPS request are arriving to the eth0 interface of the proxy:

iptables -t nat -A PREROUTING -i eth0 -p tcp --dport 443 -j REDIRECT --to 20443

PolarProxy does not support loading settings from a config file. The password for the PKCS12 certificate will therefore need to be supplied on the command line, which can make it visible from a process listing. If this is a concern for you, then please consider using “hidepid” to hide processes from other users. You can find instructions on how to use hidepid in hardening guides for Debian, Arch, SUSE and most other Linux flavors.

Posted by Erik Hjelmvik on Thursday, 12 March 2020 15:45:00 (UTC/GMT)

Tags: #PolarProxy#TLS#SSL#PCAP#decrypt#HTTPS#HTTP#HTTP/2#http2#IMAPS#SNI#decrypt#ASCII-art

Share: Facebook   Twitter   Reddit   Hacker News Short URL: https://netresec.com/?b=2033d38

2020 January

Sniffing Decrypted TLS Traffic with Security Onion

2019 December

Installing a Fake Internet with INetSim and PolarProxy

2019 January

Video: TrickBot and ETERNALCHAMPION

X / twitter

NETRESEC on X / Twitter: @netresec

Mastodon

NETRESEC on Mastodon: @netresec@infosec.exchange