
Sniffing Decrypted TLS Traffic with Security Onion
Wouldn't it be awesome to have a NIDS like Snort, Suricata or Zeek inspect HTTP requests leaving your network inside TLS encrypted HTTPS traffic? Yeah, we think so too! We have therefore created this guide on how to configure Security Onion to sniff decrypted TLS traffic with help of PolarProxy.
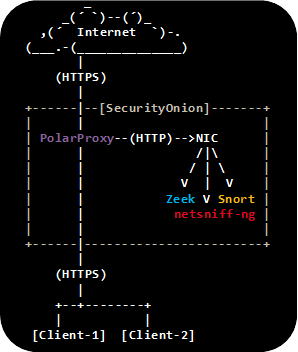
PolarProxy is a forward TLS proxy that decrypts incoming TLS traffic from clients, re-encrypts it and forwards it to the server. One of the key features in PolarProxy is the ability to export the proxied traffic in decrypted form using the PCAP format (a.k.a. libpcap/tcpdump format). This makes it possible to read the decrypted traffic with external tools, without having to perform the decryption again. It also enables packet analysis using tools that don't have built-in TLS decryption support.
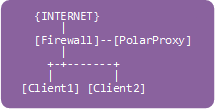
This guide outlines how to configure PolarProxy to intercept HTTPS traffic and send the decrypted HTTP traffic to an internal network interface, where it can be sniffed by an IDS.
STEP 1 ☆ Install Ubuntu
Download and install the latest SecurityOnion ISO image, but don't run the "Setup" just yet.
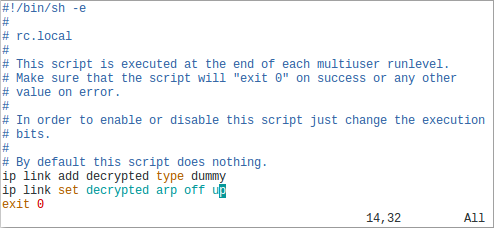
STEP 2 ☆ Add a Dummy Network Interface
Add a dummy network interface called "decrypted", to which decrypted packets will be sent.
ip link set decrypted arp off up
STEP 3 ☆ Install Updates
Install updates in Security Onion by running
STEP 4 ☆ Run the Security Onion Setup
Run the Security Onion setup utility by double-clicking the "Setup" desktop shortcut or executing
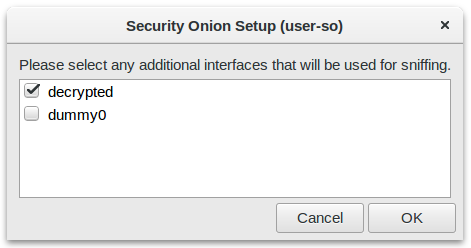
Reboot and run Setup again to continue with the second phase of Security Onion's setup. Again, select "decrypted" as the interface to be monitored.
STEP 5 ☆ Install PolarProxy Service
Download and install PolarProxy:
sudo mkdir /var/log/PolarProxy
sudo chown proxyuser:root /var/log/PolarProxy/
sudo chmod 0775 /var/log/PolarProxy/
sudo su - proxyuser
mkdir ~/PolarProxy
cd ~/PolarProxy/
curl https://www.netresec.com/?download=PolarProxy | tar -xzf -
exit
sudo cp /home/proxyuser/PolarProxy/PolarProxy.service /etc/systemd/system/PolarProxy.service
Edit
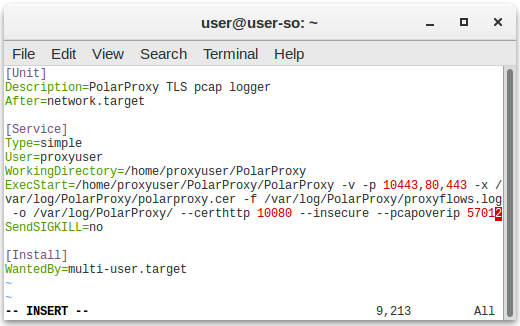
Start the PolarProxy systemd service:
sudo systemctl start PolarProxy.service
STEP 6 ☆ Install Tcpreplay Service
The decrypted traffic can now be accessed via PolarProxy's PCAP-over-IP service on TCP 57012. We can leverage tcpreplay and netcat to replay these packets to our dummy network interface in order to have them picked up by Security Onion.
Description=Tcpreplay of decrypted traffic from PolarProxy
After=PolarProxy.service
[Service]
Type=simple
ExecStart=/bin/sh -c 'nc localhost 57012 | tcpreplay -i decrypted -t -'
Restart=on-failure
RestartSec=3
[Install]
WantedBy=multi-user.target
Start the tcpreplay systemd service:
sudo systemctl start tcpreplay.service
STEP 7 ☆ Add firewall rules
Security Onion only accepts incoming connections on TCP 22 by default, we also need to allow connections to TCP port 10443 (proxy port), and 10080 (root CA certificate download web server). Add allow rules for these services to the Security Onion machine's firewall:
sudo ufw allow in 10080/tcp
Verify that the proxy is working by running this curl command on a PC connected to the same network as the Security Onion machine:
Add the following lines at the top of
:PREROUTING ACCEPT [0:0]
-A PREROUTING -i enp0s3 -p tcp --dport 443 -j REDIRECT --to 10443
COMMIT
Note: Replace "enp0s3" with the Security Onion interface to which clients will connect.
After saving before.rules, reload ufw to activate the port redirection:
Verify that you can reach the proxy on TCP 443 with this command:
STEP 8 ☆ Redirect HTTPS traffic to PolarProxy
It's now time to configure a client to run its HTTPS traffic through PolarProxy. Download and install the PolarProxy X.509 root CA certificate from PolarProxy's web service on TCP port 10080:
Install the certificate in the operating system and browser, as instructed in the PolarProxy documentation.
You also need to forward packets from the client machine to the Security Onion machine running PolarProxy. This can be done either by configuring a local NAT rule on each monitored client (STEP 8.a) or by configuring the default gateway's firewall to forward HTTPS traffic from all clients to the proxy (STEP 8.b).
STEP 8.a ☆ Local NAT
Use this firewall rule on a Linux client to configure it to forward outgoing HTTPS traffic to the Security Onion machine:
STEP 8.b ☆ Global NAT
If the client isn't running Linux, or if you wanna forward HTTPS traffic from a whole network to the proxy, then apply the following iptables rules to the firewall in front of the client network. See "Routing Option #2" in the PolarProxy documentation for more details.
-
Add a forward rule on the gateway to allow forwarding traffic to our PolarProxy server:
sudo iptables -A FORWARD -i eth1 -d [SecurityOnionIP] -p tcp
--dport 10443 -m state--state NEW -j ACCEPT -
Add a DNAT rule to forward 443 traffic to PolarProxy on port 10443:
sudo iptables -t nat -A PREROUTING -i eth1 -p tcp --dport 443
-j DNAT --to [SecurityOnionIP]:10443 -
If the reverse traffic from PolarProxy to the client doesn't pass the firewall (i.e. they are on the same LAN),
then we must add this hide-nat rule to fool PolarProxy that we are coming from the firewall:
sudo iptables -t nat -A POSTROUTING -o eth1 -d [SecurityOnionIP] -p tcp --dport 10443 -j MASQUERADE
STEP 9 ☆ Inspect traffic in SecurityOnion
Wait for the Elastic stack to initialize, so that the intercepted network traffic becomes available through the Kibana GUI.
You can check the status of the elastic initialization with
You should now be able to inspect decrypted traffic in Security Onion using Kibana, Squert, Sguil etc., just as if it was unencrypted HTTP.
 Image: Kibana showing HTTP traffic info from decrypted HTTPS sessions
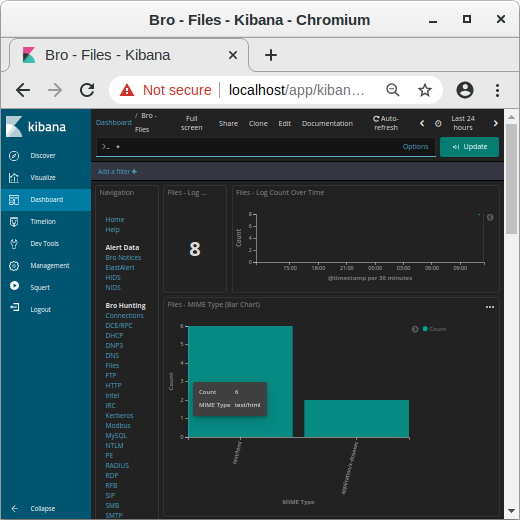 Image: MIME types in Kibana
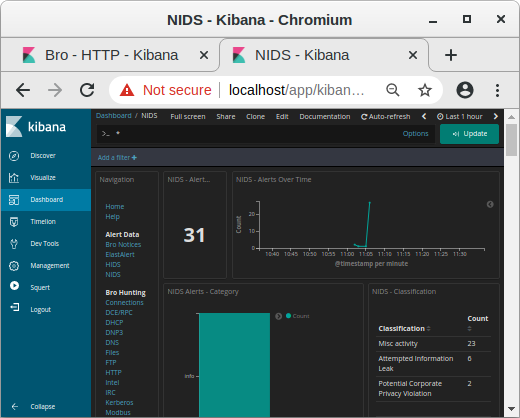 Image: NIDS alerts from payload in decrypted traffic shown in Kibana
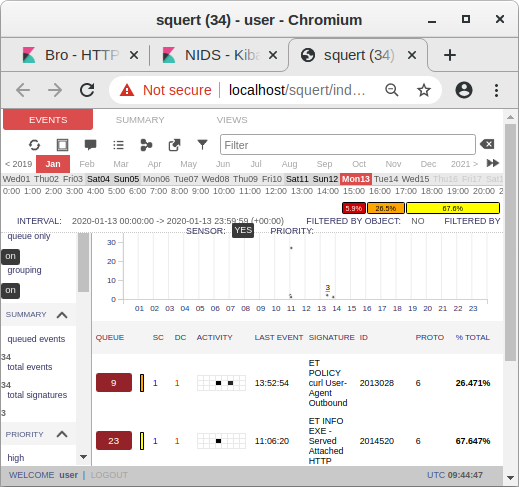 Image: Snort alerts from decrypted traffic shown in Squert
Security Considerations and Hardening
Security Onion nodes are normally configured to only allow access by SOC/CERT/CSIRT analysts, but the setup described in this blog post requires that "normal" users on the client network can access the PolarProxy service running on the Security Onion node. We therefore recommend installing PolarProxy on a dedicated Security Onion Forward Node, which is configured to only monitor traffic from the proxy.
We also recommend segmenting the client network from the analyst network, for example by using separate network interfaces on the Security Onion machine or putting it in a DMZ. Only the PolarProxy service (TCP 10080 and 10443) should be accessable from the client network.
PolarProxy could be used to pivot from the client network into the analyst network or to access the Apache webserver running on the Security Onion node. For example, the following curl command can be used to access the local Apache server running on the Security Onion machine via PolarProxy:
Hardening Steps:
- Configure the Security Onion node as a Forward Node
- Segment client network from analyst network
- Add firewall rules to prevent PolarProxy from accessing services on the local machine and analyst network
For additional info on hardening, please see the recommendations provided by Wes Lambert on the Security-Onion mailing list.
Posted by Erik Hjelmvik on Monday, 20 January 2020 09:40:00 (UTC/GMT)
Tags: #SecurityOnion #Security Onion #PCAP #Bro #Zeek #PolarProxy #Snort #Suricata #TLS #SSL #HTTPS #tcpreplay #PCAP-over-IP #IDS #NIDS #netcat #curl #UFW #ASCII-art


