Erik Hjelmvik
,
Wednesday, 12 October 2022 18:24:00 (UTC/GMT)
This is a follow-up to my Hunting for C2 Traffic video.
But I didn't have time to record a short video this time, so I wrote a long blog post instead.
UPDATE 2022-11-02
Brad Duncan has released a new pcap file on malware-traffic-analysis.net, which contains an additional C2 command (0x12).
Our analysis indicates that this command launches a file manager. This blog post has now been updated with details about this finding.
UPDATE 2022-11-09
Lenny Hansson has released IDS signatures that detect BackConnect traffic. More details further down in this blog post.
UPDATE 2022-12-05
Lenny has updated his IDS signatures to alert on BackConnect C2 traffic from port 443 in addition to 8080. The signatures in this blog post have now been updated to Lenny's new rev:2 signatures.
UPDATE 2023-04-14
Brad Duncan made the following suggestion in a toot yesterday:
If the protocol for this VNC traffic from Qakbot looks the same as the BackConnect traffic from IcedID infections, perhaps we can just call it BackConnect Protocol without specifying "IcedID"
This is an excellent idea, since IcedID, QakBot as well as Bazar have all been seen using the same BackConnect protocol.
We will therefore refer to the protocol described in this blog post as just the “BackConnect Protocol” from now on. This blog post has also been updated accordingly.
UPDATE 2023-10-02
The release of NetworkMiner 2.8.1 adds a BackConnect protocol parser to NetworkMiner.
IcedID BackConnect C2 Packet Structure
The BackConnect (BC) module uses a proprietary command-and-control (C2) protocol that is pretty straight forward. Both client (bot) and the C2 server typically send commands and responses as 13 byte packets using the following structure:
- Auth: 4 bytes
- Command: 1 byte
- Params: 4 bytes
- ID: 4 bytes
Auth Field
The "Auth" field is presumably used by the bot and C2 server to verify that the other party is communicating using the same protocol and version.
As mentioned by Group-IB and xors the Auth field is typically 0x974F014A (little endian), but we prefer to use the network byte order representation "4a 01 4f 97".
In their IcedID blog post from 2020 Group-IB say:
the auth field that has not changed since at least version 5 of the IcedID core is the constant 0x974F014A
Nevertheless, we recently noticed another BackConnect Auth field being used in the wild. But more on that later.
Commands
The following list of BackConnect C2 commands has been compiled by combining those mentioned by Group-IB with our own analysis of the BackConnect protocol:
- 0x00 = Bot queries for a task
- 0x01 = Set sleep timer
- 0x02 = Bot error
- 0x03 = Reconnect
- 0x04 = Start SOCKS
- 0x05 = Start VNC
We've also discovered these additional commands in BackConnect C2 traffic that uses the Auth value "1f 8b 08 08":
- 0x11 = Start VNC
- 0x12 = Start file manager
- 0x13 = Start reverse shell
Commands 0x04, 0x05, 0x11, 0x12 and 0x13 all cause the bot to connect back to the C2 server using a new BackConnect session, which will be used to wrap either SOCKS, VNC, file manager or reverse shell traffic.
Command 0x01: Set Sleep Timer
The set sleep timer command is issued by the C2 server to instruct the bot to sleep for a certain amount of time before requesting a new task from the C2 server again.
The sleep time is defined in the four bytes following directly after the 0x01 command.
This value is a 32-bit little endian value indicating the number of seconds the bot should sleep, i.e. "3c 00 00 00" = 0x0000003c = 60 seconds. The most common sleep value seems to be 60 seconds, which is why you'll often see byte sequences like this in IcedID C2 sessions:
zz zz zz zz 01 3c 00 00 00 xx xx xx xx
The following Wireshark display filter will show BackConnect C2 packets, where the bot is configured to sleep for 60 seconds before querying the C2 server for a new command:
tcp.len == 13 and tcp.payload[4:5] == 01:3c:00:00:00
Command 0x04: Start SOCKS
The SOCKS command (0x04) instructs the bot to start the SOCKS module.
As an example, the following byte sequence was sent by the IcedID C2 server 91.238.50.80:8080 in Brad Duncan's 2022-06-28 TA578 IcedID pcap on malware-traffic-analysis.net (see frame #10231):
4a 01 4f 97 04 09 00 00 00 8c a2 b1 09
The first four bytes are the auth value, followed by the Start SOCKS command (04).
After receiving this command the bot established a new TCP connection back to the C2 server, where it echoed back the server's "Start SOCKS" command and then started acting like a SOCKS server.
Except for initially echoing the BackConnect Start SOCKS command the SOCKS module actually seems to be compliant with RFC1928, which defines the SOCKS5 protocol.
This means that the C2 server can supply an IP address and port number to the bot's SOCKS proxy in order to relay a connection to that host through the bot.
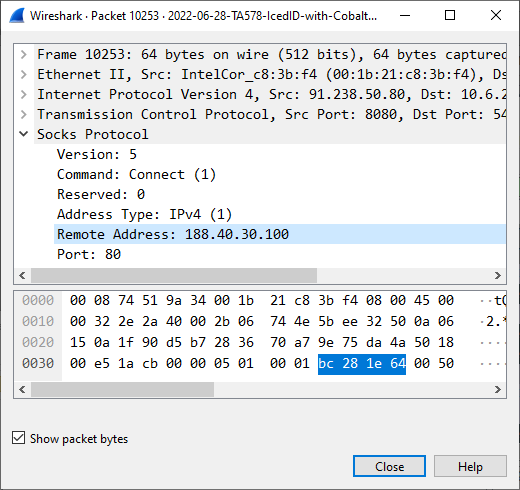
Image: C2 server instructs bot to relay a connection to 188.40.30.100:80
After receiving a Start SOCKS command an IcedID bot immediately establishes a new TCP connection to the specified IP and port, and relays the application layer data back to the C2 server through the SOCKS connection.
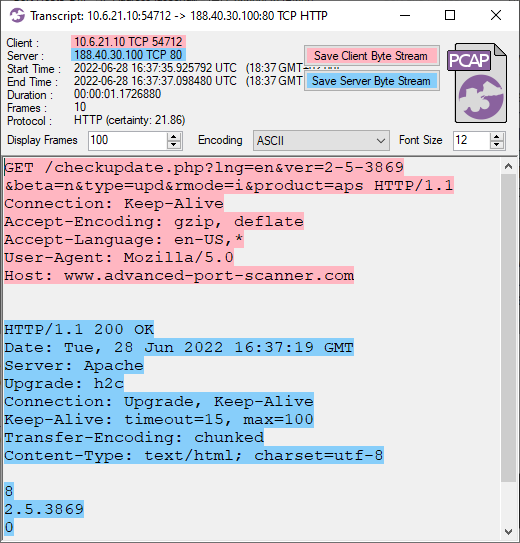
Image: Update check of Advanced Port Scanner relayed through the infected machine
In the 2022-06-28 TA578 IcedID pcap the attacker used multiple SOCKS connections to scan the 10.6.21.0/24 network for services running on TCP ports 21, 80, 445 and 4899. That last port (TCP 4899) is typically used by Radmin VPN, which just so happens to be created by the outfit "Famatech" who also develop the "Advanced Port Scanner". The attacker also used the SOCKS module to make several HTTPS connections to servers like 18.204.62.252 (tlx.3lift[.]com), 23.94.138.115 (cmd5[.]org) and 74.119.118.137 (cat.da.us.criteo[.]com). The attacker also proxied connections to 40.97.120.242 and 52.96.182.162 (outlook.live.com) through the infected bot.
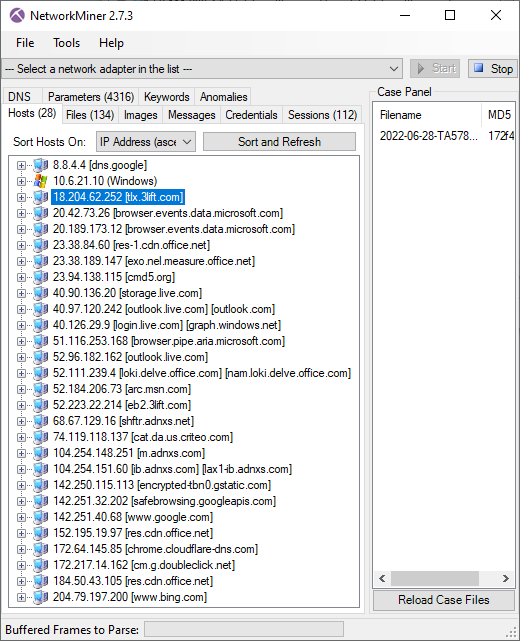
NetworkMiner showing hosts that the bot proxied TLS traffic to
JA3 Fingerprints from Proxied Traffic
Since the SOCKS proxy doesn't touch the application layer data we know that the client TLS handshake packets are coming from the C2 server rather than from the bot that's running the SOCKS proxy. This means that we can fingerprint the actual TLS client using JA3.
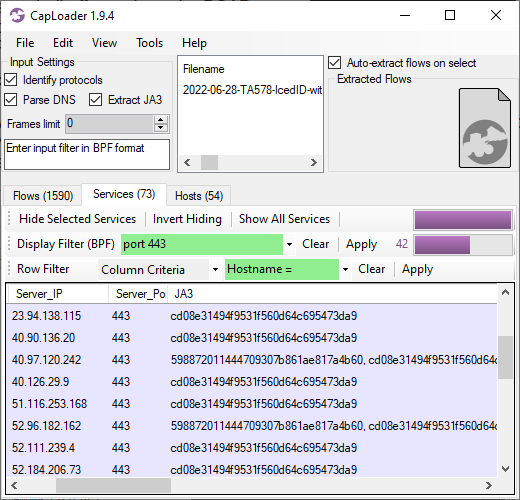
As you can see in the CapLoader screenshot above, most proxied TLS sessions use the cd08e31494f9531f560d64c695473da9 JA3 hash, but two of them use the rare JA3 hash 598872011444709307b861ae817a4b60. That rare JA3 hash was used only when connecting to outlook.live.com.
Command 0x05 or 0x11: VNC
Brad Duncan's 2022-06-28 TA578 IcedID pcap also contains the "Start VNC" command 0x05.
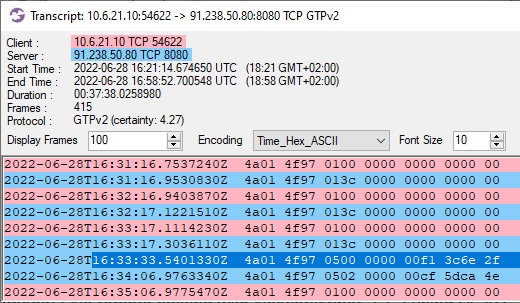
Image: Flow transcript of Start VNC command
As can be seen in the CapLoader screenshot above, Start VNC commands were sent at 16:33:33 and 16:34:06 UTC. And just like the SOCKS command, this caused the bot to establish a new connection back to the C2 server, echo the "Start VNC" command and then proceed with the VNC traffic.
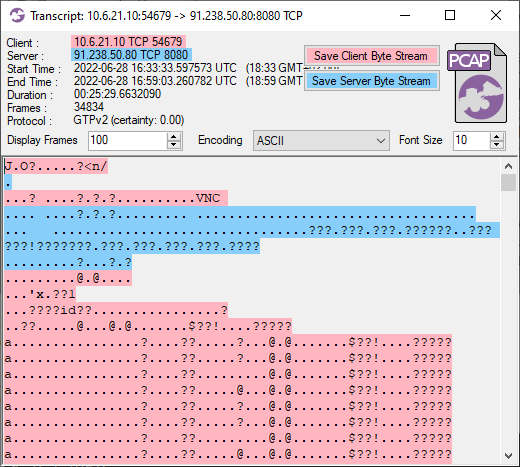
Image: Flow transcript of IcedID VNC traffic in ASCII encoding
Command 0x13: Reverse Shell
Brad posted a new capture file with network traffic from another IcedID infection last week (2022-10-04).
He also noted that the traffic to 51.89.201.236:8080 was different from normal IcedID post-infection traffic.
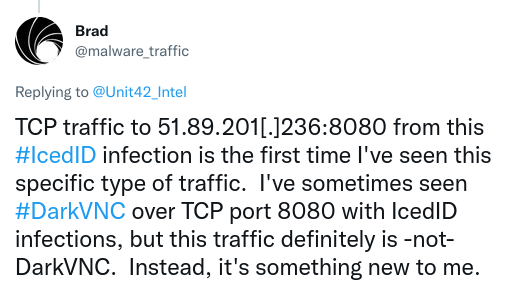
After looking at this C2 traffic I discovered that it was in fact using the IcedID BackConnect protocol outlined in this blog post, but the Auth field "4a 01 4f 97" had been replaced with "1f 8b 08 08".
That exact byte sequence is a common file header for gzip compressed files (RFC1952), where
- 1f 8b = GZIP magic
- 08 = DEFLATE compression
- 08 = Original file name header present
IcedID has previously been seen using fake gzip file headers in payloads, but this time even the C2 packets include the gzip header!
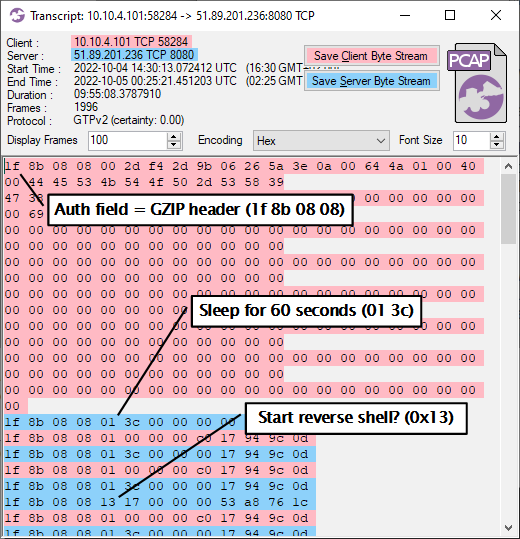
Image: Transcript of TCP session to 51.89.201.236:8080
The C2 traffic also contained the command 0x13, which I hadn't seen before.
Just like the SOCKS and VNC commands, this one triggered the bot to establish a new connection back to the C2 server. But the bot sent a task query command (00) this time, instead of echoing the C2 server's command (0x13). The new TCP session then transitioned into what looks like a reverse shell session.
![PowerShell download from https://aicsoftware[.]com:757/coin](https://www.netresec.com/images/CapLoader-Transcript-IcedID_reverse-shell_520x611.png)
Image: Transcript of reverse shell traffic from IcedID BackConnect session
The reverse shell traffic reveals that the attackers retrieved a list of domain admin users and then executed a PowerShell script from aicsoftware[.]com. This PowerShell script was used to install CobaltStrike beacon on the victim's PC.
Command 0x12: File Manager
We discovered the file manager command after this blog post was published.
This section has therefore been added after the original publication of this blog post.
The following Wireshark display filter can be used to find file manager commands (0x12) in BackConnect C2 traffic that uses the "1f 8b 08 08" auth value:
tcp.len == 13 and tcp.payload[0:5] == 1f:8b:08:08:12
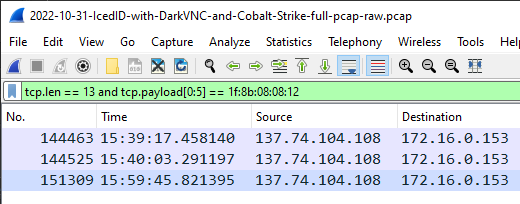
Image: File manager commands in BackConnect C2
The screenshot above shows that the file manager command was issued three times in 2022-10-31-IcedID-with-DarkVNC-and-Cobalt-Strike-full-pcap-raw.pcap.
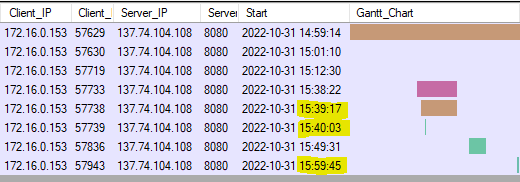
Image: BackConnect TCP sessions in CapLoader's Flows view
As you can see in the two screenshots above, each time a file manager command was issued in the C2 session (Wireshark screenshot) the bot established a new TCP connection back to the C2 server (CapLoader screenshot).
The file manager sessions use a proprietary protocol to perform tasks such as listing disks, changing directory and uploading files.
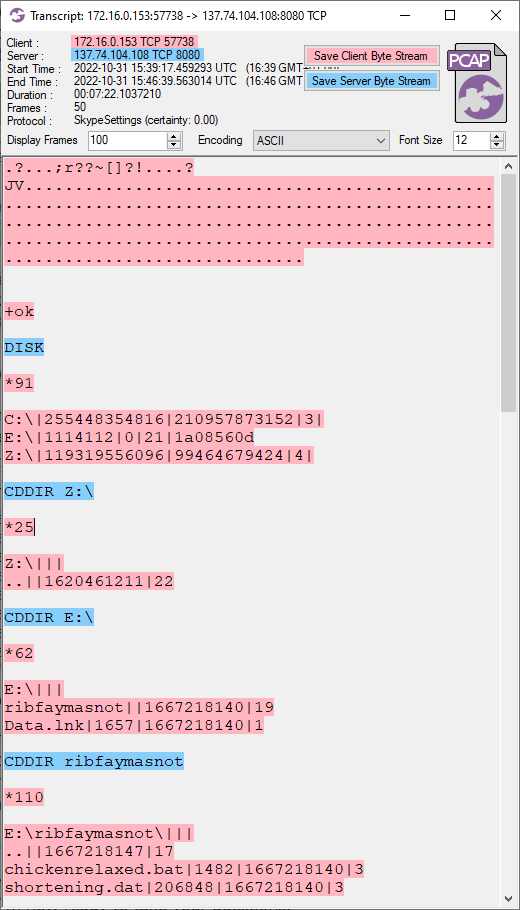
We've identified the following file manager commands:
- DISK = List drives
- CDDIR <path> = Change directory
- PWD = Show current directory
- DIR = List current directory
- PUT <path> = Upload file
IDS Signatures
Lenny Hansson has released IDS signatures that can detect IcedID (and QakBot) BackConnect traffic.
I'd like to highlight four of Lenny's signatures here.
Alert on "sleep 60 seconds" C2 command, regardless of Auth value:
alert tcp $EXTERNAL_NET [443,8080] -> $HOME_NET 1024: (msg:"NF - Malware IcedID BackConnect - Wait Command"; flow:established; flags:AP; dsize:13; content:"|01 3c 00 00 00|"; offset:4; depth:5; reference:url,networkforensic.dk; metadata:02112022; classtype:trojan-activity; sid:5006006; rev:3;)
Alert on "start VNC" C2 command with "4a 01 4f 97" Auth:
alert tcp $EXTERNAL_NET [443,8080] -> $HOME_NET 1024: (msg:"NF - Malware IcedID BackConnect - Start VNC command"; flow:established; flags:AP; dsize:13; content:"|4a 01 4f 97 05|"; offset:0; depth:5; reference:url,networkforensic.dk; metadata:03112022; classtype:trojan-activity; sid:5006007; rev:2;)
Alert on "start VNC" C2 command with "1f 8b 08 08" Auth:
alert tcp $EXTERNAL_NET [443,8080] -> $HOME_NET 1024: (msg:"NF - Malware IcedID BackConnect - Start VNC command - 11"; flow:established; flags:AP; dsize:13; content:"|1f 8b 08 08 11|"; offset:0; depth:5; reference:url,networkforensic.dk; metadata:03112022; classtype:trojan-activity; sid:5006011; rev:2;)
Alert on "start file manager" C2 command with "1f 8b 08 08" Auth:
alert tcp $EXTERNAL_NET [443,8080] -> $HOME_NET 1024: (msg:"NF - Malware IcedID BackConnect - Start file manager command"; flow:established; flags:AP; dsize:13; content:"|1f 8b 08 08 12|"; offset:0; depth:5; reference:url,networkforensic.dk; metadata:03112022; classtype:trojan-activity; sid:5006008; rev:2;)
A zip file containing Lenny's Snort rules can be downloaded from networkforensic.dk.
Questions and Answers
Allright, that's all I had to say about the IcedID BackConnect C2 protocol. I'm now ready to take your questions.
Q: Is IcedID's BackConnect VNC traffic the same thing as DarkVNC?
No, DarkVNC traffic doesn't use the BackConnect C2 Packet Structure described in this blog post. Also, one characteristic behavior DarkVNC is that the first C2 packet contains a string that looks like one of these:
- (COMPUTERNAME)_ADDITIONAL_ID-DARKVNC
- BOT-COMPUTERNAME(USERNAME)_ID-REFnnn
- USR-COMPUTERNAME(USERNAME)_ID-REFnnn
Additionally, the first four bytes in the DarkVNC packets containing one of the strings above is a 32 bit little endian length field.
For more details on DarkVNC, see the archived blog post A short journey into DarkVNC attack chain from REAQTA.
Q: Is IcedID's BackConnect VNC traffic the same thing as hVNC?
Almost. hVNC means "hidden VNC" and includes any type of malicious VNC server running on a victim's PC, including IcedID's VNC module as well as DarkVNC.
Q: How did you get Wireshark to decode the SOCKS traffic from IcedID BackConnect?
- Open the pcap file from 2022-06-28 TA578 IcedID
- Apply display filter: tcp.port eq 8080
- Right-click, Decode As, TCP port 8080 = SOCKS
- Display filter: tcp.dstport eq 8080 and tcp.len eq 13 and tcp.payload[0:5] eq 4a:01:4f:97:04
- Select all packets (Ctrl+A)
- Edit, Ignore Packets (Ctrl+D)
- Display filter: socks.dst
Q: Can CapLoader's Protocol Identification feature detect the BackConnect protocol?
The version used in this blog post (1.9.4) doesn't have a protocol model for the BackConnect protocol, but later versions can identify IcedID's BackConnect protocol regardless of port.
CapLoader version 1.9.5 (and later) also alerts on BackConnect traffic.
Posted by Erik Hjelmvik on Wednesday, 12 October 2022 18:24:00 (UTC/GMT)
Tags:
#IcedID
#QakBot
#QBot
#TA578
#BackConnect
#SOCKS
#SOCKS5
#VNC
#JA3
#gzip
#PowerShell


![PowerShell download from https://aicsoftware[.]com:757/coin](https://www.netresec.com/images/CapLoader-Transcript-IcedID_reverse-shell_520x611.png)


