NETRESEC Network Security Blog - Tag : SSL

rss Google News

PolarProxy 0.9 Released

PolarProxy 0.9

PolarProxy was previously designed to only run as a transparent TLS proxy. But due to popular demand we’ve now extended PolarProxy to also include a SOCKS proxy and a HTTP CONNECT proxy. PolarProxy automatically decrypts all proxied SSL and TLS traffic, regardless if the remote server is running on TCP 443 or some other port, as long as the traffic passes through PolarProxy. As from now we also release a Windows build of PolarProxy, alongside the Linux x64, ARM and ARM64 builds.

SOCKS Proxy

Use the command line argument “--socks [port]” to start PolarProxy’s SOCKS proxy server. This SOCKS proxy supports multiple versions of the SOCKS protocol, including SOCKS 4, SOCKS 4a, SOCKS 5 and SOCKS 5h.

As an example, the command below starts a SOCKS server on TCP port 1080 and passes a copy of the decrypted TLS traffic as a PCAP stream to tshark.

PolarProxy --socks 1080 -w - | tshark -r - -d tcp.port==443,http2
Note: The “-d tcp.port==443,http2” argument in the command above is used to tell tshark to parse traffic to port 443 as HTTP/2 instead of TLS. An alternative method would be to instead configure PolarProxy to output decrypted 443 traffic as if it was port 80, by supplying the “-p 443,80” argument to PolarProxy.

You can then use curl to run some HTTPS traffic through the SOCKS proxy:

curl --insecure --socks4 localhost https://www.netresec.com

After doing this you should see the decrypted HTTP/2 traffic in tshark’s output.

HTTP CONNECT Proxy

We’ve also added a HTTP proxy to PolarProxy 0.9, but it only supports the CONNECT request method. This means that normal unencrypted HTTP requests, like GET or POST requests, will be rejected by PolarProxy. Most web traffic is TLS encrypted nowadays anyway, so we don't consider this limitation to be a big issue.

The HTTP CONNECT proxy service is activated with the “--httpconnect” argument. Decrypted TLS traffic from PolarProxy’s HTTP CONNECT proxy can be forwarded to tshark just like in the SOCKS example, but the traffic from these proxies can also be accessed through PCAP-over-IP like this:

PolarProxy --httpconnect 8080 -p 443,80 --pcapoverip 57012

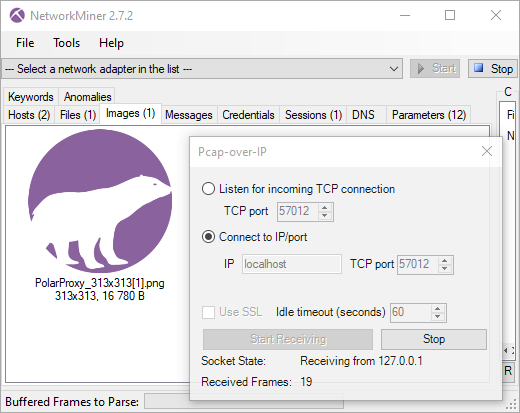
You can then connect to PolarProxy’s PCAP-over-IP service with NetworkMiner by clicking File, Receive PCAP over IP, select “Connect to IP/port”, enter “localhost” and click the “Start Receiving” button. You’ll now be able to see a real-time feed of all the traffic that PolarProxy decrypts. As an example, let’s download the PolarProxy logo over HTTPS to see if NetworkMiner can extract it from PolarProxy’s decrypted PCAP-over-IP stream:

curl --insecure --proxy localhost:8080 https://www.netresec.com/images/PolarProxy_313x313.png

The PolarProxy logo immediately shows up in NetworkMiner’s images tab:

NetworkMiner reading PCAP-over-IP from PolarProxy

Port-Independent TLS Protocol Detection

When PolarProxy is running as a transparent TLS proxy all incoming traffic can be expected to be TLS. But that’s not the case when, for example, PolarProxy is running as a SOCKS proxy. We have therefore added port-independent TLS protocol detection for proxied traffic, so that TLS traffic can be detected and decrypted even when it runs on other ports than the standard 443, 465, 853, 990, 993, 995 and 5061 ones.

There is one crucial limitation to the automatic SSL/TLS protocol detection though, it doesn’t support explicit TLS traffic that relies on opportunistic encryption features like STARTTLS, which bootstraps TLS into an already established application layer session.

Allow Non-TLS Traffic

SOCKS and HTTP CONNECT proxies can both be used to transport other protocols than TLS. PolarProxy blocks all non-TLS traffic by default, but this setting can be overridden with the “--nontls allow” argument to allow any traffic to be proxied. The allow non-TLS override has no effect on PolarProxy’s transparent proxy though, because it will need to see a valid SNI field in order to know whereto the traffic should be forwarded.

Windows Build

There wasn’t much need for a Windows build of PolarProxy prior to the release of version 0.9, because the Windows firewall can’t be configured to redirect outgoing port 443 traffic to a local service. However, now that PolarProxy also includes SOCKS and HTTP CONNECT services, the situation is completely different. There are many ways to configure a Windows PC, as well as web browsers and other applications, to use a local proxy server.

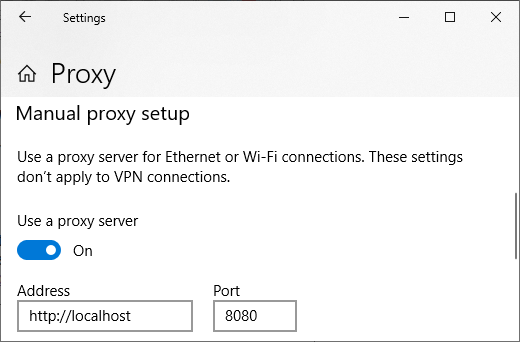
You can use the Proxy settings window in Windows 10 and 11 to enable a local HTTP proxy like this:

Windows 10 Proxy Settings

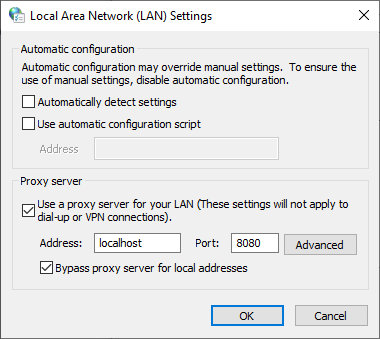
Another option is to run “inetcpl.cpl” (Internet Options), open the “Connections” tab and click the “LAN settings” button to configure an HTTP proxy.

Windows Internet Options LAN Proxy Settings

You can, of course, also configure your browser to use a local SOCKS or HTTP proxy in Windows, just as you’d do on any other operating system.

But don’t forget to configure your OS and/or browser to trust your PolarProxy instance’s root CA certificate first, as explained in the “Trusting the PolarProxy root CA” section of our PolarProxy documentation.

The Windows version of PolarProxy is a .NET framework-dependent application, which requires the .NET 6 runtime to be installed. The PolarProxy releases for other platforms (Linux x64, ARM and ARM64) are all self-contained applications, which are published with the .NET runtime built-in.

Visit our PolarProxy page to download and install PolarProxy.

Posted by Erik Hjelmvik on Thursday, 13 January 2022 10:15:00 (UTC/GMT)

Tags: #PolarProxy#proxy#SOCKS#SOCKS5#TLS#SSL#decrypt#Windows#PCAP-over-IP#pcapoverip

Share: Facebook   Twitter   Reddit   Hacker News Short URL: https://netresec.com/?b=221953b


Reverse Proxy and TLS Termination

PolarProxy is primarily a TLS forward proxy, but it can also be used as a TLS termination proxy or reverse TLS proxy to intercept and decrypt incoming TLS traffic, such as HTTPS or IMAPS, before it is forwarded to a server. The proxied traffic can be accessed in decrypted form as a PCAP formatted data stream, which allows real-time analysis of the decrypted traffic by an IDS as well as post incident forensics with Wireshark.

PolarProxy version 0.8.15 and later can import an existing X.509 server certificate (aka leaf certificate or end-entity certificate) in order to perform the TLS decryption using a valid certificate signed by a trusted certificate authority. If no server certificate is provided, then PolarProxy falls back to generating server certificates on the fly and signing them with its own root CA certificate.

There are two principal ways to run PolarProxy as a reverse proxy, either as a TLS termination proxy or as a reverse proxy that decrypts and re-encrypts the traffic.

PolarProxy as a TLS Termination Proxy

TLS Termination Proxy

The TLS termination proxy mode is useful in order to offload the task of performing TLS encryption to PolarProxy instead of doing the decryption on the web server. This mode can also be used when the proxied services don’t support TLS encryption, such as legacy web servers or servers hosting other unencrypted services that you want to secure with TLS.

The following command sequence shows how to create a Let’s Encrypt SSL certificate, convert it to the PKCS#12 format, and load the server certificate into PolarProxy to terminate incoming HTTPS connections. In this setup PolarProxy decrypts the TLS traffic and relays the HTTP traffic to the web server on TCP port 80.

sudo certbot certonly --manual --preferred-challenges dns -d example.com,www.example.com

sudo openssl pkcs12 -export -out /etc/example.p12 -inkey /etc/letsencrypt/live/example.com/privkey.pem -in /etc/letsencrypt/live/example.com/fullchain.pem --passout pass:PASSWORD

sudo mkdir /var/log/TlsTerminationProxy/

sudo ./PolarProxy --terminate --connect 10.1.2.3 --nosni www.example.com --leafcert load:example.com,www.example.com:/etc/example.p12:PASSWORD -p 443,80,80 -o /var/log/TlsTerminationProxy/

Here’s a breakdown of the arguments sent to PolarProxy:

  • --terminate : Terminate incoming TLS sessions and forward proxied traffic in unencrypted form.
  • --connect 10.1.2.3 : Forward all proxied traffic to 10.1.2.3 instead of connecting to the host name provided in the SNI extension of the TLS ClientHello message.
  • --nosni www.example.com : Treat incoming TLS sessions that don’t define a host name with the SNI extension as if they wanna to connect to “www.example.com”.
  • --leafcert load:example.com,www.example.com:/etc/example.p12:PASSWORD : Use the server certificate “/etc/example.p12” for incoming connections to “example.com” and “www.example.com”.
  • -p 443,80,80 : Listen on TCP port 443, save decrypted traffic in PCAP file as if it was directed to port 80, forward decrypted traffic to port 80.
  • -o /var/log/TlsTerminationProxy/ : Save decrypted traffic to hourly rotated PCAP files in “/var/log/TlsTerminationProxy/”.

PolarProxy is a generic TLS proxy that doesn’t care what application layer protocol the TLS tunnel carries. So if you want to terminate the TLS encryption of incoming IMAPS sessions as well, then simply append an additional argument saying “-p 993,143,143” to also forward decrypted IMAP sessions to 10.1.2.3. This method can be used in order to wrap almost any TCP based protocol in a TLS tunnel, which can be useful for privacy reasons as well as to prevent network monitoring tools from detecting the actual application layer protocol.

PolarProxy as a Reverse TLS Proxy

Reverse TLS Proxy

There are setups for which it is preferable to also encrypt the internal sessions between PolarProxy and the final server. One such setup is when the server is hosting a web service with support for the HTTP/2 protocol, which in practice always uses TLS. Luckily PolarProxy is designed to decrypt and re-encrypt proxied traffic while also forwarding important TLS parameters, such as ALPN and SNI, between the internal and external TLS sessions.

To use TLS encryption on the inside as well as outside of PolarProxy, simply do as explained in the previous TLS termination section, but remove the “--terminate” argument and change the port argument to “-p 443,80,443” like this:

sudo ./PolarProxy --connect 10.1.2.3 --nosni www.example.com --leafcert load:example.com,www.example.com:/etc/example.p12:PASSWORD -p 443,80,443 -o /var/log/ReverseTlsProxy/

PolarProxy will save the decrypted traffic as cleartext HTTP (or HTTP/2) to PCAP files in the “/var/log/ReverseTlsProxy/” directory.

Real-Time Analysis of Decrypted Traffic

Both the external (client-to-proxy) and internal (proxy-to-server) TCP sessions, in the reverse TLS proxy example above, are encrypted with TLS. This prevents passive network security monitoring tools, such as IDSs, DPI and DLP appliances, from analyzing the application layer data being sent and received. The PCAP files written to “/var/log/ReverseTlsProxy/” can be a valuable forensic asset when investigating an incident, but a real-time stream of the decrypted data is needed in order to swiftly detect and alert on potential security breaches and other incidents.

PolarProxy’s “--pcapoverip” option can be used to provide such a real-time stream of the decrypted data passing through the proxy. This data can easily be sent to a network interface using tcpreplay, as explained in our blog post “Sniffing Decrypted TLS Traffic with Security Onion”.

Security Considerations

The examples shown in this blog post all run PolarProxy with root privileges using sudo, which can be dangerous from a security perspective. PolarProxy is actually designed to be run without root privileges, but doing so prevents it from listening on a port below 1024. Luckily, this issue can easily be overcome with a simple port forwarding or redirect rule. The following iptables redirect rule can be used if PolarProxy is listening on TCP port 20443 and incoming HTTPS request are arriving to the eth0 interface of the proxy:

iptables -t nat -A PREROUTING -i eth0 -p tcp --dport 443 -j REDIRECT --to 20443

PolarProxy does not support loading settings from a config file. The password for the PKCS12 certificate will therefore need to be supplied on the command line, which can make it visible from a process listing. If this is a concern for you, then please consider using “hidepid” to hide processes from other users. You can find instructions on how to use hidepid in hardening guides for Debian, Arch, SUSE and most other Linux flavors.

Posted by Erik Hjelmvik on Thursday, 12 March 2020 15:45:00 (UTC/GMT)

Tags: #PolarProxy#TLS#SSL#PCAP#decrypt#HTTPS#HTTP#HTTP/2#http2#IMAPS#SNI#decrypt#ASCII-art

Share: Facebook   Twitter   Reddit   Hacker News Short URL: https://netresec.com/?b=2033d38


Sniffing Decrypted TLS Traffic with Security Onion

Wouldn't it be awesome to have a NIDS like Snort, Suricata or Zeek inspect HTTP requests leaving your network inside TLS encrypted HTTPS traffic? Yeah, we think so too! We have therefore created this guide on how to configure Security Onion to sniff decrypted TLS traffic with help of PolarProxy.

Network drawing with Clients, SecurityOnion and the Internet

PolarProxy is a forward TLS proxy that decrypts incoming TLS traffic from clients, re-encrypts it and forwards it to the server. One of the key features in PolarProxy is the ability to export the proxied traffic in decrypted form using the PCAP format (a.k.a. libpcap/tcpdump format). This makes it possible to read the decrypted traffic with external tools, without having to perform the decryption again. It also enables packet analysis using tools that don't have built-in TLS decryption support.

This guide outlines how to configure PolarProxy to intercept HTTPS traffic and send the decrypted HTTP traffic to an internal network interface, where it can be sniffed by an IDS.

STEP 1 ☆ Install Ubuntu

Download and install the latest SecurityOnion ISO image, but don't run the "Setup" just yet.

STEP 2 ☆ Add a Dummy Network Interface

Add a dummy network interface called "decrypted", to which decrypted packets will be sent.

ip link add decrypted type dummy
ip link set decrypted arp off up
Add the commands above to /etc/rc.local before "exit 0" to have the network interface automatically configured after reboots.

dummy interface in rc.local

STEP 3 ☆ Install Updates

Install updates in Security Onion by running "sudo soup".

STEP 4 ☆ Run the Security Onion Setup

Run the Security Onion setup utility by double-clicking the "Setup" desktop shortcut or executing "sudo sosetup" from a terminal. Follow the setup steps in the Production Deployment documentation and select "decrypted" as your sniffing interface.

Sniffing Interface Selection Window

Reboot and run Setup again to continue with the second phase of Security Onion's setup. Again, select "decrypted" as the interface to be monitored.

STEP 5 ☆ Install PolarProxy Service

Download and install PolarProxy:

sudo adduser --system --shell /bin/bash proxyuser
sudo mkdir /var/log/PolarProxy
sudo chown proxyuser:root /var/log/PolarProxy/
sudo chmod 0775 /var/log/PolarProxy/

sudo su - proxyuser
mkdir ~/PolarProxy
cd ~/PolarProxy/
curl https://www.netresec.com/?download=PolarProxy | tar -xzf -
exit

sudo cp /home/proxyuser/PolarProxy/PolarProxy.service /etc/systemd/system/PolarProxy.service

Edit /etc/systemd/system/PolarProxy.service and add "--pcapoverip 57012" at the end of the ExecStart command.

--pcapoverip 57012 in PolarProxy.service

Start the PolarProxy systemd service:

sudo systemctl enable PolarProxy.service
sudo systemctl start PolarProxy.service

STEP 6 ☆ Install Tcpreplay Service

The decrypted traffic can now be accessed via PolarProxy's PCAP-over-IP service on TCP 57012. We can leverage tcpreplay and netcat to replay these packets to our dummy network interface in order to have them picked up by Security Onion.

nc localhost 57012 | tcpreplay -i decrypted -t -
However, it's better to create a systemd service that does this automatically on bootup. We therefore create a file called /etc/systemd/system/tcpreplay.service with the following contents:
[Unit]
Description=Tcpreplay of decrypted traffic from PolarProxy
After=PolarProxy.service

[Service]
Type=simple
ExecStart=/bin/sh -c 'nc localhost 57012 | tcpreplay -i decrypted -t -'
Restart=on-failure
RestartSec=3

[Install]
WantedBy=multi-user.target

Start the tcpreplay systemd service:

sudo systemctl enable tcpreplay.service
sudo systemctl start tcpreplay.service

STEP 7 ☆ Add firewall rules

Security Onion only accepts incoming connections on TCP 22 by default, we also need to allow connections to TCP port 10443 (proxy port), and 10080 (root CA certificate download web server). Add allow rules for these services to the Security Onion machine's firewall:

sudo ufw allow in 10443/tcp
sudo ufw allow in 10080/tcp

Verify that the proxy is working by running this curl command on a PC connected to the same network as the Security Onion machine:

curl --insecure --connect-to www.netresec.com:443:[SecurityOnionIP]:10443 https://www.netresec.com/
Note: You can even perform this test from a Win10 PC, since curl is included with Windows 10 version 1803 and later.

Add the following lines at the top of /etc/ufw/before.rules (before the *filter section) to redirect incoming packets on TCP 443 to PolarProxy on port 10443.

*nat
:PREROUTING ACCEPT [0:0]
-A PREROUTING -i enp0s3 -p tcp --dport 443 -j REDIRECT --to 10443
COMMIT

Note: Replace "enp0s3" with the Security Onion interface to which clients will connect.

After saving before.rules, reload ufw to activate the port redirection:

sudo ufw reload

Verify that you can reach the proxy on TCP 443 with this command:

curl --insecure --resolve www.netresec.com:443:[SecurityOnionIP] https://www.netresec.com/

STEP 8 ☆ Redirect HTTPS traffic to PolarProxy

It's now time to configure a client to run its HTTPS traffic through PolarProxy. Download and install the PolarProxy X.509 root CA certificate from PolarProxy's web service on TCP port 10080:

http://[SecurityOnionIP]:10080/polarproxy.cer

Install the certificate in the operating system and browser, as instructed in the PolarProxy documentation.

You also need to forward packets from the client machine to the Security Onion machine running PolarProxy. This can be done either by configuring a local NAT rule on each monitored client (STEP 8.a) or by configuring the default gateway's firewall to forward HTTPS traffic from all clients to the proxy (STEP 8.b).

STEP 8.a ☆ Local NAT

Use this firewall rule on a Linux client to configure it to forward outgoing HTTPS traffic to the Security Onion machine:

sudo iptables -t nat -A OUTPUT -p tcp --dport 443 -j DNAT --to [SecurityOnionIP]

STEP 8.b ☆ Global NAT Network drawing Firewall, PolarProxy, Clients

If the client isn't running Linux, or if you wanna forward HTTPS traffic from a whole network to the proxy, then apply the following iptables rules to the firewall in front of the client network. See "Routing Option #2" in the PolarProxy documentation for more details.

  1. Add a forward rule on the gateway to allow forwarding traffic to our PolarProxy server:
    sudo iptables -A FORWARD -i eth1 -d [SecurityOnionIP] -p tcp --dport 10443 -m state --state NEW -j ACCEPT
  2. Add a DNAT rule to forward 443 traffic to PolarProxy on port 10443:
    sudo iptables -t nat -A PREROUTING -i eth1 -p tcp --dport 443 -j DNAT --to [SecurityOnionIP]:10443
  3. If the reverse traffic from PolarProxy to the client doesn't pass the firewall (i.e. they are on the same LAN), then we must add this hide-nat rule to fool PolarProxy that we are coming from the firewall:
    sudo iptables -t nat -A POSTROUTING -o eth1 -d [SecurityOnionIP] -p tcp --dport 10443 -j MASQUERADE
For other network configurations, please see the various routing setups in the PolarProxy documentation.

STEP 9 ☆ Inspect traffic in SecurityOnion

Wait for the Elastic stack to initialize, so that the intercepted network traffic becomes available through the Kibana GUI. You can check the status of the elastic initialization with "sudo so-elastic-status".

You should now be able to inspect decrypted traffic in Security Onion using Kibana, Squert, Sguil etc., just as if it was unencrypted HTTP.

Bro HTTP traffic in Kibana 
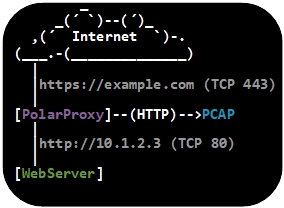
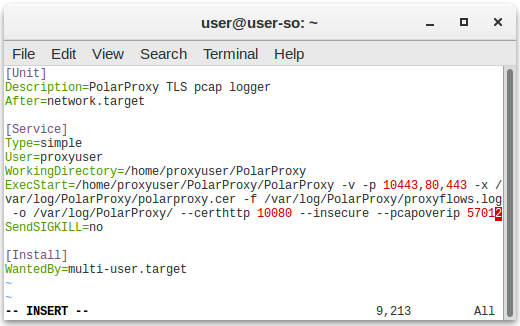
Image: Kibana showing HTTP traffic info from decrypted HTTPS sessions

MIME types in Kibana Image: MIME types in Kibana

NIDS alerts in Kibana Image: NIDS alerts from payload in decrypted traffic shown in Kibana

Snort alerts in Squert 
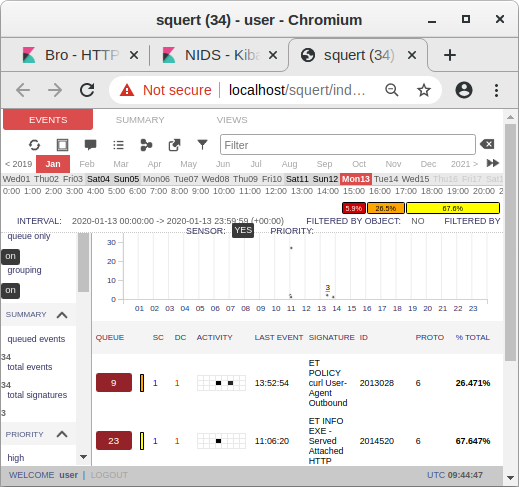
Image: Snort alerts from decrypted traffic shown in Squert

Security Considerations and Hardening

Security Onion nodes are normally configured to only allow access by SOC/CERT/CSIRT analysts, but the setup described in this blog post requires that "normal" users on the client network can access the PolarProxy service running on the Security Onion node. We therefore recommend installing PolarProxy on a dedicated Security Onion Forward Node, which is configured to only monitor traffic from the proxy.

We also recommend segmenting the client network from the analyst network, for example by using separate network interfaces on the Security Onion machine or putting it in a DMZ. Only the PolarProxy service (TCP 10080 and 10443) should be accessable from the client network.

PolarProxy could be used to pivot from the client network into the analyst network or to access the Apache webserver running on the Security Onion node. For example, the following curl command can be used to access the local Apache server running on the Security Onion machine via PolarProxy:

curl --insecure --connect-to localhost:443:[SecurityOnionIP]:10443 https://localhost/
We therefore recommend adding firewall rules that prevent PolarProxy from accessing the analyst network as well as the local Apache server.

Hardening Steps:

  • Configure the Security Onion node as a Forward Node
  • Segment client network from analyst network
  • Add firewall rules to prevent PolarProxy from accessing services on the local machine and analyst network

For additional info on hardening, please see the recommendations provided by Wes Lambert on the Security-Onion mailing list.

Posted by Erik Hjelmvik on Monday, 20 January 2020 09:40:00 (UTC/GMT)

Tags: #SecurityOnion#Security Onion#PCAP#Bro#Zeek#PolarProxy#Snort#Suricata#TLS#SSL#HTTPS#tcpreplay#PCAP-over-IP#IDS#NIDS#netcat#curl#UFW#ASCII-art

Share: Facebook   Twitter   Reddit   Hacker News Short URL: https://netresec.com/?b=2013af4


Raspberry PI WiFi Access Point with TLS Inspection

This is a how-to guide for setting up a Raspberry Pi as a WiFi Access Point, which acts as a transparent TLS proxy and saves the decrypted traffic in PCAP files.

Raspberry Pi 4 Model B running PolarProxy
Image: Raspberry Pi 4 Model B running PolarProxy

Step 1: Install PolarProxy for Linux ARM

We will start with installing PolarProxy, which will be used for the TLS decryption and re-encryption. The steps are almost identical to those in the official PolarProxy installation guide, except here we will download the "linux-arm" build of PolarProxy instead of the x64 version.

sudo adduser --system --shell /bin/bash proxyuser
sudo mkdir /var/log/PolarProxy
sudo chown proxyuser:root /var/log/PolarProxy/
sudo chmod 0775 /var/log/PolarProxy/
sudo su - proxyuser
mkdir ~/PolarProxy
cd ~/PolarProxy/
curl https://www.netresec.com/?download=PolarProxy_linux-arm | tar -xzf -
exit
sudo cp /home/proxyuser/PolarProxy/PolarProxy.service /etc/systemd/system/PolarProxy.service
sudo systemctl enable PolarProxy.service
sudo systemctl start PolarProxy.service

Note: The installation instructions above will fail on 64-bit ARM Linux OS's since the downloaded PolarProxy tarball is compiled for 32-bit ARM Linux. Luckily, we do have a linux-arm64 build as well, which is available here:
https://www.netresec.com/?download=PolarProxy_linux-arm64

Verify that the PolarProxy service is running as expected with these commands:

systemctl status PolarProxy.service
journalctl -t PolarProxy

Step 2: Set up your Pi as a WiFi AP

The Raspberry Pi Foundation have a great guide for "Setting up a Raspberry Pi as a Wireless Access Point". Follow the instructions in their guide for the NAT mode setup (first section), but replace the iptables config with this:

sudo iptables -t nat -A POSTROUTING -o eth0 -j MASQUERADE
sudo iptables -A INPUT -i wlan0 -p tcp --dport 10443 -m state --state NEW -j ACCEPT
sudo iptables -t nat -A PREROUTING -i wlan0 -p tcp --dport 443 -j REDIRECT --to 10443
Then save the iptables rules with:
sudo sh -c "iptables-save > /etc/iptables.ipv4.nat"
Finally, edit /etc/rc.local and add this iptables-restore command just above "exit 0" to install the rules on boot.
iptables-restore < /etc/iptables.ipv4.nat

Step 3: Configure the Clients

The final step is to connect the clients (phones, tablets or computers) to the Raspberry Pi WiFi Access Point and install the root CA from PolarProxy.

Follow the instructions for "Trusting the PolarProxy root CA" in the official PolarProxy setup guide to install the public certificate from the TLS proxy in your clients. The certificate can be downloaded from the Raspberry Pi by browsing to http://192.168.4.1:10080/polarproxy.cer.

PCAP PCAP PCAP

Your Raspberry Pi WiFi AP will now intercept all HTTPS traffic going to tcp/443 and save the decrypted traffic in PCAP files, one per hour. The PCAP files with decrypted TLS traffic can be found in the /var/log/PolarProxy/ directory of your Raspberry Pi.

pi@raspberrypi:/var/log/PolarProxy $ ls *.pcap
proxy-190925-075704.pcap proxy-190925-152902.pcap
proxy-190925-085704.pcap proxy-190925-162902.pcap
proxy-190925-095704.pcap proxy-190925-172902.pcap
proxy-190925-105704.pcap proxy-190925-182902.pcap
proxy-190925-115704.pcap proxy-190926-062902.pcap
proxy-190925-125704.pcap proxy-190926-072902.pcap
proxy-190925-132704.pcap proxy-190926-082902.pcap
proxy-190925-132902.pcap proxy-190926-092902.pcap
proxy-190925-142902.pcap proxy-190926-102902.pcap

HTTP/2 traffic to Facebook opened in Wireshark
Image: Decrypted HTTP/2 traffic to Facebook opened in Wireshark

Posted by Erik Hjelmvik on Thursday, 26 September 2019 11:37:00 (UTC/GMT)

Tags: #PolarProxy#PCAP#WiFi#TLS#SSL#HTTPS#Wireshark#http2

Share: Facebook   Twitter   Reddit   Hacker News Short URL: https://netresec.com/?b=199dc9a


PolarProxy Released

I’m very proud to announce the release of PolarProxy today! PolarProxy is a transparent TLS proxy that decrypts and re-encrypts TLS traffic while also generating a PCAP file containing the decrypted traffic.

PolarProxy flow chart

PolarProxy enables you to do lots of things that have previously been impossible, or at least very complex, such as:

  • Analyzing HTTP/2 traffic without an SSLKEYLOGFILE
  • Viewing decrypted HTTPS traffic in real-time using Wireshark
    PolarProxy -p 10443,80,443 -w - | wireshark -i - -k
  • Replaying decrypted traffic to an internal or external interface using tcpreplay
    PolarProxy -p 10443,80,443 -w - | tcpreplay -i eth1 -
  • Forwarding of decrypted traffic to a NIDS (see tcpreplay command above)
  • Extracting DNS queries and replies from DNS-over-TLS (DoT) or DNS-over-HTTPS (DoH) traffic
    PolarProxy -p 853,53 -p 443,80 -w dns.pcap
  • Extracting email traffic from SMTPS, POP3S or IMAPS
    PolarProxy -p 465,25 -p 995,110 -p 993,143 -w emails.pcap

Here is an example PCAP file generated by PolarProxy:
https://media.netresec.com/pcap/polarproxy-demo.pcap

This capture files contains HTTP, WebSocket and HTTP/2 packets to Mozilla, Google and Twitter that would otherwise have been encrypted with TLS.

 HTTP/2 traffic from PolarProxy opened in Wireshark
Image: HTTP/2 traffic from PolarProxy opened in Wireshark

Now, head over to our PolarProxy page and try it for yourself (it’s free)!

Posted by Erik Hjelmvik on Friday, 21 June 2019 06:00:00 (UTC/GMT)

Tags: #PolarProxy#PCAP#NIDS#IDS#http2#HTTP/2#Wireshark#tcpreplay#DoH#SMTPS#IMAPS#TLS#SSL

Share: Facebook   Twitter   Reddit   Hacker News Short URL: https://netresec.com/?b=196571b


Examining an x509 Covert Channel

Jason Reaves gave a talk titled “Malware C2 over x509 certificate exchange” at BSides Springfield 2017, where he demonstrated that the SSL handshake can be abused by malware as a covert command-and-control (C2) channel.

Jason Reaves presenting at BSides Springfield 2017

He got the idea while analyzing the Vawtrak malware after discovering that it read multiple fields in the X.509 certificate provided by the server before proceeding. Jason initially thought these fields were used as a C2 channel, but then realized that Vawtrak performed a variant of certificate pinning in order to discover SSL man-in-the-middle attempts.

Nevertheless, Jason decided to actually implement a proof-of-concept (PoC) that uses the X.509 certificate as a C2 channel. Jason’s code is now available on GitHub along with a PCAP file demonstrating this covert C2 channel. Of course I couldn’t resist having a little look at this PCAP file in NetworkMiner.

The first thing I noticed was that the proof-of-concept PCAP ran the SSL session on TCP 4433, which prevented NetworkMiner from parsing the traffic as SSL. However, I was able to parse the SSL traffic with NetworkMiner Professional just fine thanks to the port-independent-protocol-identification feature (a.k.a Dynamic Port Detection), which made the Pro-version parse TCP 4433 as SSL/TLS.

X.509 certificates extracted from PCAP with NetworkMiner
Image: X.509 certificates extracted from PCAP with NetworkMiner

A “normal” x509 certificate size is usually around 1kB, so certificates that are 11kB should be considered as anomalies. Also, opening one of these .cer files reveals an extremely large value in the Subject Key Identifier field.

X.509 certificate with MZ header in the Subject Key Identifier field

Not only is this field very large, it also starts with the familiar “4D 5A” MZ header sequence.

NetworkMiner additionally parses details from the certificates that it extracts from PCAP files, so the Subject Key Identifier field is actually accessible from within NetworkMiner, as shown in the screenshot below.

Parameters tab in NetworkMiner showing X.509 certificate details

You can also see that NetworkMiner validates the certificate using the local trusted root certificates. Not surprisingly, this certificates is not trusted (certificate valid = FALSE). It would be most unlikely that anyone would manage to include arbitrary data like this in a signed certificate.


Extracting the MZ Binary from the Covert X.509 Channel

Even though NetworkMiner excels at pulling out files from PCAPs, this is definitively an occasion where manual handling is required. Jason’s PoC implementation actually uses a whopping 79 individual certificates in order to transfer this Mimikatz binary, which is 785 kB.

Here’s a tshark oneliner you can use to extract the Mimikatz binary from Jason's example PCAP file.

tshark -r mimikatz_sent.pcap -Y 'ssl.handshake.certificate_length gt 2000' -T fields -e x509ce.SubjectKeyIdentifier -d tcp.port==4433,ssl | tr -d ':\n' | xxd -r -p > mimikatz.exe

Detecting x509 Anomalies

Even though covert channels using x509 certificates isn’t a “thing” (yet?) it’s still a good idea to think about how this type of covert signaling can be detected. Just looking for large Subject Key Identifier fields is probably too specific, since there are other fields and extensions in X.509 that could also be used to transmit data. A better approach would be to alert on certificates larger than, let’s say, 3kB. Multiple certificates can also be chained together in a single TLS handshake certificate record, so it would also make sense to look for handshake records larger than 8kB (rough estimate).

Bro IDS logo

This type of anomaly-centric intrusion detection is typically best done using the Bro IDS, which provides easy programmatic access to the X.509 certificate and SSL handshake.

There will be false positives when alerting on large certificates in this manner, which is why I recommend to also check if the certificates have been signed by a trusted root or not. A certificate that is signed by a trusted root is very unlikely to contain malicious data.

Posted by Erik Hjelmvik on Tuesday, 06 February 2018 12:13:00 (UTC/GMT)

Tags: #malware#C2#SSL#TLS#certificate#NetworkMiner#PCAP#x509#X.509#PIPI#Bro#IDS#tshark

Share: Facebook   Twitter   Reddit   Hacker News Short URL: https://netresec.com/?b=182e662


Hunting AdwindRAT with SSL Heuristics

An increasing number of malware families employ SSL/TLS encryption in order to evade detection by Network Intrusion Detection Systems (NIDS). In this blog post I’m gonna have a look at Adwind, which is a cross-platform Remote Access Trojan (RAT) that has been using SSL to conceal it’s traffic for several years. AdwindRAT typically connects SSL sessions to seemingly random TCP ports on the C2 servers. Hence, a heuristic that could potentially be used to hunt for Adwind RAT malware is to look for SSL traffic going to TCP ports that normally don’t use SSL. However, relying on ONLY that heuristic would generate way too many false positives.

Brad Duncan did an interesting writeup about Adwind RAT back in 2015, where he wrote:

I saw the same certificate information used last week, and it continues this week.
  • commonName = assylias
  • organizationName = assylias.Inc
  • countryName = FR
Currently, this may be the best way to identify Adwind-based post-infection traffic. Look for SSL traffic on a non-standard TCP port using that particular certificate.

Unfortunately, Adwind RAT has evolved to use other CN’s in their new certificates, so looking for “assylias.Inc” will not cut it anymore. However, looking for SSL traffic on non-standard TCP ports still holds on the latest Adwind RAT samples that we’ve analyzed.

The PT Research Attack Detection Team (ADT) sent an email with IDS signatures for detecting AdwindRAT to the Emerging-Sigs mailing list a few days ago, where they wrote:

“We offer one of the ways to detect malicious AdwindRAT software inside the encrypted traffic. Recently, the detection of this malicious program in network traffic is significantly reduced due to encryption. As a result of the research, a stable structure of data fragments was created.”

Not only is it awesome that they were able to detect static patterns in the encrypted data, they also provided 25 PCAP files containing AdwindRAT traffic. I loaded these PCAP files into NetworkMiner Professional in order to have a look at the X.509 certificates. NetworkMiner Professional supports Port-Independent Protocol Identification (PIPI), which means that it will automatically identify the C2 sessions as SSL, regardless of which port that is used. It will also automatically extract the X.509 certificates along with any other parameters that can be extracted from the SSL handshake before the session goes encrypted.

X.509 certificates extracted from AdwindRAT PCAP by NetworkMiner 
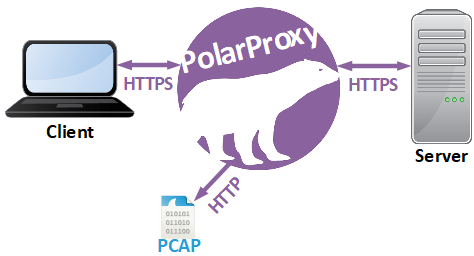
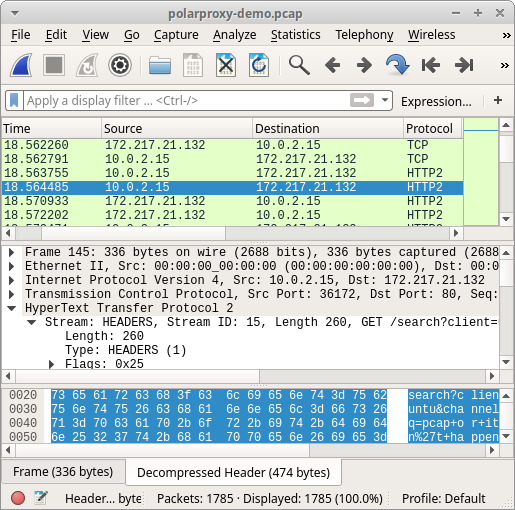
Image: Files extracted from ADT’s PCAP files that mach “Oracle” and “cer”.

In this recent campaign the attackers used X.509 certificates claiming to be from Oracle. The majory of the extracted certificates were exactly 1237 bytes long, so maybe they’re all identical? This is what the first extracted X.509 certificate looks like:

Self-signed Oracle America, Inc. X.509 certificate

The cert claims to be valid for a whopping 100 years!

Self-signed Oracle America, Inc. X.509 certificate

Self-signed, not trusted.

However, after opening a few of the other certificates it's clear that each C2 server is using a unique X.509 certificate. This can be quickly confirmed by opening the parameters tab in NetworkMiner Pro and showing only the Certificate Hash or Subject Key Identifier values.

NetworkMiner Parameters tab showing Certificate Hash values Image: Certificate Hash values found in Adwind RAT’s SSL traffic

I also noted that the CN of the certificates isn’t constant either; these samples use CN’s such as “Oracle America”, “Oracle Tanzania”, “Oracle Arusha Inc.”, “Oracle Leonardo” and “Oracle Heaven”.

The CN field is normally used to specify which domain(s) the certificate is valid for, together with any additinoal Subject Alternative Name field. However, Adwind RAT’s certificates don’t contain any domain name in the CN field and they don’t have an Alternative Name record. This might very well change in future versions of this piece of malware though, but I don’t expect the malware authors to generate a certificate with a CN matching the domain name used by each C2 server. I can therefore use this assumption in order to better hunt for Adwind RAT traffic.

But how do I know what public domain name the C2 server has? One solution is to use passive DNS, i.e. to capture all DNS traffic in order to do passive lookups locally. Another solution is to leverage the fact that the Adwind RAT clients use the Server Name Indication (SNI) when connecting to the C2 servers.

TLS Server Name (aka SNI) and Subject CN values don’t match for AdwindRAT Image: TLS Server Name (aka SNI) and Subject CN values don’t match for AdwindRAT

TLS Server Name (SNI) with matching Subject CN from Google Image: TLS Server Name (SNI) with matching Subject CN from Google.

My conclusion is therefore that Brad’s recommendations from 2015 are still pretty okay, even for the latest wave of Adwind RAT traffic. However, instead of looking for a fix CN string I’d prefer to use the following heuristics to hunt for this type of C2 traffic:

  • SSL traffic to non-standard SSL port
  • Self signed X.509 certificate
  • The SNI domain name in the Client Hello message does not match the CN or Subject Alternative Name of the certificate.

These heuristics will match more than just Adwind RAT traffic though. You’ll find that the exact same heuristics will also help identify other pieces of SSL-enabled malware as well as Tor traffic.

Posted by Erik Hjelmvik on Monday, 04 September 2017 19:01:00 (UTC/GMT)

Tags: #NetworkMiner#SSL#TLS#port#PCAP#PIPI#X.509#certificate#extract

Share: Facebook   Twitter   Reddit   Hacker News Short URL: https://netresec.com/?b=1798dc3


NetworkMiner 2.2 Released

NetworkMiner 2.2 = Harder Better Faster Stronger

NetworkMiner 2.2 is faster, better and stronger than ever before! The PCAP parsing speed has more than doubled and even more details are now extracted from analyzed packet capture files.

The improved parsing speed of NetworkMiner 2.2 can be enjoyed regardless if NetworkMiner is run in Windows or Linux, additionally the user interface is more responsive and flickers way less when capture files are being loaded.

User Interface Improvements

The keyword filter available in the Files, Messages, Sessions, DNS and Parameters tabs has been improved so that the rows now can be filtered on a single column of choice by selecting the desired column in a drop-down list. There is also an “Any column” option, which can be used to search for the keyword in all columns.

Keyword drop-down in NetworkMiner's Parameters tab

The Messages tab has also received an additional feature, which allows the filter keyword to be matched against the text in the message body as well as email headers when the “Any column” option is selected. This allows for an efficient analysis of messages (such as emails sent/received through SMTP, POP3 and IMAP as well as IRC messages and some HTTP based messaging platforms), since the messages can be filtered just like in a normal e-mail client.

We have also given up on using local timestamp formats; timestamps are now instead shown using the yyyy-MM-dd HH:mm:ss format with time zone explicitly stated.

Protocol Parsers

NetworkMiner 2.2 comes with a parser for the Remote Desktop Protocol (RDP), which rides on top of COTP and TPKT. The RDP parser is primarily used in order to extract usernames from RDP cookies and show them on the Credentials tab. This new version also comes with better extraction of SMB1 and SMB2 details, such as NTLM SSP usernames.

RDP Cookies extracted with NetworkMiner 2.2

One big change that has been made behind the scenes of NetworkMiner is the move from .NET Framework 2.0 to version 4.0. This move doesn’t require any special measures to be taken for most Microsoft Windows users since the 4.0 Framework is typically already installed on these machines. If you’re running NetworkMiner in Linux, however, you might wanna check out our updated blog post on how to install NetworkMiner in Linux.

We have also added an automatic check for new versions of NetworkMiner, which runs every time the tool is started. This update check can be disabled by adding a --noupdatecheck switch to the command line when starting NetworkMiner.

NetworkMiner.exe --noupdatecheck capturefile.pcap

NetworkMiner Professional

Even though NetworkMiner 2.2 now uses ISO-like time representations NetworkMiner still has to decide which time zone to use for the timestamps. The default decision has always been to use the same time zone as the local machine, but NetworkMiner Professional now additionally comes with an option that allows the user to select whether to use UTC (as nature intended), the local time zone or some other custom time zone for displaying timestamps. The time zone setting can be found in the “Tools > Settings” menu.

UPDATE: With the release of NetworkMiner 2.3 the default time zone is now UTC unless the user has specifically selected a different time zone.

The Port-Independent-Protocol-Detection (PIPI) feature in NetworkMiner Pro has been improved for more reliable identification of HTTP, SSH, SOCKS, FTP and SSL sessions running on non-standard port numbers.

CASE / JSON-LD Export

We are happy to announce that the professional edition of NetworkMiner 2.2 now has support for exporting extracted details using the Cyber-investigation Analysis Standard Expression (CASE) format, which is a JSON-LD format for digital forensics data. The CASE export is also available in the command line tool NetworkMinerCLI.

We would like to thank Europol for recommending us to implement the CASE export format in their effort to adopt CASE as a standard digital forensic format. Several other companies in the digital forensics field are currently looking into implementing CASE in their tools, including AccessData, Cellebrite, Guidance, Volatility and XRY. We believe the CASE format will become a popular format for exchanging digital forensic data between tools for digital forensics, log correlation and SIEM solutions.

We will, however, still continue supporting and maintaining the CSV and XML export formats in NetworkMiner Professional and NetworkMinerCLI alongside the new CASE format.

Credits

I would like to thank Sebastian Gebhard and Clinton Page for reporting bugs in the Credentials tab and TFTP parsing code that now have been fixed. I would also like to thank Jeff Carrell for providing a capture file that has been used to debug an issue in NetworkMiner’s OpenFlow parser. There are also a couple of users who have suggested new features that have made it into this release of NetworkMiner. Marc Lindike suggested the powerful deep search of extracted messages and Niclas Hirschfeld proposed a new option in the PCAP-over-IP functionality that allows NetworkMiner to receive PCAP data via a remote netcat listener.

Upgrading to Version 2.2

Users who have purchased a license for NetworkMiner Professional 2.x can download a free update to version 2.2 from our customer portal.

Those who instead prefer to use the free and open source version can grab the latest version of NetworkMiner from the official NetworkMiner page.

Posted by Erik Hjelmvik on Tuesday, 22 August 2017 11:37:00 (UTC/GMT)

Tags: #pcap#CASE#PIPI#HTTP#SOCKS#FTP#SSL#port#forensics

Share: Facebook   Twitter   Reddit   Hacker News Short URL: https://netresec.com/?b=17888cb

2015 October

Port Independent Protocol Detection

2015 January

Chinese MITM attack on outlook.com

2014 October

Verifying Chinese MITM of Yahoo

2014 September

Analysis of Chinese MITM on Google

X / twitter

NETRESEC on X / Twitter: @netresec

Mastodon

NETRESEC on Mastodon: @netresec@infosec.exchange