
Gh0stKCP Protocol
Gh0stKCP is a transport protocol based on KCP, which runs on top of UDP. Gh0stKCP has been used to carry command-and-control (C2) traffic by malware families such as PseudoManuscrypt and ValleyRAT/Winos4.0.

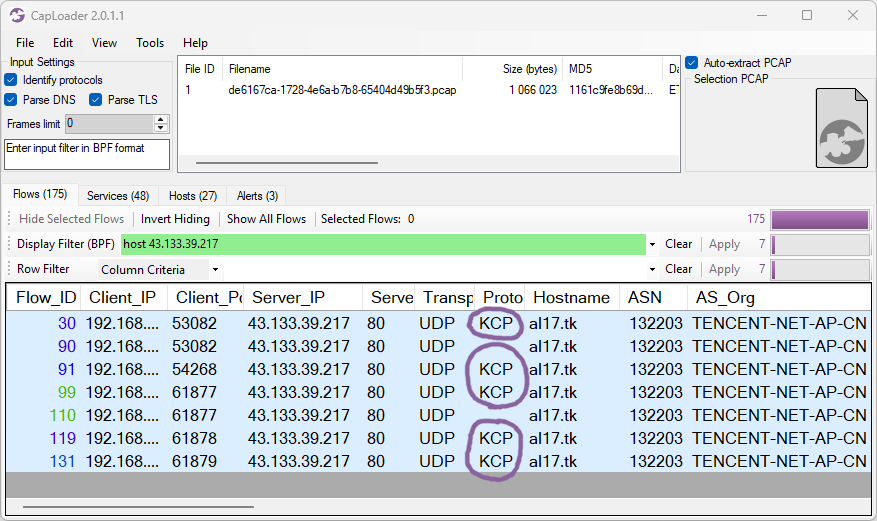
@Jane_0sint recently tweeted about ValleyRAT using a new UDP based C2 protocol. I wanted to take a closer look at the protocol, so I downloaded the PCAP from any.run and opened it with CapLoader. To my surprise CapLoader claimed that the C2 traffic was using a known protocol called “KCP”.
The protocol detection feature in CapLoader compares traffic in TCP and UDP sessions to statistical models of known protocols. This means that no protocol specification or RFC is required to identify a protocol. All that is needed is some example traffic to build a protocol model from (see this XenoRAT detection video for a demonstration of this feature). In this case CapLoader’s KCP protocol model was built from UDP based C2 traffic from PseudoManuscrypt, which was reported to have been using KCP.
What is KCP?
KCP is a UDP based protocol designed as a low-latency alternative to TCP. The protocol was created by Lin Wei in the early 2010s, primarily to transport p2p voice chat audio in games. The protocol is, however, very generic and can be used to transport basically any type of data. The KCP protocol specification includes the following packet structure:
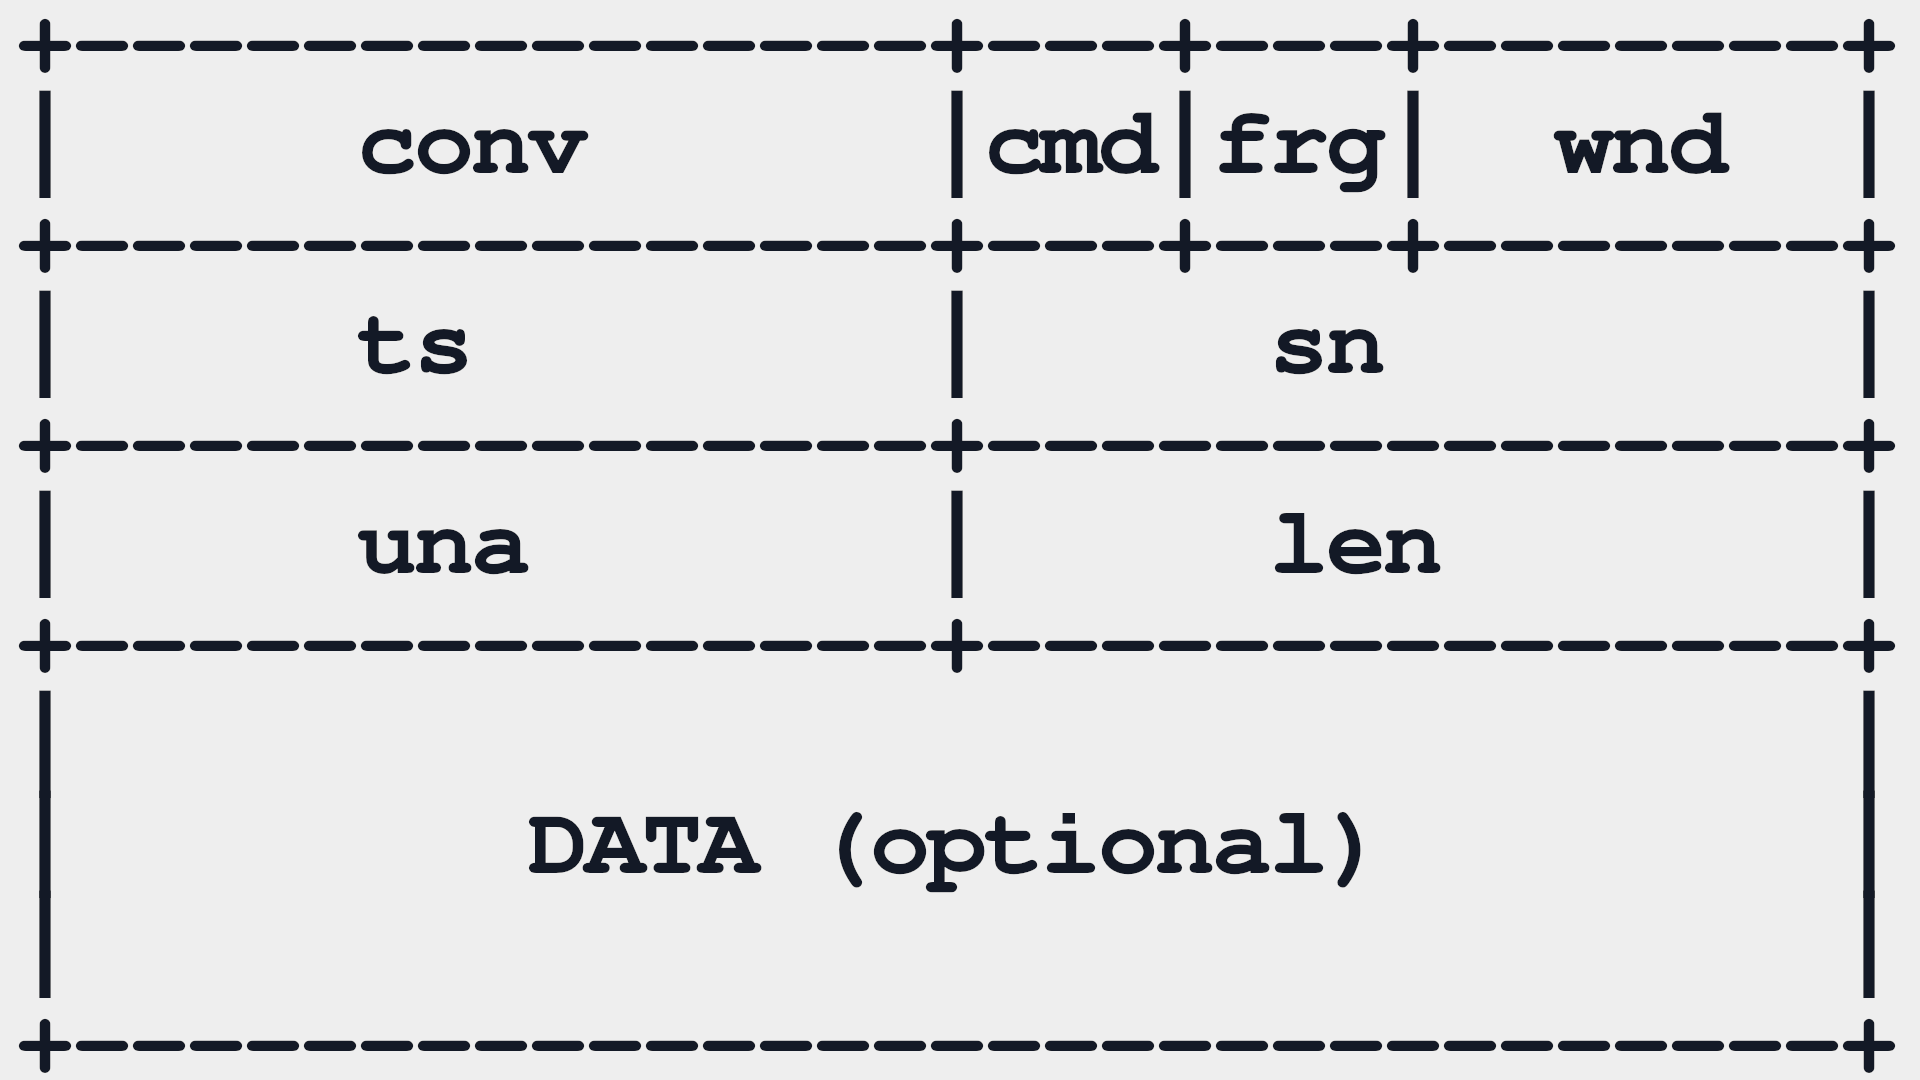
The first field “conv” is a 32 bit (4 byte) unique ID for a KCP session. This conversation ID is used to uniquely identify a connection and will remain constant throughout the connection. KCP doesn’t include any handshake mechanism for establishing new sessions, which means that KCP endpoints typically start transmitting payload data already in the first KCP packet.
The Gh0stKcp Protocol
The UDP based KCP C2 protocol used by PseudoManuscrypt as well as the ValleyRAT C2 traffic that CapLoader reported being “KCP” both deviated from the original KCP specification in several ways. For instance, KCP packets have a 24 byte header, which means that packets shorter than 24 bytes can’t be KCP. In fact, the KCP source code actually ignores UDP packets that carry less than 24 bytes of payload. Yet, both the PseudoManuscrypt and ValleyRAT UDP C2 traffic initially transmit several 12-byte packets.
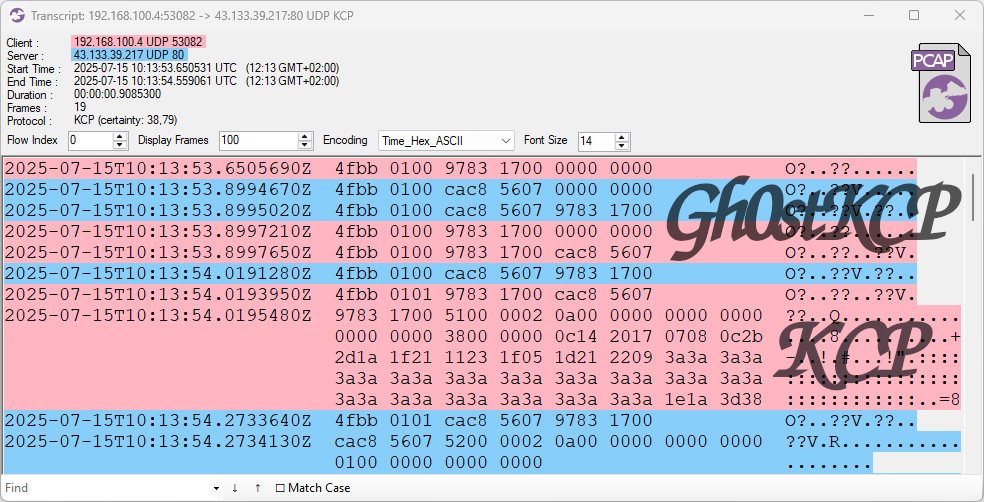
Image:Flow transcript of Gh0stKCP traffic in CapLoader
These 12-byte Gh0stKCP handshake packets are generated by an open source library called HP-Socket, which includes a custom Automatic Repeat reQuest (ARQ) handshake mechanism.
The following behavior can be deduced by examining UDP traffic from Valley RAT or by analyzing the UDP handshake mechanism in HP-Socket's ArqHelper.h.
The client (bot) starts by sending an empty UDP packet to the C2 server, followed by a UDP packet carrying a 12 byte payload structured like this:
The first four bytes can be decoded as follows:
- 4f bb = Magic bytes
- 01 = Handshake command
- 00 = Handshake is not completed
The “xx” bytes represent a KCP conversation ID (conv) proposed by the bot. This initial handshake packet can easily be detected and alerted on with the following Suricata IDS signature:
The C2 server also transmits a UDP packet containing a 12 byte handshake using the exact same structure as the client. However, the C2 server proposes a 32 bit conversation ID of its own. In “normal” KCP implementations the client and server agree on a single shared conversation ID, but Gh0stKCP actually uses one separate ID for each direction. This allows the server to transmit its handshake packet without having seen the client’s handshake.
The “yy” bytes represent the C2 server’s 32-bit conversation ID (conv).
The communicating parties frequently re-transmit this initial handshake packet until they have received a handshake from the other end.
Upon receiving the other end’s handshake both the bot and C2 server acknowledge the other end’s conversation ID with a UDP packet carrying the following 12 byte payload:
Where “xx” is the sender’s conversation ID and “yy” is the other end’s conversation ID. After having received the other end’s acknowledgment packet both parties additionally transmit a final ack packet, indicating that the handshake is completed and they will start communicating using KCP. This final ack packet is identical to the previous one, except the fourth byte (handshake complete flag) has changed from 0x00 to 0x01.
From this point on Gh0stKCP communicates using the KCP protocol, with the exception that each end transmits packets using their own conversation ID rather than a common ID. The KCP traffic that follows can therefore be parsed and inspected in Wireshark with help of a KCP Lua parser, such as CandyMi’s kcp_dissector.lua.
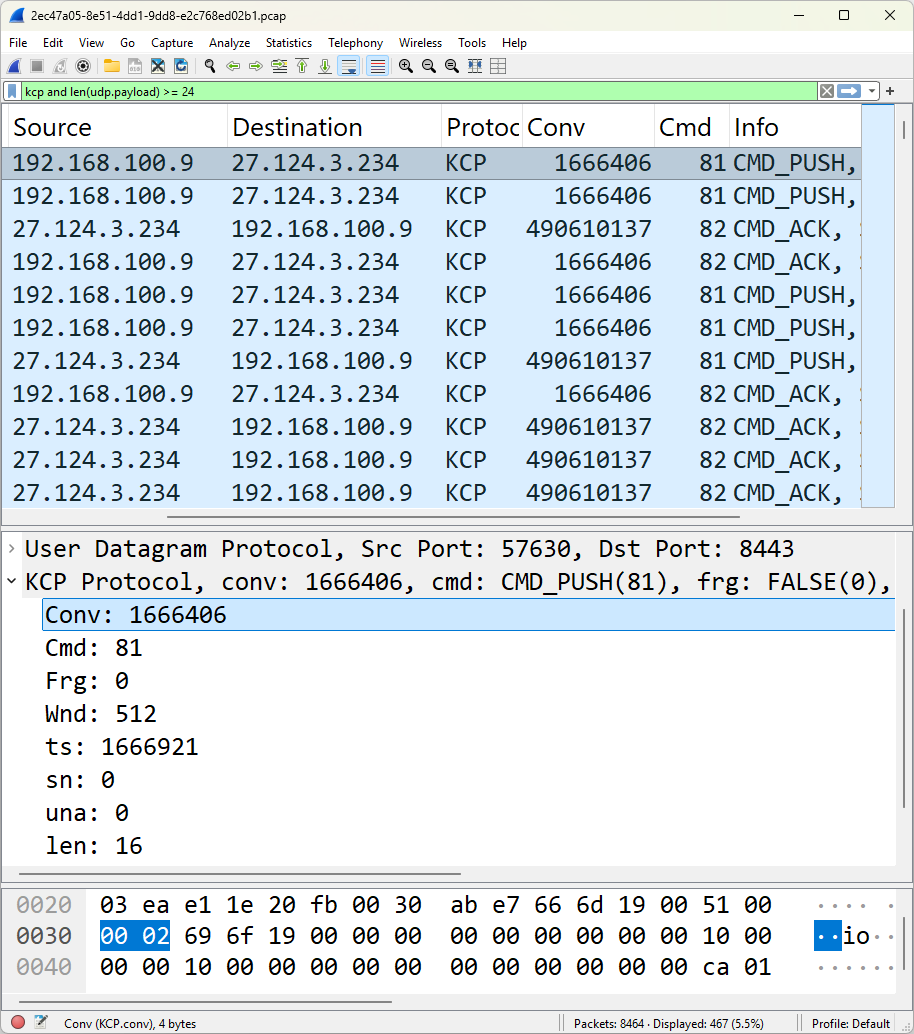
Image: KCP traffic from ValleyRAT sample any.run in Wireshark
Finally, the Gh0stKCP session is terminated by sending a UDP packet containing the following hard coded 16 bytes:
This unique byte sequence is defined in HP-Socket as s_szUdpCloseNotify, which can be detected with the following Suricata IDS signature:
Hole Punching in NAT Firewalls
The elaborate handshake procedure used by Gh0stKCP introduces a significant delay before the C2 session is established. The handshake takes up to 500ms to complete, which is much slower than a normal TCP 3-way handshake. KCP is typically used because of its low-latency properties, but the handshake routine ruins any chance for quick establishment of Gh0stKCP sessions.
The intricate ARQ handshake routine does, however, allow for hole punching in firewalls, aka “NAT traversal”, which enables the protocol to be used for peer-to-peer communication. This p2p-enabling property could potentially be used to relay C2 communication through one or several bots, even if those bots are behind separate NAT firewalls.
Detecting Gh0stKCP with Snort and YARA
CapLoader can detect when the KCP protocol is used. However, only a few security analysts have a CapLoader license. We have therefore decided to release Surucata signatures and a YARA rule that can be used to detect Gh0stKCP.
The Suricata signatures included in this blog post can also be downloaded from here:
https://github.com/Netresec/Suricata/blob/main/netresec.rules
Our Gh0stKCP YARA rule is based on Steve Miller’s “RareEquities_KCP” rule, from Mandiant’s 2020 blog post APT41 Initiates Global Intrusion Campaign Using Multiple Exploits. Steve’s original YARA rule provides generic detection of software that uses the original KCP library. We’ve extended that rule to also look for HP-Socket’s characteristic 16-byte close command.
https://github.com/Netresec/YARA/blob/main/Gh0stKCP.yar
IOC List
Many of the IOCs in the list below are old, which is why you might not want to use them for alerting. They are included here primarily for researchers and analysts who wish to perform retrohunting to discover malware samples that use GhostKCP.
2021 (PseudoManuscrypt)
- UDP 34.64.183.91:53
- UDP 34.97.69.225:53
- UDP 160.16.200.77:53
- UDP 167.179.89.78:53
- UDP 185.116.193.219:53
- UDP 198.13.62.186:53
- UDP email.yg9[.]me:53
- UDP facebook.websmails[.]com:53
- UDP google.vrthcobj[.]com:53
2022 (PseudoManuscrypt)
- UDP 34.142.181.181:53
2025 (ValleyRAT / Winos4.0)
- UDP 27.124.3.234:8443
- UDP 43.133.39.217:80
- UDP al17[.]tk:80
- UDP xiaoxiao.fenghua678.eu[.]cc:8443
Attribution
Use of ValleyRAT is often attributed to the APT group Silver Fox
Posted by Erik Hjelmvik on Wednesday, 24 September 2025 09:40:00 (UTC/GMT)

 Image: Kibana showing HTTP traffic info from decrypted HTTPS sessions
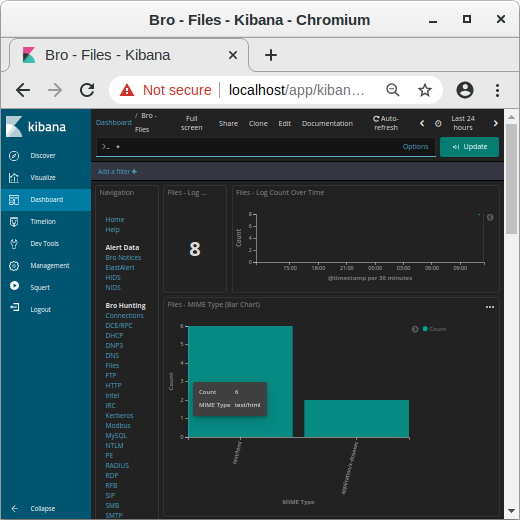 Image: MIME types in Kibana
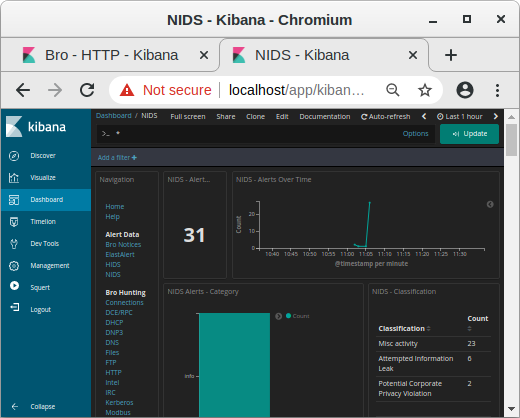 Image: NIDS alerts from payload in decrypted traffic shown in Kibana
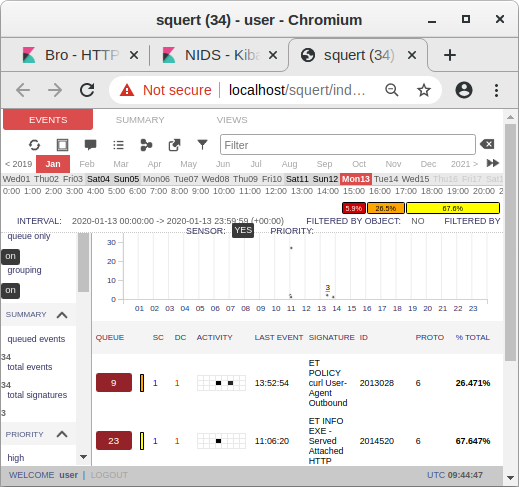 Image: Snort alerts from decrypted traffic shown in Squert


