NETRESEC Network Security Blog - Tag : TLS

rss Google News

How to Inspect TLS Encrypted Traffic

Do you want to analyze decrypted TLS traffic in Wireshark or let an IDS, like Suricata, Snort or Zeek, inspect the application layer data of potentially malicious TLS encrypted traffic? There are many different TLS inspection solutions to choose from, but not all of them might be suitable for the specific challenge you’re facing. In this blog post I describe three different methods for decrypting TLS and explain when to use one or the other.

RSA Private Key TLS Key Log TLS Inspection Proxy
Works for all ciphers No (DHE cipher suites not supported) Yes Yes
TLS 1.3 supported No Yes Yes
Zero client configuration required Yes No (pre-master secrets must be logged or extracted from TLS libraries) No (root CA certificate must be installed)
Decrypts traffic from any application No (most applications use modern ciphers with forward secrecy, which RSA doesn’t provide) No (each method for TLS key extraction typically only supports a specific set of applications or TLS libraries) No (apps that use certificate pinning or a custom certificate trust store cannot be intercepted without patching the app)
L7 traffic in PCAP files can be analyzed without decrypting TLS No No Yes
Allows decrypted traffic to be mirrored to a network interface No No Yes

RSA Private Key

TLS decryption with a private RSA key was for a long time the preferred method for inspecting SSL and TLS traffic. This approach allowed anyone with access to the server’s private RSA key to decrypt the traffic and inspect the application layer (L7) communication.

The primary drawback with RSA private key decryption is that a stolen or leaked private RSA key can be used by an attacker to decrypt all previously captured traffic from that server, if RSA key exchange is being used. Modern TLS stacks have therefore deprecated such ciphers in favor of ones that support forward secrecy, which typically perform an ephemeral Diffie–Hellman (DHE) key exchange instead of reusing the same private RSA key over and over. This means that the RSA private key decryption method cannot be used if the client and server are using a key exchange algorithm that supports forward secrecy.

RSA private key decryption can only be performed when all these conditions are met:

  • The protocol version is SSL 3.0, TLS 1.0, TLS 1.1 or TLS 1.2 (RSA was removed in TLS 1.3)
  • The server has selected a cipher suite that use RSA key exchange, such as TLS_RSA_WITH_AES_256_GCM_SHA384, TLS_RSA_WITH_AES_128_GCM_SHA256, TLS_RSA_WITH_AES_256_CBC_SHA256, TLS_RSA_WITH_AES_128_CBC_SHA256, TLS_RSA_WITH_AES_256_CBC_SHA or TLS_RSA_WITH_AES_128_CBC_SHA
  • The private key matches the server certificate (traffic cannot be decrypted with a client certificate or an intermediate or root certificate)
  • The session has not been resumed (the handshake must include a Client Key Exchange message)

This Wireshark display filter can be used to check if the server has selected an RSA cipher:

tls.handshake.type == 2 and tls.handshake.ciphersuite in {10,47,53,60,61,156,157}

You can check for a client key exchange message with:

tls.handshake.type == 16

A private RSA key can be loaded into Wireshark by clicking Edit, Preferences and RSA Keys. Another alternative is to use the command line tool tshark’s -ouat:rsa_keys switch like this:

tshark -r tls.pcap -ouat:rsa_keys:'"/path/rsa.key",""'

TLS Key Log

Wireshark can decrypt the TLS layer in captured network traffic if the pre-master secrets used to establish the encrypted connection are provided. These secrets, or encryption key material, can be loaded into Wireshark from an SSLKEYLOGFILE by clicking Edit, Preferences, Protocols, TLS, and setting the (Pre)-Master-Secret log filename to the path of your SSLKEYLOGFILE.

Wireshark SSLKEYLOGFILE

Another alternative is to encode the key material as metadata in a pcap-ng file with editcap like this:

editcap --inject-secrets tls,SSLKEYLOG.txt tls.pcap tls-and-keys.pcapng

The primary drawback with the TLS key log decryption method is that only Wireshark and tshark can be used to analyze the decrypted TLS traffic. You also need to get hold of the keys or pre-master secrets in order to perform the decryption. Some applications, such as Firefox, Chrome and curl, can be configured to export a key log. Another alternative is to install an agent that extracts key material from specific TLS libraries.

The limitation of only being able to extract keys from a specific set of applications or TLS libraries makes the TLS key log method unsuitable for analyzing TLS encrypted C2 traffic from malware, which often use custom TLS libraries. It is also difficult to send decrypted TLS traffic to an IDS or a network security monitoring tool using a TLS key log. If you, on the other hand, want to analyze network traffic from your own Firefox or Chrome browser in Wireshark, then the TLS key log approach is probably the best solution.

TLS Inspection Proxy

A TLS inspection proxy acts as a man-in-the-middle that intercepts and decrypts TLS traffic for inspection, it then re-encrypts the traffic and forwards it to the intended destination.

TLS inspection proxy

A major advantage of using a TLS inspection proxy is that decrypted TLS traffic can be analyzed from applications even if they use modern ciphers with forward secrecy and don’t support logging of TLS keys. The drawback, however, is that clients have to trust the root CA certificate that the proxy is using.

TLS inspection proxies often differ in how they make the decrypted traffic available to external tools, if at all. In fact, many TLS inspection proxies and Next-Generation Firewalls (NGFW) only make the decrypted payload available to the internal application or appliance. Such an approach prevents analysis of the decrypted traffic with an external tool, like Wireshark, Snort, Suricata, Zeek or NetworkMiner.

Another approach, used by proxies like mitmproxy, is to save a TLS key log for all proxied traffic. That approach allows captured TLS traffic to or from the proxy to be decrypted and inspected with Wireshark, but the application layer traffic cannot be inspected with other tools that don’t support TLS decryption using a key log.

The third and most integration friendly approach is to save the decrypted traffic in clear text form, so that other applications can inspect the unencrypted traffic without having to decrypt TLS. Some TLS proxies, like PolarProxy and SSLsplit, can even save the decrypted traffic to a PCAP file. Decrypted TLS traffic in PCAP format can easily be ingested into other tools or be replayed to a network interface for inspection by an external security appliance.

Best Practices

The list below can be used to select the best suited TLS inspection method for the particular challenge you’re tasked with.

I want to...

  • Inspect traffic from my browser.

    Use TLS key log to inspect traffic from Firefox, Chrome and curl. Use a TLS inspection proxy for other browsers.

  • Inspect traffic to my HTTPS website.

    Use RSA private key inspection if it is acceptable to use an older TLS version and less secure ciphers. Use a TLS key log if your web server can be configured to export one or if you have an agent based key extraction solution that supports the TLS library used by the web server. Use a TLS inspection proxy if you want to inspect the traffic with something other than Wireshark.

  • Inspect potentially malicious TLS traffic with an IDS or security appliance.

    Use a TLS inspection proxy.

  • Inspect traffic from my operating system.

    Use a TLS inspection proxy.

  • Inspect traffic from my mobile phone, smart device or other embedded device.

    Use a TLS inspection proxy.

  • Inspect traffic from a proprietary game, app or service.

    Use a TLS inspection proxy.

Posted by Erik Hjelmvik on Wednesday, 07 August 2024 11:40:00 (UTC/GMT)

Tags: #TLS#TLS Inspection#PolarProxy#SSLKEYLOGFILE#Wireshark#PCAP

Short URL: https://netresec.com/?b=248b1db


PolarProxy 1.0 Released

I am thrilled to announce the release of PolarProxy version 1.0 today! Several bugs that affected performance, stability and memory usage have now been resolved in our TLS inspection proxy. PolarProxy has also been updated with better logic for importing external root CA certificates and the HAProxy implementation has been improved. But the most significant addition in the 1.0 release is what we call the “TLS Firewall” mode.

TLS Firewall

PolarProxy now supports rule based logic for determining if a session should be allowed to pass through, get blocked or if the TLS encrypted data should be inspected (i.e. decrypted and re-encrypted) by the proxy. This rule based logic can be used to turn PolarProxy into a TLS firewall. As an example, the ruleset-block-malicious.json ruleset included in the new PolarProxy release blocks traffic to malicious domains in abuse.ch’s ThreatFox IOC database as well as traffic to web tracker domains listed in the EasyPrivacy filter from EasyList. This ruleset also includes an allow list in order to avoid accidentally blocking access to legitimate websites.

PolarProxy TLS Firewall - block malicious, inspect suspicious, bypass legitimate

PolarProxy’s ruleset logic isn’t limited to just domain names. It is also possible to match traffic based on JA3 or JA4 hashes as well as application layer protocol information provided in the ALPN extension of a client’s TLS handshake.

For more information on the ruleset format and how to use PolarProxy as a TLS firewall, see here:
https://www.netresec.com/?page=TlsFirewall

Linux, macOS and Windows builds of the new PolarProxy release can be downloaded from here:
https://www.netresec.com/?page=PolarProxy

Posted by Erik Hjelmvik on Thursday, 02 May 2024 07:00:00 (UTC/GMT)

Tags: #PolarProxy#TLS#inspect#bypass#ThreatFox#ASCII-art

Short URL: https://netresec.com/?b=2451e98


TLS Redirection and Dynamic Decryption Bypass in PolarProxy

PolarProxy is constantly being updated with new features, enhanced performance and bug fixes, but these updates are not always communicated other than as a short mention in the ChangeLog. I would therefore like to highlight a few recent additions to PolarProxy in this blog post.

Custom TLS Redirection

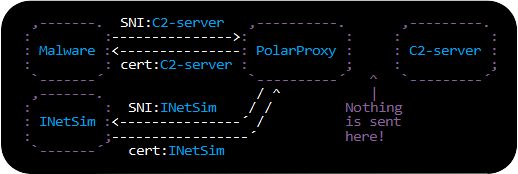
One new feature in PolarProxy is the --redirect argument, which can be used to redirect TLS traffic destined for a specific domain name to a different domain. This feature can be used to redirect TLS-encrypted malware traffic going to a known C2 domain to a local HTTPS sandbox instead, for example INetSim.

PolarProxy --redirect malware-c2.com:inetsim.local --leafcert noclone

This --redirect argument will cause PolarProxy to terminate outgoing TLS traffic to malware-c2.com and redirect the decrypted traffic into a new TLS session going to inetsim.local instead. The “--leafcert noclone” argument forces PolarProxy to generate a fake X.509 certificate for “malware-c2.com” rather than sending a clone of the certificate received from the INetSim server to the malware implant.

Note: You also need to specify a proxy mode, such as -p for transparent proxy or --socks for SOCKS proxy, to make the command above work.
PolarProxy TLS redirect

The --redirect argument can also be used to perform domain fronting, which is a clever method for hiding the true destination of HTTPS based communication, in order to circumvent censorship or for other reasons conceal who you’re communicating with. The following command can be used to set up a local socks proxy that redirects traffic destined for YouTube to google.com instead:

PolarProxy --socks 1080 --redirect youtube.com,www.youtube.com,youtu.be:google.com

A browser configured to use PolarProxy as a SOCKS proxy will send HTTPS requests for youtube.com to PolarProxy, which then decrypts the TLS layer and re-encrypts the HTTP communication in a new TLS session directed at google.com instead. Someone who monitors the outgoing traffic from PolarProxy will assume that this is normal Google traffic, since the SNI as well as certificate will be for google.com. On the server side however, after having decrypted the TLS layer, Google will kindly forward the client’s original HTTP request for youtube.com to an endpoint that serves the content for YouTube.

Dynamic TLS Decryption Bypass

PolarProxy is designed to block TLS connections that it can’t decrypt, except for when the server’s domain name is explicitly marked for decryption bypass with the “--bypass” command line argument. However, as of recently PolarProxy also supports dynamic TLS decryption bypass using a form of fail-open mode. When this fail-open mode is enabled, PolarProxy attempts to intercept and decrypt proxied TLS traffic, but allows connections to bypass decryption if the same client-server pair has previously rejected PolarProxy’s certificate. This method is convenient when monitoring network traffic from applications that enforce certificate pinning or for some other reason can’t be configured to trust PolarProxy’s root CA – provided that it’s acceptable to let traffic that can’t be decrypted to pass through untouched rather than blocking it, of course.

The following command line option configures PolarProxy to allow new TLS connections to bypass decryption for one hour (3600 seconds) after previously having failed to decrypt traffic between the same client and server.

--bypassonfail 1:3600

A simple way to verify this fail-open feature is to do a simple test with curl. It doesn’t matter if the client you’re testing on is Windows, Linux or macOS, since PolarProxy as well as curl is available for all three platforms.

PolarProxy --bypassonfail 1:3600 --socks 1080
curl --socks4 localhost -I https://example.com
curl: (60) SSL certificate problem: unable to get local issuer certificate

curl --socks4 localhost -I https://example.com
HTTP/2 200
content-encoding: gzip
accept-ranges: bytes
age: 593298
cache-control: max-age=604800
content-type: text/html; charset=UTF-8
date: Mon, 27 Feb 2023 14:29:46 GMT
etag: "3147526947"
expires: Mon, 06 Mar 2023 14:29:46 GMT
last-modified: Thu, 17 Oct 2019 07:18:26 GMT
server: ECS (nyb/1DCD)
x-cache: HIT
content-length: 648

Web browsers that don’t trust PolarProxy’s root CA will display a certificate warning the first time they visit a website that PolarProxy tries to decrypt traffic for.

Firefox certificate warning

But once the dynamic bypass has kicked in the user will no longer see a certificate warning when visiting the same website again, since traffic between that client and server is now end-to-end encrypted.

Handling of non-TLS traffic and Better Logging

Other new features in PolarProxy is the “--nontls” argument, which can be used to specify how to handle connections that doesn’t use TLS. The default action is to block non-TLS connections, but they can also be allowed to pass through (if the target host is known) or to forward the connection to a specific host and port. There is even a “--nontls encrypt” argument, which can be used to encrypt traffic that isn’t already TLS-encrypted before forwarding it to a specific host. This feature can be used as an alternative to stunnel to wrap traffic from applications that lack TLS support inside a TLS tunnel.

PolarProxy now also produces less output to stdout, unless -v is used, and error messages have been improved to be more specific and easier to understand.

Posted by Erik Hjelmvik on Tuesday, 28 February 2023 13:42:00 (UTC/GMT)

Tags: #PolarProxy#TLS#redirect#bypass#SNI#ASCII-art

Short URL: https://netresec.com/?b=23275c9


CapLoader 1.9.4 Released

CapLoader 1.9.4

A new version of our advanced PCAP filtering tool CapLoader was released today. The new CapLoader 1.9.4 release includes features like JA3 hash extraction from TLS traffic and a fantastic thing called Select Similar Flows, which is a unique feature that you will only find in CapLoader! We have also included a VXLAN parser, so that flows tunneled inside of overlay networks can be presented directly in the CapLoader GUI.

Select Similar Flows or Services

If you right-click a flow or service in CapLoader you’ll now be presented with an option to “select similar flows” (or services). This feature causes CapLoader to read through the loaded PCAP files again in order to find other flows that are similar to the one that was right-clicked. CapLoader doesn’t care about IP addresses or port numbers when assessing this similarity. Instead it looks at behavioral patterns in the traffic itself, such as packet sizes and byte patterns. In practice, this feature will select flows that are communicating using the same protocol as the one you clicked, regardless of which port it runs on. CapLoader already comes with an advanced feature for doing port-independent protocol identification, which currently detects over 170 protocols. But the “select similar” feature can even be used to find odd or proprietary protocols that aren’t in CapLoaders protocol database.

There is also a feature called “select VERY similar flows” which, instead of searching for flows with the same protocol, looks for flows with the same implementation or dialect of that particular protocol. This feature can be used to single out the network traffic of a particular software or tool from a haystack of network traffic from multiple applications, which all run the same application layer protocol. Another use case is to find additional malicious C2 sessions that run on top of a standard protocol like HTTP, TLS or DNS – provided that you’ve located at least one such malicious flow or service.

JA3 and JA3S Hashes for TLS Flows

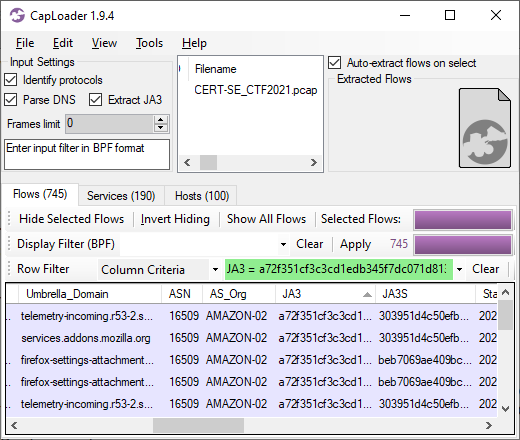
We added JA3 extraction to NetworkMiner back in 2019, with the release of NetworkMiner 2.5. It’s now time to bring this useful little TLS fingerprinting feature into CapLoader as well. As of version 1.9.4 CapLoader attempts to extract JA3 and JA3S hashes from all TCP flows. The JA3 and JA3S hashes are presented in the Flows and Services tabs as separate columns. This allows users to filter flows based on a JA3 hash directly in CapLoader instead of having to export a filtered PCAP to an external tool to calculate JA3 hashes.

CapLoader with Column Critera filter for JA3 hash

Image: Column criteria filter “JA3 = a72f351cf3c3cd1edb345f7dc071d813” on PCAP from CERT-SE’s 2021 CTF.

Extraction of Flows Inside of VXLAN Tunnels

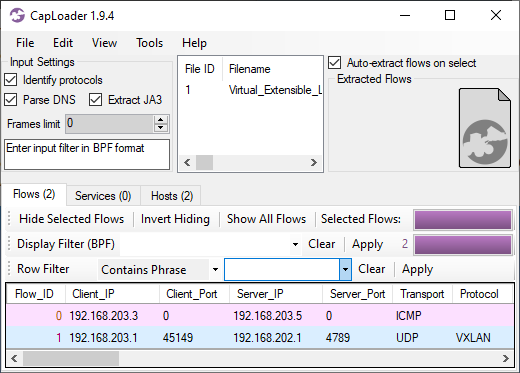
VXLAN is a network virtualization technology that can be used to create overlay networks, where Ethernet frames are encapsulated inside of UDP packets (see RFC 7348). The UDP port used for VXLAN is 4789 or 8472. We added support for VXLAN to NetworkMiner in 2017, but CapLoader has until now only presented the VXLAN tunnels in the GUI when VXLAN traffic is loaded. We’re happy to announce that CapLoader now extracts flows for the VXLAN tunnels and the traffic inside of those tunnels.

ICMP flow extracted from VXLAN tunnel

Image: ICMP flow extracted from VXLAN tunnel. PCAP file is Virtual_Extensible_LAN-VXLAN.pcap from Xena Networks

Additional GUI Improvements

We’ve also made several minor improvements to CapLoader’s user interface, such as a “Save Visible Flows” option on the File menu, which can be used to save the filtered traffic in the current view to a PCAP file. Another nice addition is the “Copy from Selected Rows” menu option, which can be used to copy text from a particular column.

CapLoader’s OSINT lookup context menus have also been updated to include some very useful services like Feodo Tracker, Hatching Triage and IPVoid.

Free Trial versus Full Version

Many of the new additions to CapLoader are only available in the full version, but the VXLAN extraction and some of the GUI additions are also available in the free trial version of CapLoader. No registration is required to download the trial — just download, extract and run for 30 days. If you like it, then please consider purchasing the full version!

Updating to the Latest Release

Users who have already purchased a license for CapLoader can download a free update to version 1.9.4 from our customer portal.

Posted by Erik Hjelmvik on Thursday, 16 June 2022 11:44:00 (UTC/GMT)

Tags: #CapLoader#JA3#JA3S#Protocol Identification#Protocol Detection#PCAP#TLS#VXLAN

Short URL: https://netresec.com/?b=226917b


PolarProxy in Windows Sandbox

In this video I demonstrate how PolarProxy can be run in a Windows Sandbox to intercept and decrypt outgoing TLS communication. This setup can be used to inspect otherwise encrypted traffic from malware or suspicious Windows applications, which communicate over HTTPS or some other TLS encrypted protocol.

The Windows Sandbox WSB file used in the demo can be downloaded from here: https://www.netresec.com/?download=PolarProxySandbox

Note: Windows Pro or Enterprise is required to run WSB files

Parsing Decrypted TLS Traffic with NetworkMiner

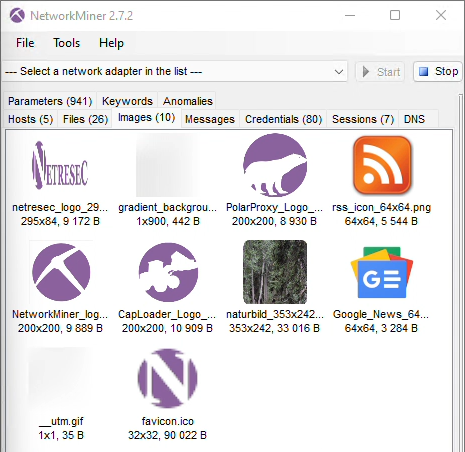
This sandbox also includes NetworkMiner, primarily because it can be used to read a real-time PCAP-over-IP stream with decrypted traffic from PolarProxy. As shown in the video, this feature can be used in order to extract files, images or parameters from the decrypted TLS traffic in near real-time.

Images extracted from decrypted HTTP/2 traffic shown in NetworkMiner

For more info about how to run NetworkMiner in Windows Sandbox, please see our blog post Running NetworkMiner in Windows Sandbox.

Configuring a Proxy Server in Windows Sandbox

Windows’ built-in proxy settings are unfortunately not available in Windows Sandbox, which is why I installed a third-party proxy client that redirects all outgoing network traffic to PolarProxy’s SOCKS server. I used Proxifier in the video, which has the additional benefit of being able to redirect all traffic to the proxy, even from applications that aren’t proxy aware. This feature is crucial when attempting to intercept and decrypt TLS traffic from malware that doesn’t respect the proxy settings configured in the operating system.

Command Log

Start PolarProxy with a PCAP-over-IP listener on TCP 57012, SOCKS server on TCP 1080, HTTP proxy on 8080 and a transparent TLS proxy on port 443:

PolarProxy --pcapoverip 57012 -x ..\proxyroot.cer --socks 1080 --httpconnect 8080 --nontls allow -p 443,80

Test PolarProxy’s SOCKS server by sending an unencrypted HTTP request through the proxy:

curl --socks4 localhost http://www.netresec.com

Test PolarProxy’s SOCKS server by sending an HTTPS request through the proxy:

curl --insecure --socks4 localhost https://www.netresec.com

Test PolarProxy’s HTTP CONNECT proxy server by sending an HTTPS request through the proxy:

curl --insecure --proxy localhost:8080 https://www.netresec.com

Start Menu Search

As shown in the video, text typed into Windows’ start menu gets sent to Microsoft. For more information about this behavior, and how it can be disabled, check out our Start Menu Search video and blog post.

Posted by Erik Hjelmvik on Monday, 31 January 2022 09:50:00 (UTC/GMT)

Tags: #PolarProxy#NetworkMiner#SOCKS#proxy#Windows Sandbox#Sandbox#PCAP-over-IP#pcapoverip#Windows#TLS#HTTPS

Short URL: https://netresec.com/?b=221d46b


PolarProxy 0.9 Released

PolarProxy 0.9

PolarProxy was previously designed to only run as a transparent TLS proxy. But due to popular demand we’ve now extended PolarProxy to also include a SOCKS proxy and a HTTP CONNECT proxy. PolarProxy automatically decrypts all proxied SSL and TLS traffic, regardless if the remote server is running on TCP 443 or some other port, as long as the traffic passes through PolarProxy. As from now we also release a Windows build of PolarProxy, alongside the Linux x64, ARM and ARM64 builds.

SOCKS Proxy

Use the command line argument “--socks [port]” to start PolarProxy’s SOCKS proxy server. This SOCKS proxy supports multiple versions of the SOCKS protocol, including SOCKS 4, SOCKS 4a, SOCKS 5 and SOCKS 5h.

As an example, the command below starts a SOCKS server on TCP port 1080 and passes a copy of the decrypted TLS traffic as a PCAP stream to tshark.

PolarProxy --socks 1080 -w - | tshark -r - -d tcp.port==443,http2
Note: The “-d tcp.port==443,http2” argument in the command above is used to tell tshark to parse traffic to port 443 as HTTP/2 instead of TLS. An alternative method would be to instead configure PolarProxy to output decrypted 443 traffic as if it was port 80, by supplying the “-p 443,80” argument to PolarProxy.

You can then use curl to run some HTTPS traffic through the SOCKS proxy:

curl --insecure --socks4 localhost https://www.netresec.com

After doing this you should see the decrypted HTTP/2 traffic in tshark’s output.

HTTP CONNECT Proxy

We’ve also added a HTTP proxy to PolarProxy 0.9, but it only supports the CONNECT request method. This means that normal unencrypted HTTP requests, like GET or POST requests, will be rejected by PolarProxy. Most web traffic is TLS encrypted nowadays anyway, so we don't consider this limitation to be a big issue.

The HTTP CONNECT proxy service is activated with the “--httpconnect” argument. Decrypted TLS traffic from PolarProxy’s HTTP CONNECT proxy can be forwarded to tshark just like in the SOCKS example, but the traffic from these proxies can also be accessed through PCAP-over-IP like this:

PolarProxy --httpconnect 8080 -p 443,80 --pcapoverip 57012

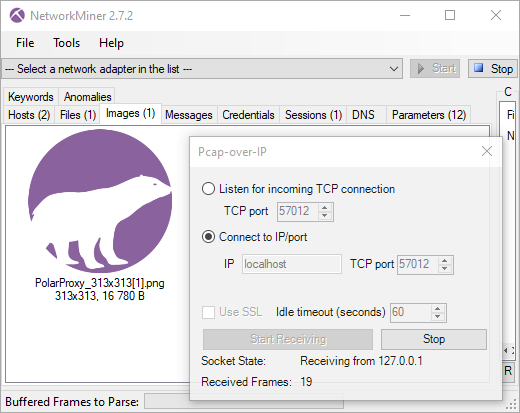
You can then connect to PolarProxy’s PCAP-over-IP service with NetworkMiner by clicking File, Receive PCAP over IP, select “Connect to IP/port”, enter “localhost” and click the “Start Receiving” button. You’ll now be able to see a real-time feed of all the traffic that PolarProxy decrypts. As an example, let’s download the PolarProxy logo over HTTPS to see if NetworkMiner can extract it from PolarProxy’s decrypted PCAP-over-IP stream:

curl --insecure --proxy localhost:8080 https://www.netresec.com/images/PolarProxy_313x313.png

The PolarProxy logo immediately shows up in NetworkMiner’s images tab:

NetworkMiner reading PCAP-over-IP from PolarProxy

Port-Independent TLS Protocol Detection

When PolarProxy is running as a transparent TLS proxy all incoming traffic can be expected to be TLS. But that’s not the case when, for example, PolarProxy is running as a SOCKS proxy. We have therefore added port-independent TLS protocol detection for proxied traffic, so that TLS traffic can be detected and decrypted even when it runs on other ports than the standard 443, 465, 853, 990, 993, 995 and 5061 ones.

There is one crucial limitation to the automatic SSL/TLS protocol detection though, it doesn’t support explicit TLS traffic that relies on opportunistic encryption features like STARTTLS, which bootstraps TLS into an already established application layer session.

Allow Non-TLS Traffic

SOCKS and HTTP CONNECT proxies can both be used to transport other protocols than TLS. PolarProxy blocks all non-TLS traffic by default, but this setting can be overridden with the “--nontls allow” argument to allow any traffic to be proxied. The allow non-TLS override has no effect on PolarProxy’s transparent proxy though, because it will need to see a valid SNI field in order to know whereto the traffic should be forwarded.

Windows Build

There wasn’t much need for a Windows build of PolarProxy prior to the release of version 0.9, because the Windows firewall can’t be configured to redirect outgoing port 443 traffic to a local service. However, now that PolarProxy also includes SOCKS and HTTP CONNECT services, the situation is completely different. There are many ways to configure a Windows PC, as well as web browsers and other applications, to use a local proxy server.

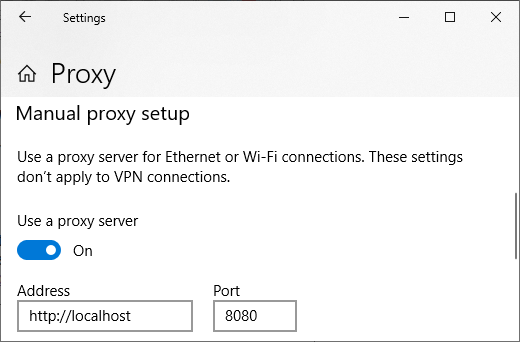
You can use the Proxy settings window in Windows 10 and 11 to enable a local HTTP proxy like this:

Windows 10 Proxy Settings

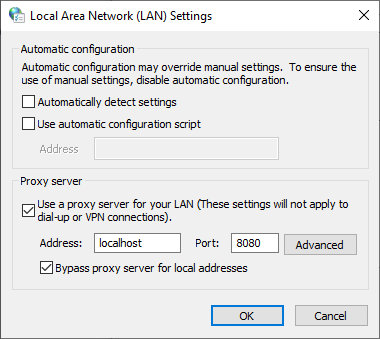
Another option is to run “inetcpl.cpl” (Internet Options), open the “Connections” tab and click the “LAN settings” button to configure an HTTP proxy.

Windows Internet Options LAN Proxy Settings

You can, of course, also configure your browser to use a local SOCKS or HTTP proxy in Windows, just as you’d do on any other operating system.

But don’t forget to configure your OS and/or browser to trust your PolarProxy instance’s root CA certificate first, as explained in the “Trusting the PolarProxy root CA” section of our PolarProxy documentation.

The Windows version of PolarProxy is a .NET framework-dependent application, which requires the .NET 6 runtime to be installed. The PolarProxy releases for other platforms (Linux x64, ARM and ARM64) are all self-contained applications, which are published with the .NET runtime built-in.

Visit our PolarProxy page to download and install PolarProxy.

Posted by Erik Hjelmvik on Thursday, 13 January 2022 10:15:00 (UTC/GMT)

Tags: #PolarProxy#proxy#SOCKS#SOCKS5#TLS#SSL#decrypt#Windows#PCAP-over-IP#pcapoverip

Short URL: https://netresec.com/?b=221953b


Capturing Decrypted TLS Traffic with Arkime

PolarProxy and Arkime Logo

The latest version of Arkime (The Sniffer Formerly Known As Moloch) can now be fed with a real-time stream of decrypted HTTPS traffic from PolarProxy. All that is needed to enable this feature is to include "pcapReadMethod=pcap-over-ip-server" in Arkime's config.ini file and start PolarProxy with the "--pcapoveripconnect 127.0.0.1:57012" option. PolarProxy will then connect to Arkime's PCAP-over-IP listener on TCP port 57012 and send it a copy of all TLS packets it decrypts.

Note: The required PCAP-over-IP feature is available in Arkime 2.7.0 and PolarProxy 0.8.16.

About Arkime

Arkime is an open source packet capture solution that indexes the PCAP data it collects. Arkime also comes with a web frontend for browsing and searching through the captured, and indexed, network traffic. The Arkime project recently changed name from Moloch, probably in an attempt to convince users that the tool doesn't eat children.

How to Install Arkime with PolarProxy

This guide demonstrates how TLS traffic, or more specifically HTTPS traffic, can be decrypted and ingested in real-time into Arkime.

The TLS decryption is performed with PolarProxy, which is a transparent TLS interception proxy that is freely available under a Creative Commons BY-ND 4.0 license.

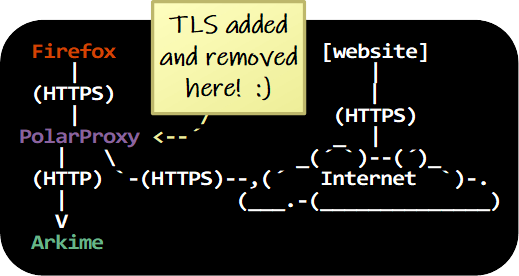
TLS decryption with PolarProxy and Arkime. TLS added and removed here.

PolarProxy and Arkime can be installed on a server to intercept, decrypt, index and store decrypted TLS network traffic from multiple clients on a network. It is even possible to install PolarProxy and Arkime on separate servers, so that PolarProxy forwards a stream of decrypted traffic to the Arkime server. However, to avoid unnecessary complexity, Arkime and PolarProxy are installed locally on a Linux client in this howto guide. The Linux client is a Ubuntu 20.04.1 machine, but the instructions can also be used on other Linux flavors that use systemd, such as Arch, CentOS, Debian, Fedora, SUSE and Red Hat Linux.

Download and Install Arkime

Arkime can be downloaded as a pre-built installation packages for CentOS and Ubuntu here: https://arkime.com/#download

Note: You can alternatively visit the Arkime GitHub page if there is no pre-built installation package for your Linux distro or you prefer to build Arkime from source.

After installing the Arkime package, configure Arkime by running:

sudo /data/moloch/bin/Configure
Found interfaces: lo;enp0s3 Semicolon ';' seperated list of interfaces to monitor [eth1] none
  • Enter "none" as the interface to monitor (the interface setting will be ignored when Arkime gets configured as a PCAP-over-IP server)
  • Install the ElasticSearch server by typing "yes" when prompted

Edit /data/moloch/etc/config.ini and add "pcapReadMethod=pcap-over-ip-server" to configure Arkime to listen for PCAP-over-IP connections.

pcapReadMethod=pcap-over-ip-server in Arkime's config.ini

Next, enable and start the ElasticSearch systemd service.

sudo systemctl enable elasticsearch.service
sudo systemctl start elasticsearch.service

Initiate the Arkime search cluster.

/data/moloch/db/db.pl http://localhost:9200 init

Create a new admin user.

/data/moloch/bin/moloch_add_user.sh admin "Admin User" THEPASSWORD --admin
Note: Feel free to pick a more secure password than "THEPASSWORD" for the admin user.

You can now enable and start the Moloch capture and viewer services.

sudo systemctl enable molochcapture.service
sudo systemctl start molochcapture.service
sudo systemctl enable molochviewer.service
sudo systemctl start molochviewer.service

Verify that Arkime now listens for incoming connections on TCP port 57012.

ss -nta | grep 57012
LISTEN 0 10 0.0.0.0:57012 0.0.0.0:*

Install PolarProxy to Decrypt TLS Traffic

Create a user for PolarProxy's systemd service and download PolarProxy like this:

sudo adduser --system --shell /bin/bash proxyuser
sudo mkdir /var/log/PolarProxy
sudo chown proxyuser:root /var/log/PolarProxy/
sudo chmod 0775 /var/log/PolarProxy/
sudo su - proxyuser
mkdir ~/PolarProxy
cd ~/PolarProxy/
curl https://www.netresec.com/?download=PolarProxy | tar -xzf -
exit

Copy the default PolarProxy service config to the systemd location.

sudo cp /home/proxyuser/PolarProxy/PolarProxy.service /etc/systemd/system/PolarProxy.service

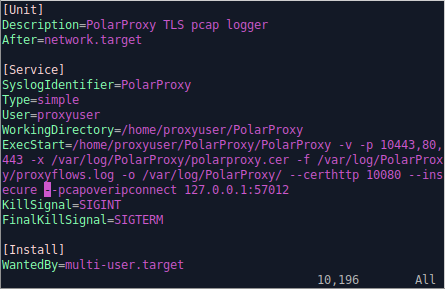
Modify /etc/systemd/system/PolarProxy.service by adding "--pcapoveripconnect 127.0.0.1:57012" at the end of the ExecStart command.

PolarProxy.service with --pcapoveripconnect 127.0.0.1:57012

It's now time to enable and start the PolarProxy service.

sudo systemctl enable PolarProxy.service
sudo systemctl start PolarProxy.service

Verify that PolarProxy has connected to Arkime's PCAP-over-IP listener on TCP port 57012.

ss -nta | grep 57012
LISTEN 0 10 0.0.0.0:57012 0.0.0.0:*
ESTAB 0 0 127.0.0.1:40801 127.0.0.1:57012
ESTAB 0 0 127.0.0.1:57012 127.0.0.1:40801

Take it For a Test Run

PolarProxy is listening for incoming TLS connections on TCP port 10443. We can therefore run traffic through the TLS decryption proxy with this curl command:

curl --insecure --connect-to www.netresec.com:443:127.0.0.1:10443 https://www.netresec.com/

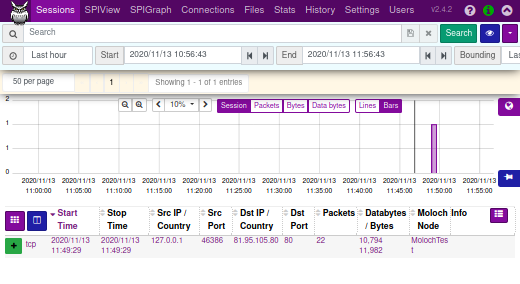
The decrypted traffic will show up in Arkime if everything is working. Open http://localhost:8005/sessions in a browser and look for a connection to www.netresec.com.

Note: The Arkime username and password is admin/THEPASSWORD if you've followed the instructions in this tutorial.

Also: You might have to wait a minute or two for the traffic to appear in Arkime's user interface.

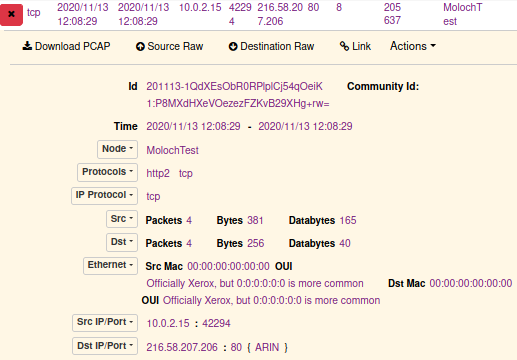
Moloch Sessions showing curl connection to www.netresec.com

Trust PolarProxy's Root CA Certificate

The root CA certificate used by your PolarProxy service must be trusted by both the operating system and browser in order to run TLS traffic through the decryption proxy without errors. Follow these instructions to add trust the root CA:

sudo mkdir /usr/share/ca-certificates/extra
sudo openssl x509 -inform DER -in /var/log/PolarProxy/polarproxy.cer -out /usr/share/ca-certificates/extra/PolarProxy-root-CA.crt
sudo dpkg-reconfigure ca-certificates
  • Select the "extra/PolarProxy-root-CA.crt" Certificate Authority
  • Press <Ok>

Start Firefox

  • Download the root CA certificate from: http://localhost:10080/polarproxy.cer
  • Open: about:preferences#privacy
  • Scroll down to "Certificates" and click "View Certificates"
  • Import > Select "polarproxy.cer"
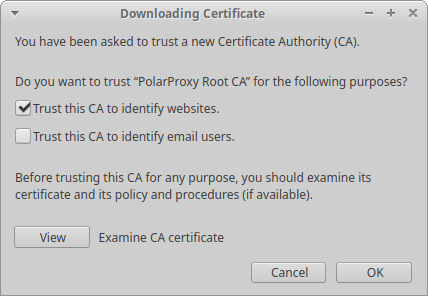
  • Select: ☑ Trust this CA to identify websites

Firefox: Trust this CA to identify websites

Configure Firewall Redirect of Outgoing HTTPS Traffic

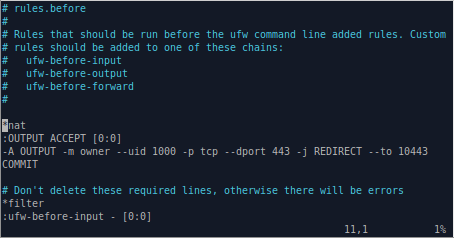
The final step in this tutorial is to redirect the local user's outgoing HTTPS traffic to the PolarProxy service listening on TCP port 10443. Add the following lines at the top of /etc/ufw/before.rules (before the "*filter" section) to redirect outgoing HTTPS traffic to the local PolarProxy service listening on port 10443.

*nat
:OUTPUT ACCEPT [0:0]
-A OUTPUT -m owner --uid 1000 -p tcp --dport 443 -j REDIRECT --to 10443
COMMIT

Firefox: Trust this CA to identify websites

Note: The UFW config in "before.rules" is equivalent to running "iptables -t nat -A OUTPUT -m owner --uid 1000 -p tcp --dport 443 -j REDIRECT --to 10443"

Make sure to modify the uid value (1000) in the firewall rule to match that of the local user that PolarProxy should decrypt the HTTPS traffic for. You can see your uid value by running the command "id -u". You can even redirect traffic from several users to PolarProxy, but it's important that you DON'T forward the outgoing HTTPS traffic from the "proxyuser" account. You will otherwise generate an infinite firewall redirect loop, where outgoing HTTPS traffic from PolarProxy is redirected back to PolarProxy again. You can check the proxyuser's uid with the command "id -u proxyuser".

After saving before.rules, reload UFW to activate the port redirection.

sudo ufw reload

Surf 'n' Snoop

Your Linux machine is now configured to send decrypted HTTPS traffic to Arkime for inspection. Open Firefox and visit some websites, then go back to Arkime and have a look at the traffic. Again, remember that there might be a few minutes' delay before the traffic appears in Arkime's user interface

HTTP/2 Session in Moloch

You'll probably notice that the majority of all HTTPS traffic is actually using the HTTP/2 protocol. Unfortunately Arkime's http2 support is still quite limited, but I'm hoping it will improve in future releases.

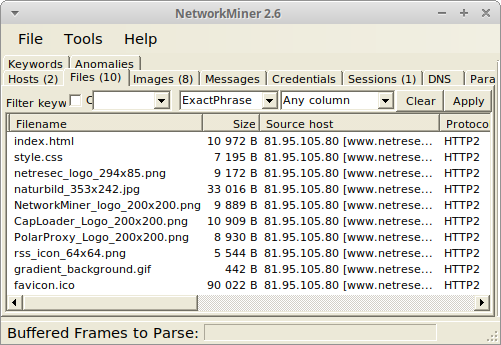
Luckily, both Wireshark and NetworkMiner (which runs fine in Linux by the way) can be used to parse and extract contents from HTTP/2 traffic. Just hit Arkime's "Download PCAP" button and open the capture file in a tool of your choice.

NetworkMiner 2.6 showing files ectracted from HTTP/2 traffic

Image: NetworkMiner in Linux with files extracted from decrypted HTTP/2 traffic

Posted by Erik Hjelmvik on Tuesday, 01 December 2020 07:50:00 (UTC/GMT)

Tags: #Arkime#PolarProxy#TLS#HTTPS#decrypt#PCAP#systemd#systemctl#UFW#http2#HTTP/2#PCAP-over-IP#pcapoverip#ASCII-art

Short URL: https://netresec.com/?b=20C3247


PolarProxy 0.8.16 Released

PolarProxy 0.8.16 We are happy to announce a new release of the TLS decryption tool PolarProxy. The new version has been updated to support features like client certificates and a PCAP-over-IP connector.

Client Certificates

PolarProxy now supports client-authenticated TLS handshakes for outgoing connections to support sites that require mutual TLS (mTLS) authentication. The following example uses the PKCS#12 client certificate "client.p12" with password "pwd" to authenticate PolarProxy when connecting to "https://api.example.com":

./PolarProxy -p 10443,80,443 --clientcert api.example.com:client.p12:pwd

Thanks to Peter Lambrechtsen for the idea!

Bypassing Decryption for Specific Domains

There are situations when it isn't appropriate to decrypt the traffic passing through PolarProxy. The traffic might, for example, contain personal or confidential information. It might also not be possible to decrypt the traffic for technical reasons, such as when clients use certificate pinning or certificate transparency to validate the server certificate. We therefore recommend that such sites are put on a "bypass" list, i.e. a list of domains for which PolarProxy should let the encrypted traffic pass untouched to preserve the end-to-end encryption between the client and server.

PolarProxy's "--bypass <file>" option, which can be used to provide a regular expression list of domains not to decrypt, has now been acompanied by "--bypassexact <file>". The new --bypassexact option simply matches domains against the lines in <file> using string matching of the full domain name, no fancy-pants regex involved.

PCAP-over-IP Client

The new "--pcapoveripconnect" option can be used to let PolarProxy connect to a PCAP-over-IP listener and send it a live PCAP stream of decrypted traffic over TCP. This option complements PolarProxy's "--pcapoverip" option, which sets up a PCAP-over-IP listener that serves clients with the same PCAP stream. Thanks to Andy Wick for suggesting adding a PCAP-over-IP connector to PolarProxy!

The following command instructs PolarProxy to send a live PCAP stream with decrypted traffic to a local PCAP-over-IP listener:

./PolarProxy -p 10443,80,443 --pcapoveripconnect 127.0.0.1:57012

PolarProxy will automatically attempt to re-establish the PCAP-over-IP connection every 10 seconds if it goes down or cannot be established for some reason.

Only Store Packets When Instructed

PolarProxy no longer writes hourly rotated pcap files with decrypted packets to disk unless explicitly instructed to do so with "-o <directory>" or "-w <file>".

Flushing Buffered Packets to Disk

PolarProxy now periodically flushes buffered packets to disk every 60 seconds. The flush interval can be controlled with the "--autoflush <seconds>" option. The auto flush can also be disabled with "--autoflush 0".

No More Out-of-Quota Issues

We have also improved the quota handling for our privileged users, who have a license key that allows them to decrypt more than 10 GB or 10 000 TLS sessions per day. You should now be able to use your full daily quota without issues!

UPDATE 2022-12-08

Peter Lambrechtsen's talk IoT your Pet from Kawaiicon 2022 is on YouTube! In this talk Peter explains how he used PolarProxy to MITM traffic between an IoT device and a cloud service running on Amazon AWS. Check out Peter's Pet Hub Local project for more details.

Posted by Erik Hjelmvik on Monday, 30 November 2020 07:45:00 (UTC/GMT)

Tags: #Netresec#PolarProxy#PCAP#TLS#bypass#PCAP-over-IP#pcapoverip#certificate

Short URL: https://netresec.com/?b=20Bf4b2

2020 October

PolarProxy in Podman

PolarProxy in Docker

2020 March

Discovered Artifacts in Decrypted HTTPS

Reverse Proxy and TLS Termination

2020 January

Sniffing Decrypted TLS Traffic with Security Onion

Sharing a PCAP with Decrypted HTTPS

2019 December

Installing a Fake Internet with INetSim and PolarProxy

2019 November

The NSA HSTS Security Feature Mystery

2019 September

Raspberry PI WiFi Access Point with TLS Inspection

2019 June

PolarProxy Released

2018 February

Examining an x509 Covert Channel

2017 September

Hunting AdwindRAT with SSL Heuristics

X / twitter

X / Twitter: @netresec


Bluesky

Bluesky: @netresec.com


Mastodon

Mastodon: @netresec@infosec.exchange