NETRESEC Network Security Blog - Tag : HTTP/2

rss Google News

Start Menu Search Video

In this video I demonstrate that text typed into the Windows 10 start menu gets sent to Microsoft and how that traffic can be intercepted, decrypted and parsed.

What Was Sent?

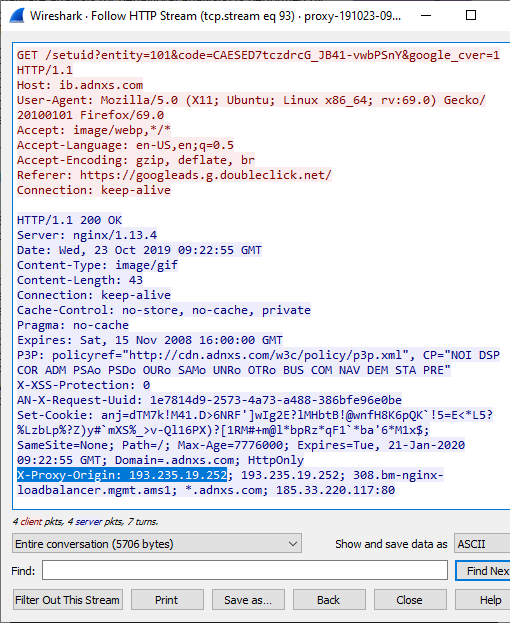
The XML files shown in the video were sent by Cortana's "SmartSearch" app to https://www.bing.com/threshold/xls.aspx in HTTP/2 POST requests. As shown in the video, the POST'ed keystrokes can be found inside requestInfo XML tags that have a "RawQuery" key.

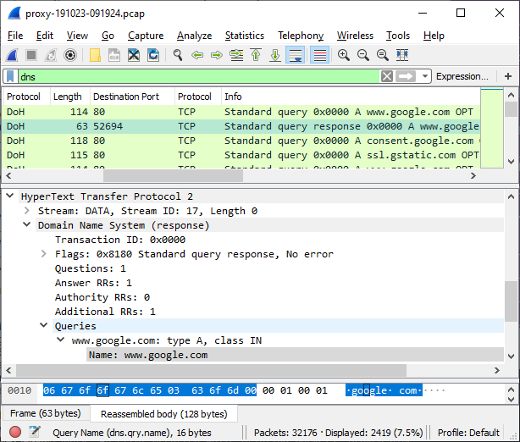
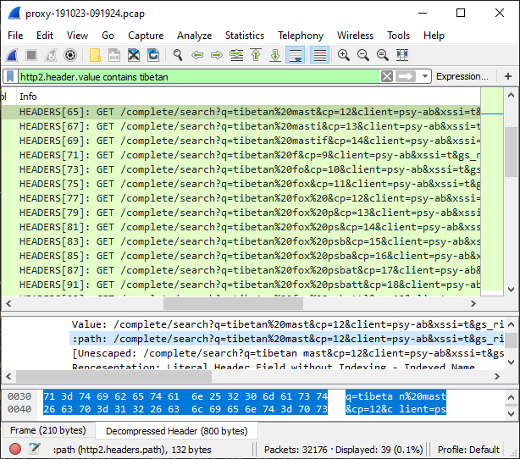
The following tcpdump and grep commands can be used to list the RawQuery data sent to Bing in these HTTP/2 requests:

tcpdump -A -r proxy-210927-134557.pcap | grep -a -o 'key="RawQuery" value="[^"]*"'

Running that command on the PolarProxy PCAP file from the video gives the following output:

key="RawQuery" value="n"
key="RawQuery" value="no"
key="RawQuery" value="not"
key="RawQuery" value="note"
key="RawQuery" value="notep"
key="RawQuery" value="notepa"
key="RawQuery" value="notepad"
key="RawQuery" value="s"
key="RawQuery" value="se"
key="RawQuery" value="sea"
key="RawQuery" value="sear"
key="RawQuery" value="searc"
key="RawQuery" value="search"
key="RawQuery" value="search .."
key="RawQuery" value="search ..e"
key="RawQuery" value="search ..er"
key="RawQuery" value="search ..e"
key="RawQuery" value="search .."
key="RawQuery" value="search"
key="RawQuery" value="search p"
key="RawQuery" value="search per"
key="RawQuery" value="search perm"
key="RawQuery" value="search permi"
key="RawQuery" value="p"
key="RawQuery" value="pr"
key="RawQuery" value="pri"
key="RawQuery" value="priv"
key="RawQuery" value="priva"
key="RawQuery" value="privac"
key="RawQuery" value="privacy"

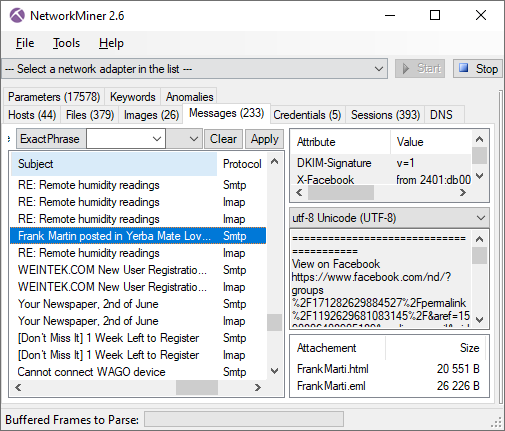
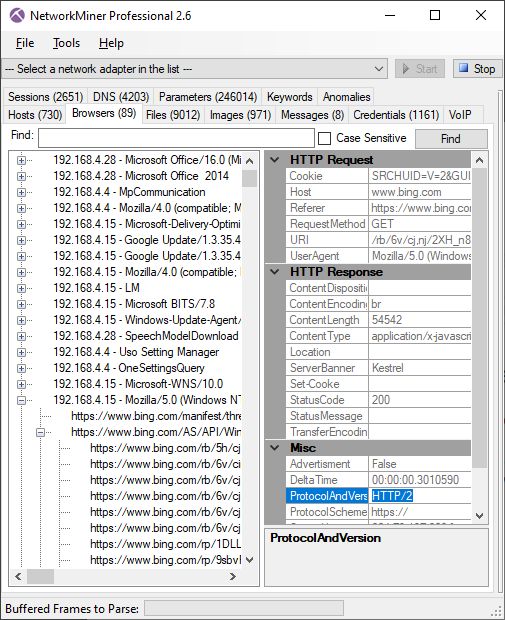
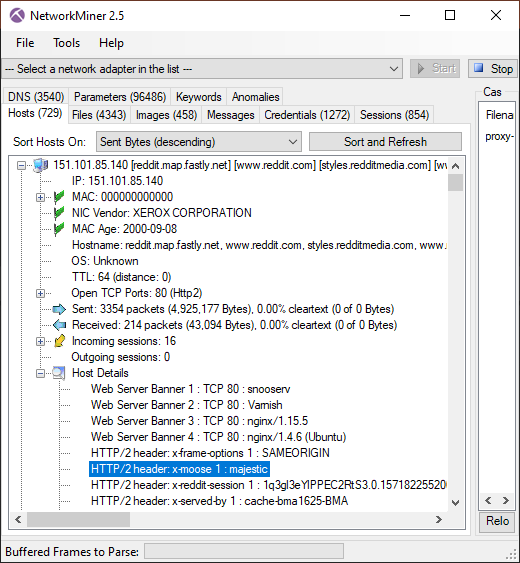
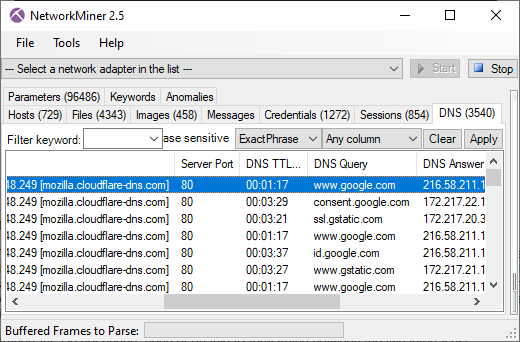
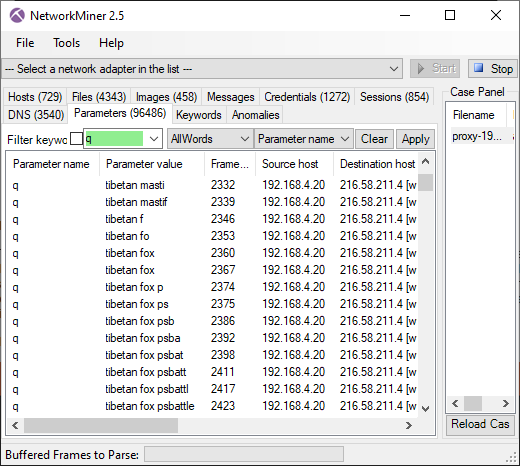
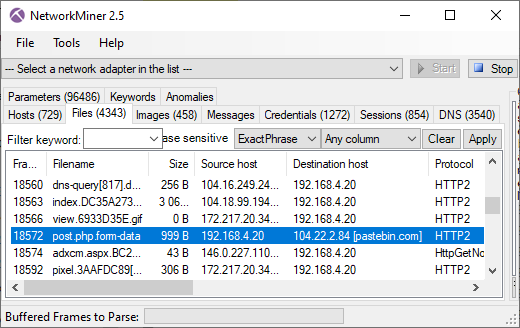
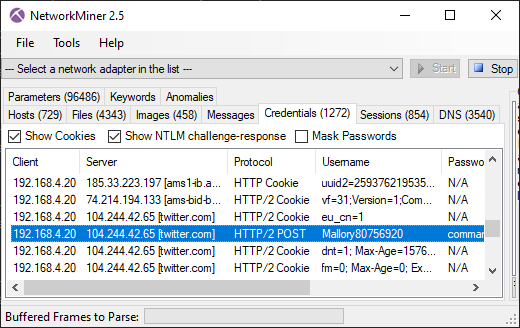
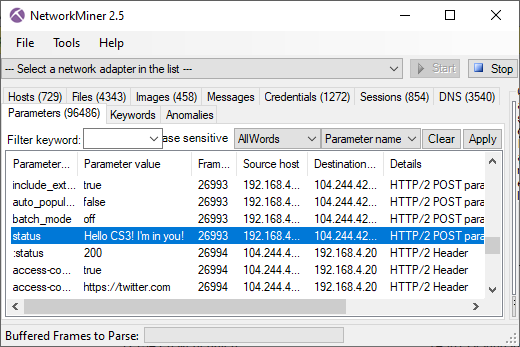
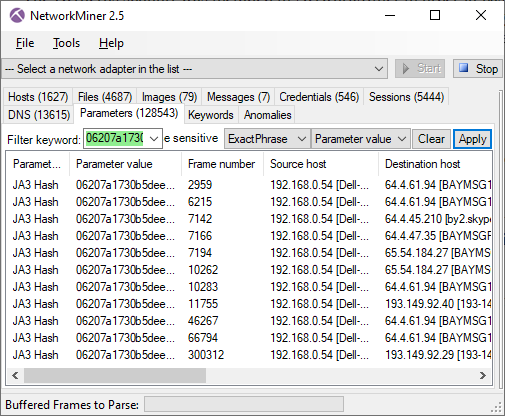
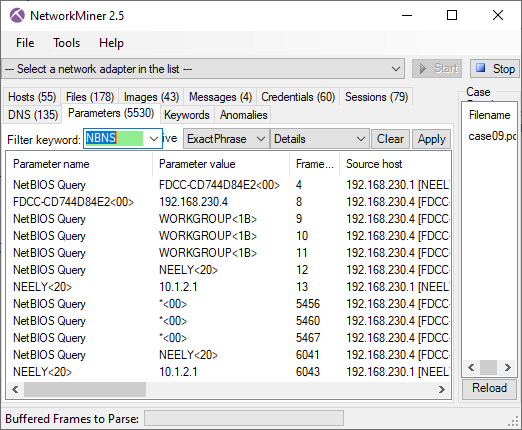
The same data also gets sent in the query string variable "qry" of GET requests for https://www.bing.com/AS/API/WindowsCortanaPane/V2/Suggestions, as shown in this NetworkMiner screenshot.

Parameters tab in NetworkMiner
Image: NetworkMiner's Parameters tab with filter "qry" on "Parameter name" column

How to Intercept, Decrypt and Decode HTTPS Traffic

The following section presents the technical details regarding my setup, so that others can reproduce and verify these findings.

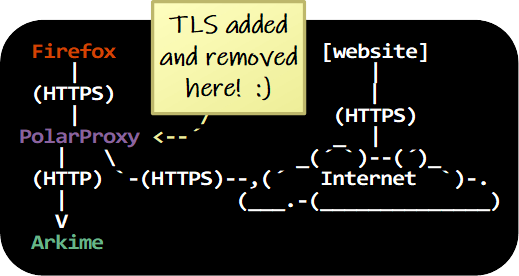
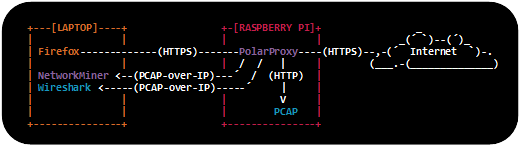
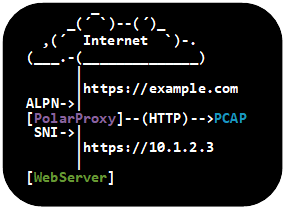
My first step was to install PolarProxy on a Linux machine on the local network. PolarProxy is a TLS proxy, which can intercept and decrypt TLS traffic. This TLS proxy is primarily designed to decrypt traffic from malware and hackers, but can also be used to decrypt legitimate traffic when needed.

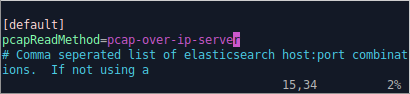
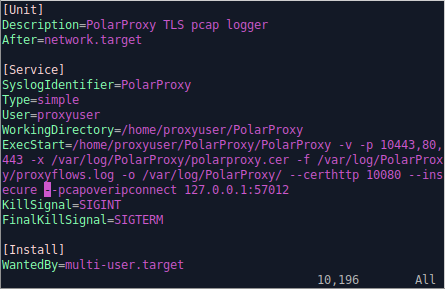
PolarProxy was configured to listen for incoming TLS connections on TCP port 443 and output PCAP data with the decrypted traffic as if it had been transmitted over TCP 80. The decrypted traffic was accessible as a real-time stream through a PCAP-over-IP service running on port 57012. Here's the full command that was used to start PolarProxy:

sudo ./PolarProxy -p 443,80 --pcapoverip 0.0.0.0:57012 --certhttp 10080

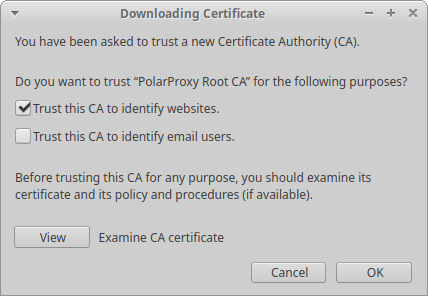
In the video I showed the Windows 10 client's modified hosts file, which included an entry for www.bing.com pointing to the PolarProxy machine. What was not shown in the video though, is that PolarProxy's own CA certificate had been added to the Win10 machine's list of trusted root CA's, as explained in the "Trusting the PolarProxy root CA" section of the PolarProxy installation instructions. With these two changes in place all HTTPS requests for www.bing.com from the Win10 PC got diverted through the PolarProxy TLS inspection service, which then decrypted and re-encrypted the traffic before forwarding it to Bing.

The decrypted Bing requests could be accessed either locally on the Linux machine, or remotely using the PCAP-over-IP service on TCP port 57012. I used NetworkMiner to read the live PCAP stream with decrypted traffic from port 57012 and extract all files being sent and received in real-time.

Is it Possible to Disable the Cortana Search?

When Ars Technica reporters asked Microsoft back in 2015 if there was any way to disable this communication, Microsoft replied with the following statement:

As part of delivering Windows 10 as a service, updates may be delivered to provide ongoing new features to Bing search, such as new visual layouts, styles and search code. No query or search usage data is sent to Microsoft, in accordance with the customer's chosen privacy settings.

There are plenty of how-to guides online with instructions on how the Cortana search feature can be disabled. Most of these guides suggest disabling the AllowCortana setting in group policies or in the registry. We've tried several of the settings suggested in these how-to guides, but none of them seem to prevent Windows from sending keystrokes to Bing.

If you know how to successfully disable Cortana's Bing searches, then please feel free to reach out to us so that we can update this blog post.

UPDATE 210928 - How to Actually Disable Cortana Search

Twitter user @GeorgeProfonde3 reached out to suggest a fix that might prevent the start menu from sending data to Bing. We have now verified this fix and we're happy to announce that it works (at least for us).

  1. Start regedit.exe
  2. Open the following registry key:
    HKEY_CURRENT_USER\SOFTWARE\Microsoft\Windows\CurrentVersion\Search
  3. Ensure that the value for CortanaConsent is set to 0
  4. Create a new DWORD registry entry called "BingSearchEnabled" with value 0

You should no longer see any connections to www.bing.com when interacting with the start menu after implementing this fix.

UPDATE 211015 - Another way to Disable Cortana Search

You may need to use a different method to disable the start meny search, depending on your Windows version and build. Kimberly (@StopMalvertisin) suggested the following method, which seems to work on Windows 11:

  1. Start regedit.exe
  2. Create a registry key for:
    HKEY_CURRENT_USER\SOFTWARE\Policies\Microsoft\Windows\Explorer
  3. Create a new DWORD registry entry called "DisableSearchBoxSuggestions" with value 1

Disabling Start Menu Search from Group Policy

There are also a few different methods for disabling start menu searches using GPO. However, please note that your success will vary depending on your Windows version and build.

GPO Method #1

  1. Start gpedit.msc
  2. Open the following branch:
    User configuration\Administrative templates\Windows components\File Explorer
  3. Enable the following group policy:
    "Turn off display of recent search entries in the File Explorer search box"

GPO Method #2

  • Start gpedit.msc
  • Open the following branch:
    User Configuration\Administrative Templates\Start Menu and Taskbar
  • Enable the following group policy: "Do not search communications"

Posted by Erik Hjelmvik on Tuesday, 28 September 2021 08:24:00 (UTC/GMT)

Tags: #PCAP#NetworkMiner#PolarProxy#Microsoft#video#videotutorial#pcapoverip#PCAP-over-IP#HTTP/2#http2

Share: Facebook   Twitter   Reddit   Hacker News Short URL: https://netresec.com/?b=2199fe7


Capturing Decrypted TLS Traffic with Arkime

PolarProxy and Arkime Logo

The latest version of Arkime (The Sniffer Formerly Known As Moloch) can now be fed with a real-time stream of decrypted HTTPS traffic from PolarProxy. All that is needed to enable this feature is to include "pcapReadMethod=pcap-over-ip-server" in Arkime's config.ini file and start PolarProxy with the "--pcapoveripconnect 127.0.0.1:57012" option. PolarProxy will then connect to Arkime's PCAP-over-IP listener on TCP port 57012 and send it a copy of all TLS packets it decrypts.

Note: The required PCAP-over-IP feature is available in Arkime 2.7.0 and PolarProxy 0.8.16.

About Arkime

Arkime is an open source packet capture solution that indexes the PCAP data it collects. Arkime also comes with a web frontend for browsing and searching through the captured, and indexed, network traffic. The Arkime project recently changed name from Moloch, probably in an attempt to convince users that the tool doesn't eat children.

How to Install Arkime with PolarProxy

This guide demonstrates how TLS traffic, or more specifically HTTPS traffic, can be decrypted and ingested in real-time into Arkime.

The TLS decryption is performed with PolarProxy, which is a transparent TLS interception proxy that is freely available under a Creative Commons BY-ND 4.0 license.

TLS decryption with PolarProxy and Arkime. TLS added and removed here.

PolarProxy and Arkime can be installed on a server to intercept, decrypt, index and store decrypted TLS network traffic from multiple clients on a network. It is even possible to install PolarProxy and Arkime on separate servers, so that PolarProxy forwards a stream of decrypted traffic to the Arkime server. However, to avoid unnecessary complexity, Arkime and PolarProxy are installed locally on a Linux client in this howto guide. The Linux client is a Ubuntu 20.04.1 machine, but the instructions can also be used on other Linux flavors that use systemd, such as Arch, CentOS, Debian, Fedora, SUSE and Red Hat Linux.

Download and Install Arkime

Arkime can be downloaded as a pre-built installation packages for CentOS and Ubuntu here: https://arkime.com/#download

Note: You can alternatively visit the Arkime GitHub page if there is no pre-built installation package for your Linux distro or you prefer to build Arkime from source.

After installing the Arkime package, configure Arkime by running:

sudo /data/moloch/bin/Configure
Found interfaces: lo;enp0s3 Semicolon ';' seperated list of interfaces to monitor [eth1] none
  • Enter "none" as the interface to monitor (the interface setting will be ignored when Arkime gets configured as a PCAP-over-IP server)
  • Install the ElasticSearch server by typing "yes" when prompted

Edit /data/moloch/etc/config.ini and add "pcapReadMethod=pcap-over-ip-server" to configure Arkime to listen for PCAP-over-IP connections.

pcapReadMethod=pcap-over-ip-server in Arkime's config.ini

Next, enable and start the ElasticSearch systemd service.

sudo systemctl enable elasticsearch.service
sudo systemctl start elasticsearch.service

Initiate the Arkime search cluster.

/data/moloch/db/db.pl http://localhost:9200 init

Create a new admin user.

/data/moloch/bin/moloch_add_user.sh admin "Admin User" THEPASSWORD --admin
Note: Feel free to pick a more secure password than "THEPASSWORD" for the admin user.

You can now enable and start the Moloch capture and viewer services.

sudo systemctl enable molochcapture.service
sudo systemctl start molochcapture.service
sudo systemctl enable molochviewer.service
sudo systemctl start molochviewer.service

Verify that Arkime now listens for incoming connections on TCP port 57012.

ss -nta | grep 57012
LISTEN 0 10 0.0.0.0:57012 0.0.0.0:*

Install PolarProxy to Decrypt TLS Traffic

Create a user for PolarProxy's systemd service and download PolarProxy like this:

sudo adduser --system --shell /bin/bash proxyuser
sudo mkdir /var/log/PolarProxy
sudo chown proxyuser:root /var/log/PolarProxy/
sudo chmod 0775 /var/log/PolarProxy/
sudo su - proxyuser
mkdir ~/PolarProxy
cd ~/PolarProxy/
curl https://www.netresec.com/?download=PolarProxy | tar -xzf -
exit

Copy the default PolarProxy service config to the systemd location.

sudo cp /home/proxyuser/PolarProxy/PolarProxy.service /etc/systemd/system/PolarProxy.service

Modify /etc/systemd/system/PolarProxy.service by adding "--pcapoveripconnect 127.0.0.1:57012" at the end of the ExecStart command.

PolarProxy.service with --pcapoveripconnect 127.0.0.1:57012

It's now time to enable and start the PolarProxy service.

sudo systemctl enable PolarProxy.service
sudo systemctl start PolarProxy.service

Verify that PolarProxy has connected to Arkime's PCAP-over-IP listener on TCP port 57012.

ss -nta | grep 57012
LISTEN 0 10 0.0.0.0:57012 0.0.0.0:*
ESTAB 0 0 127.0.0.1:40801 127.0.0.1:57012
ESTAB 0 0 127.0.0.1:57012 127.0.0.1:40801

Take it For a Test Run

PolarProxy is listening for incoming TLS connections on TCP port 10443. We can therefore run traffic through the TLS decryption proxy with this curl command:

curl --insecure --connect-to www.netresec.com:443:127.0.0.1:10443 https://www.netresec.com/

The decrypted traffic will show up in Arkime if everything is working. Open http://localhost:8005/sessions in a browser and look for a connection to www.netresec.com.

Note: The Arkime username and password is admin/THEPASSWORD if you've followed the instructions in this tutorial.

Also: You might have to wait a minute or two for the traffic to appear in Arkime's user interface.

Moloch Sessions showing curl connection to www.netresec.com

Trust PolarProxy's Root CA Certificate

The root CA certificate used by your PolarProxy service must be trusted by both the operating system and browser in order to run TLS traffic through the decryption proxy without errors. Follow these instructions to add trust the root CA:

sudo mkdir /usr/share/ca-certificates/extra
sudo openssl x509 -inform DER -in /var/log/PolarProxy/polarproxy.cer -out /usr/share/ca-certificates/extra/PolarProxy-root-CA.crt
sudo dpkg-reconfigure ca-certificates
  • Select the "extra/PolarProxy-root-CA.crt" Certificate Authority
  • Press <Ok>

Start Firefox

  • Download the root CA certificate from: http://localhost:10080/polarproxy.cer
  • Open: about:preferences#privacy
  • Scroll down to "Certificates" and click "View Certificates"
  • Import > Select "polarproxy.cer"
  • Select: ☑ Trust this CA to identify websites

Firefox: Trust this CA to identify websites

Configure Firewall Redirect of Outgoing HTTPS Traffic

The final step in this tutorial is to redirect the local user's outgoing HTTPS traffic to the PolarProxy service listening on TCP port 10443. Add the following lines at the top of /etc/ufw/before.rules (before the "*filter" section) to redirect outgoing HTTPS traffic to the local PolarProxy service listening on port 10443.

*nat
:OUTPUT ACCEPT [0:0]
-A OUTPUT -m owner --uid 1000 -p tcp --dport 443 -j REDIRECT --to 10443
COMMIT

Firefox: Trust this CA to identify websites

Note: The UFW config in "before.rules" is equivalent to running "iptables -t nat -A OUTPUT -m owner --uid 1000 -p tcp --dport 443 -j REDIRECT --to 10443"

Make sure to modify the uid value (1000) in the firewall rule to match that of the local user that PolarProxy should decrypt the HTTPS traffic for. You can see your uid value by running the command "id -u". You can even redirect traffic from several users to PolarProxy, but it's important that you DON'T forward the outgoing HTTPS traffic from the "proxyuser" account. You will otherwise generate an infinite firewall redirect loop, where outgoing HTTPS traffic from PolarProxy is redirected back to PolarProxy again. You can check the proxyuser's uid with the command "id -u proxyuser".

After saving before.rules, reload UFW to activate the port redirection.

sudo ufw reload

Surf 'n' Snoop

Your Linux machine is now configured to send decrypted HTTPS traffic to Arkime for inspection. Open Firefox and visit some websites, then go back to Arkime and have a look at the traffic. Again, remember that there might be a few minutes' delay before the traffic appears in Arkime's user interface

HTTP/2 Session in Moloch

You'll probably notice that the majority of all HTTPS traffic is actually using the HTTP/2 protocol. Unfortunately Arkime's http2 support is still quite limited, but I'm hoping it will improve in future releases.

Luckily, both Wireshark and NetworkMiner (which runs fine in Linux by the way) can be used to parse and extract contents from HTTP/2 traffic. Just hit Arkime's "Download PCAP" button and open the capture file in a tool of your choice.

NetworkMiner 2.6 showing files ectracted from HTTP/2 traffic

Image: NetworkMiner in Linux with files extracted from decrypted HTTP/2 traffic

Posted by Erik Hjelmvik on Tuesday, 01 December 2020 07:50:00 (UTC/GMT)

Tags: #Arkime#PolarProxy#TLS#HTTPS#decrypt#PCAP#systemd#systemctl#UFW#http2#HTTP/2#PCAP-over-IP#pcapoverip#ASCII-art

Share: Facebook   Twitter   Reddit   Hacker News Short URL: https://netresec.com/?b=20C3247


NetworkMiner 2.6 Released

NetworkMiner 2.6

We are happy to announce the release of NetworkMiner 2.6 today! The network forensic tool is now even better at extracting emails, password hashes, FTP transfers and artifacts from HTTP and HTTP/2 traffic than before.

Some of the major improvements in this new release are related to extraction and presentation of emails from SMTP, POP3 and IMAP traffic. On that note, we’d like to thank Mandy van Oosterhout for reporting a bug in our email parser!

Emails extracted with NetworkMiner 2-6
Image: Emails extracted from SMTP and IMAP traffic

I have previously blogged about how to extract John-the-Ripper hashes from Kerberos network traffic with NetworkMiner. We have now added support for presenting LANMAN and NTLM credentials as JtR hashes as well.

NTLMv2 and Kerberos hashes in NetworkMiner 2.6
Image: JtR formatted NTLMv2 and Kerberos hashes in NetworkMiner 2.6

We have also improved NetworkMiner’s Linux support. Files, images and folders can now be opened in external tools directly from the NetworkMiner GUI also when running NetworkMiner in Linux using Mono 6 (or later). Linux users previously got a “System.ComponentModel.Win32Exception” error message saying something like “Cannot find the specified file” or “Access denied” due to a breaking change introduced in Mono version 6.

NetworkMiner running in Ubuntu 20.04
Image: NetworkMiner 2.6 running in Ubuntu 20.04 with Mono 6.8.0.105

The new release also comes with several updates of how HTTP and HTTP/2 traffic is handled and presented. We have, for example, added better extraction of data sent in HTTP (or HTTP/2) POST requests. Posted JSON formatted parameters are also extracted even if the JSON data has been gzip compressed. The “Accept-Language” header values in HTTP and HTTP/2 are extracted as “Host Details” in order to support forensic analysis of user language settings, as shown by Fox-IT in their “Operation Wocao - Shining a light on one of China’s hidden hacking groups” report.

NetworkMiner has supported decapsulation of tunneling protocols and protocols for network virtualization, like 802.1Q, GRE, PPPoE, VXLAN, OpenFlow, MPLS and EoMPLS, since version 2.1. We have now improved our GRE parser to also support NVGRE (RFC 7637) by adding support for Transparent Ethernet Bridging.

Jan Hesse sent us a feature request on Twitter earlier this year, where asked about support for FritzBox captures. We are happy to announce that NetworkMiner now supports the modified pcap format you get when sniffing network traffic with a FritzBox gateway.

Fritz!Box

NetworkMiner 2.6 can now also parse and extract SIP chat messages (RFC 3428) to the “Messages” tab. Audio extraction of VoIP calls is still a feature that is exclusively available only in NetworkMiner Professional though.

NetworkMiner Professional

Our commercial tool NetworkMiner Professional has received a few additional updates, such as support for analysis of HTTP/2 traffic in the “Browsers tab”. However, please note that NetworkMiner does not perform TLS decryption, so the HTTP/2 traffic will have to be decrypted by a TLS proxy like PolarProxy prior to being saved to a PCAP file.

HTTP/2 traffic in NetworkMiner Professional's Browsers tab

We have added a few new great online services to NetworkMiner Pro’s OSINT lookup as well, such as shouldiclick.org, Browserling, MalwareDomainList and VirusTotal lookups of URL’s in the “Browsers” tab. We have also added some additional external OSINT sources for lookups of IP addresses and domain names, such as MalwareDomainList and mnemonic ACT. The JA3 hash lookup menu in NetworkMiner Professional’s “Hosts” tab has also been extended to include GreyNoise.

URL lookup menu in NetworkMiner Professional's Browsers tab

NetworkMiner Pro previously played back G.722 VoIP audio at half speed. This issue has now been fixed, so that G.722 RTP audio is extracted and played back in 16k samples/s. The bug was due to an error in RFC 1890 that was later corrected in RFC 3551. Thanks to Michael "MiKa" Kafka for teaching us about this!

Excerpt from RFC 3551:

Even though the actual sampling rate for G.722 audio is 16,000 Hz, the RTP clock rate for the G722 payload format is 8,000 Hz because that value was erroneously assigned in RFC 1890 and must remain unchanged for backward compatibility. The octet rate or sample-pair rate is 8,000 Hz.

We’d also like to mention that NetworkMiner Professional now comes with improved analytical support to help investigators detect Tor traffic.

Upgrading to Version 2.6

Users who have purchased a license for NetworkMiner Professional 2.x can download a free update to version 2.6 from our customer portal, or use the “Help > Check for Updates” feature. Those who instead prefer to use the free and open source version can grab the latest version of NetworkMiner from the official NetworkMiner page.

Posted by Erik Hjelmvik on Wednesday, 23 September 2020 09:10:00 (UTC/GMT)

Tags: #NetworkMiner#SMTP#POP3#IMAP#email#FTP#JtR#John#Mono#Linux#HTTP#HTTP/2#GRE#SIP#VoIP#Tor#PCAP

Share: Facebook   Twitter   Reddit   Hacker News Short URL: https://netresec.com/?b=209ff4e


Discovered Artifacts in Decrypted HTTPS

We released a PCAP file earlier this year, which was recorded as part of a live TLS decryption demo at the CS3Sthlm conference. The demo setup used PolarProxy running on a Raspberry Pi in order to decrypt all HTTPS traffic and save it in a PCAP file as unencrypted HTTP.

Laptop, Raspberry Pi, PolarProxy, Internet ASCII

This capture file was later used as a challenge for our twitter followers, when we made the following announcement:

PCAP CHALLENGE!
The capture file released in this blog post contains a few interesting things that were captured unintentionally. Can you find anything strange, funny or unexpected in the pcap file? (1/2)

Followed by this message:

The person to submit the most interesting answer wins a “PCAP or it didn’t happen” t-shirt. Compete by including your discovery in a retweet or reply to this tweet, or in an email to info(at)netresec.com. We want your answers before the end of January. (2/2)

We'd like to thank everyone who submitted answers in this challenge, such as David Ledbetter, Christoffer Strömblad, RunΞ and Chris Sistrunk.

We're happy to announce that the winner of our challenge is David Ledbetter. Congratulations David!

So what were the interesting thing that could be found in the released capture file? Below is a short summary of some things that can be found.

Telemetry data sent to mozilla.org

A surprising amount of information about the Firefox browser was sent to incoming.telemetry.mozilla.org, including things like:

  • Active browser addons
  • Active browser plugins
  • Firefox profile creation date
  • Browser search region
  • Default search engine
  • Regional locales
  • Screen width
  • Screen height
  • CPU vendor, family and model
  • HDD model, revision and type
  • Installed RAM
  • Operating system
  • Etc..

Here's an excerpt showing a part of the data sent to Mozilla:

"build": { "applicationId": "{ec8030f7-c20a-464f-9b0e-13a3a9e97384}", "applicationName": "Firefox", "architecture": "x86-64", "buildId": "20191002194346", "version": "69.0.2", "vendor": "Mozilla", "displayVersion": "69.0.2", "platformVersion": "69.0.2", "xpcomAbi": "x86_64-gcc3", "updaterAvailable": false }, "partner": { "distributionId": "canonical", "distributionVersion": "1.0", "partnerId": "ubuntu", "distributor": "canonical", "distributorChannel": "ubuntu", "partnerNames": [ "ubuntu" ] }, "system": { "memoryMB": 3943, "virtualMaxMB": null, "cpu": { "count": 1, "cores": 1, "vendor": "GenuineIntel", "family": 6, "model": 42, "stepping": 7, "l2cacheKB": 256, "l3cacheKB": 4096, "speedMHz": null, "extensions": [ "hasMMX", "hasSSE", "hasSSE2", "hasSSE3", "hasSSSE3", "hasSSE4_1", "hasSSE4_2", "hasAVX", "hasAES" ] }, "os": { "name": "Linux", "version": "5.0.0-31-generic", "locale": "en-US" }, "hdd": { "profile": { "model": null, "revision": null, "type": null }, "binary": { "model": null, "revision": null, "type": null }, "system": { "model": null, "revision": null, "type": null } }, "gfx": { "D2DEnabled": null, "DWriteEnabled": null, "ContentBackend": "Skia", "Headless": false, "adapters": [ { "description": "llvmpipe (LLVM 8.0, 256 bits)", "vendorID": "0xffff", "deviceID": "0xffff", "subsysID": null, "RAM": 3942, "driver": null, "driverVendor": "mesa/llvmpipe", "driverVersion": "19.0.8.0", "driverDate": null, "GPUActive": true } ], "monitors": [ { "screenWidth": 681, "screenHeight": 654 } ], "features": { "compositor": "basic", "gpuProcess": { "status": "unavailable" }, "wrQualified": { "status": "blocked-vendor-unsupported" }, "webrender": { "status": "opt-in" } } }, "appleModelId": null }, "settings": { "blocklistEnabled": true, "e10sEnabled": true, "e10sMultiProcesses": 8, "telemetryEnabled": false, "locale": "en-US", "intl": { "requestedLocales": [ "en-US" ], "availableLocales": [ "en-US", "en-CA", "en-GB" ], "appLocales": [ "en-US", "en-CA", "en-GB", "und" ], "systemLocales": [ "en-US" ], "regionalPrefsLocales": [ "sv-SE" ], "acceptLanguages": [ "en-US", "en" ] }, "update": { "channel": "release", "enabled": true, "autoDownload": false }, "userPrefs": { "browser.cache.disk.capacity": 1048576, "browser.search.region": "SE", "browser.search.widget.inNavBar": false, "network.trr.mode": 2 }, "sandbox": { "effectiveContentProcessLevel": 4 }, "addonCompatibilityCheckEnabled": true, "isDefaultBrowser": false, "defaultSearchEngine": "google", "defaultSearchEngineData": { "name": "Google", "loadPath": "[distribution]/searchplugins/locale/en-US/google.xml", "origin": "default", "submissionURL": "https://www.google.com/search?client=ubuntu&channel=fs&q=&ie=utf-8&oe=utf-8" } }, "profile": { "creationDate": 18183, "firstUseDate": 18183 }

You can use the following Wireshark display filter to find all the data sent to Mozilla:

http.request.method eq POST and http.host contains telemetry

Public IP Revealed in PCAP

The client's IP address was 192.168.4.20, which is part of the RFC 1918 192.168/16 private address space. It's therefore safe to assume that the client was behind a NAT (the client was in fact behind a double NAT). However, we noticed that the public IP of the client was revealed through multiple services in the captured network traffic. One of these services is the advertising exchange company AppNexus (adnxs.com), which sent the client's public IP address 193.235.19.252 in an X-Proxy-Origin HTTP header.

X-Proxy-Origin HTTP header in Wireshark

You can use the following Wireshark/tshark display filter to find X-Proxy-Origin headers:

http.response.line matches "x-proxy-origin" or http2.header.name matches "x-proxy-origin"

We are using the "matches" operator here instead of "contains" or "==" because we want to perform case insensitive matching. You might also notice that we need a completely different display filter syntax to match HTTP/2 headers compared to what we are used to with HTTP/1.1.

Monty Python "Majestik møøse" reference in reddit x-header

The reddit server 151.101.85.140 sends an HTTP/2 header called "x-moose" with a value of "majestic".

x-moose 1 : majestic header from reddit

This header refers to the opening credits of Monty Python and the Holy Grail.

Wi nøt trei a høliday in Sweden this yër?

Posted by Erik Hjelmvik on Tuesday, 17 March 2020 09:00:00 (UTC/GMT)

Tags: #HTTP/2#http2#TLS#decrypt#TLSI#PolarProxy#NetworkMiner#Wireshark#CS3Sthlm#CS3#Forensics#PCAP#ASCII-art

Share: Facebook   Twitter   Reddit   Hacker News Short URL: https://netresec.com/?b=2030e17


Reverse Proxy and TLS Termination

PolarProxy is primarily a TLS forward proxy, but it can also be used as a TLS termination proxy or reverse TLS proxy to intercept and decrypt incoming TLS traffic, such as HTTPS or IMAPS, before it is forwarded to a server. The proxied traffic can be accessed in decrypted form as a PCAP formatted data stream, which allows real-time analysis of the decrypted traffic by an IDS as well as post incident forensics with Wireshark.

PolarProxy version 0.8.15 and later can import an existing X.509 server certificate (aka leaf certificate or end-entity certificate) in order to perform the TLS decryption using a valid certificate signed by a trusted certificate authority. If no server certificate is provided, then PolarProxy falls back to generating server certificates on the fly and signing them with its own root CA certificate.

There are two principal ways to run PolarProxy as a reverse proxy, either as a TLS termination proxy or as a reverse proxy that decrypts and re-encrypts the traffic.

PolarProxy as a TLS Termination Proxy

TLS Termination Proxy

The TLS termination proxy mode is useful in order to offload the task of performing TLS encryption to PolarProxy instead of doing the decryption on the web server. This mode can also be used when the proxied services don’t support TLS encryption, such as legacy web servers or servers hosting other unencrypted services that you want to secure with TLS.

The following command sequence shows how to create a Let’s Encrypt SSL certificate, convert it to the PKCS#12 format, and load the server certificate into PolarProxy to terminate incoming HTTPS connections. In this setup PolarProxy decrypts the TLS traffic and relays the HTTP traffic to the web server on TCP port 80.

sudo certbot certonly --manual --preferred-challenges dns -d example.com,www.example.com

sudo openssl pkcs12 -export -out /etc/example.p12 -inkey /etc/letsencrypt/live/example.com/privkey.pem -in /etc/letsencrypt/live/example.com/fullchain.pem --passout pass:PASSWORD

sudo mkdir /var/log/TlsTerminationProxy/

sudo ./PolarProxy --terminate --connect 10.1.2.3 --nosni www.example.com --leafcert load:example.com,www.example.com:/etc/example.p12:PASSWORD -p 443,80,80 -o /var/log/TlsTerminationProxy/

Here’s a breakdown of the arguments sent to PolarProxy:

  • --terminate : Terminate incoming TLS sessions and forward proxied traffic in unencrypted form.
  • --connect 10.1.2.3 : Forward all proxied traffic to 10.1.2.3 instead of connecting to the host name provided in the SNI extension of the TLS ClientHello message.
  • --nosni www.example.com : Treat incoming TLS sessions that don’t define a host name with the SNI extension as if they wanna to connect to “www.example.com”.
  • --leafcert load:example.com,www.example.com:/etc/example.p12:PASSWORD : Use the server certificate “/etc/example.p12” for incoming connections to “example.com” and “www.example.com”.
  • -p 443,80,80 : Listen on TCP port 443, save decrypted traffic in PCAP file as if it was directed to port 80, forward decrypted traffic to port 80.
  • -o /var/log/TlsTerminationProxy/ : Save decrypted traffic to hourly rotated PCAP files in “/var/log/TlsTerminationProxy/”.

PolarProxy is a generic TLS proxy that doesn’t care what application layer protocol the TLS tunnel carries. So if you want to terminate the TLS encryption of incoming IMAPS sessions as well, then simply append an additional argument saying “-p 993,143,143” to also forward decrypted IMAP sessions to 10.1.2.3. This method can be used in order to wrap almost any TCP based protocol in a TLS tunnel, which can be useful for privacy reasons as well as to prevent network monitoring tools from detecting the actual application layer protocol.

PolarProxy as a Reverse TLS Proxy

Reverse TLS Proxy

There are setups for which it is preferable to also encrypt the internal sessions between PolarProxy and the final server. One such setup is when the server is hosting a web service with support for the HTTP/2 protocol, which in practice always uses TLS. Luckily PolarProxy is designed to decrypt and re-encrypt proxied traffic while also forwarding important TLS parameters, such as ALPN and SNI, between the internal and external TLS sessions.

To use TLS encryption on the inside as well as outside of PolarProxy, simply do as explained in the previous TLS termination section, but remove the “--terminate” argument and change the port argument to “-p 443,80,443” like this:

sudo ./PolarProxy --connect 10.1.2.3 --nosni www.example.com --leafcert load:example.com,www.example.com:/etc/example.p12:PASSWORD -p 443,80,443 -o /var/log/ReverseTlsProxy/

PolarProxy will save the decrypted traffic as cleartext HTTP (or HTTP/2) to PCAP files in the “/var/log/ReverseTlsProxy/” directory.

Real-Time Analysis of Decrypted Traffic

Both the external (client-to-proxy) and internal (proxy-to-server) TCP sessions, in the reverse TLS proxy example above, are encrypted with TLS. This prevents passive network security monitoring tools, such as IDSs, DPI and DLP appliances, from analyzing the application layer data being sent and received. The PCAP files written to “/var/log/ReverseTlsProxy/” can be a valuable forensic asset when investigating an incident, but a real-time stream of the decrypted data is needed in order to swiftly detect and alert on potential security breaches and other incidents.

PolarProxy’s “--pcapoverip” option can be used to provide such a real-time stream of the decrypted data passing through the proxy. This data can easily be sent to a network interface using tcpreplay, as explained in our blog post “Sniffing Decrypted TLS Traffic with Security Onion”.

Security Considerations

The examples shown in this blog post all run PolarProxy with root privileges using sudo, which can be dangerous from a security perspective. PolarProxy is actually designed to be run without root privileges, but doing so prevents it from listening on a port below 1024. Luckily, this issue can easily be overcome with a simple port forwarding or redirect rule. The following iptables redirect rule can be used if PolarProxy is listening on TCP port 20443 and incoming HTTPS request are arriving to the eth0 interface of the proxy:

iptables -t nat -A PREROUTING -i eth0 -p tcp --dport 443 -j REDIRECT --to 20443

PolarProxy does not support loading settings from a config file. The password for the PKCS12 certificate will therefore need to be supplied on the command line, which can make it visible from a process listing. If this is a concern for you, then please consider using “hidepid” to hide processes from other users. You can find instructions on how to use hidepid in hardening guides for Debian, Arch, SUSE and most other Linux flavors.

Posted by Erik Hjelmvik on Thursday, 12 March 2020 15:45:00 (UTC/GMT)

Tags: #PolarProxy#TLS#SSL#PCAP#decrypt#HTTPS#HTTP#HTTP/2#http2#IMAPS#SNI#decrypt#ASCII-art

Share: Facebook   Twitter   Reddit   Hacker News Short URL: https://netresec.com/?b=2033d38


Sharing a PCAP with Decrypted HTTPS

Modern malware and botnet C2 protocols use TLS encryption in order to blend in with "normal" web traffic, sometimes even using legitimate services like Twitter or Instagram.

I did a live demo at the CS3Sthlm conference last year, titled "TLS Interception and Decryption", where I showed how TLS interception can be used to decrypt and analyze malicious HTTPS network traffic. During the demo I used DNS-over-HTTPS (DoH) and posted messages to Pastebin and Twitter, pretending to be a malware or malicious actor. The HTTPS network traffic was decrypted and analyzed live as part of my demo. The CS3Sthlm organizers have posted a video recording of the live demo on YouTube.

Erik presenting PolarProxy at CS3Sthlm, photo credit: CS3Sthlm

Image: Erik demoing TLS Interception and Decryption at CS3Sthlm 2019

We are now releasing a PCAP file with the decrypted network traffic captured during this live demo here:

» https://media.netresec.com/pcap/proxy-191023-091924.pcap «

This blog post provides a step-by-step walk-through of the decrypted HTTPS traffic in the released capture file.

The TLS decryption was performed by connecting a laptop to a custom WiFi access point, which was a Raspberry Pi configured as in our "Raspberry Pi WiFi Access Point with TLS Inspection" blog post. I additionally enabled the PCAP-over-IP feature in PolarProxy by starting it with the "--pcapoverip 57012" option. This allowed me to connect with Wireshark and NetworkMiner to TCP port 57012 on the TLS proxy and stream the decrypted traffic in order to perform live network traffic analysis.

Laptop, Raspberry Pi, PolarProxy, Internet ASCII

Image: Live demo network with Laptop (Browser, NetworkMiner, Wireshark), Raspberry Pi (PolarProxy) and the Internet.

Below follows a breakdown of various significant events of my demo and where you can find these events in the released capture file.

DNS lookup of "www.google.com" using DoH

  • Frame: 833
  • Protocol: DoH using HTTP/2 POST
  • Five tuple: 192.168.4.20:52694 104.16.248.249:80 TCP
DoH lookup of www.google.com shown in NetworkMiner DoH lookup of www.google.com shown in Wireshark

Google search for "tibetan fox psbattle"

  • Frame: 2292
  • Protocol: HTTP/2
  • Five tuple: 192.168.4.20:52716 216.58.211.4:80 TCP
Google search for 'tibetan fox psbattle' in Wireshark Google search for 'tibetan fox psbattle' in NetworkMiner

Tibetan Fox image downloaded from reddit

  • Frame: 3457
  • Protocol: HTTP/2
  • Five tuple: 192.168.4.20:52728 151.101.85.140:80 TCP
Image download from reddit shown in NetworkMiner

Orginal "tibetan fox" image downloaded from this reddit thread.

Tibetan Fox Remix Image HTTP/2 Download

  • Frame: 5805
  • Protocol: HTTP/2
  • Five tuple: 192.168.4.20:52769 151.101.84.193:80 TCP
Images downloaded via HTTP/2

DNS Lookup of "cs3sthlm.se"

  • Frame: 13494
  • Protocol: DoH using HTTP/2 POST
  • Five tuple: 192.168.4.20:52699 104.16.249.249:80 TCP

Images downloaded from CS3Sthlm's website

  • Frame: 14134
  • Protocol: HTTP/1.1
  • Five tuple: 192.168.4.20:52896 192.195.142.160:80 TCP
Images downloaded from CS3Sthlm's website

Data sent in HTTP/2 POST to Pastebin

  • Frame: 18572
  • Protocol: HTTP/2 POST
  • Five tuple: 192.168.4.20:52904 104.22.2.84:80 TCP
Data sent to Pastebin in HTTP/2 POST

The file "post.php.form-data" contains the data sent to Pastebin in the HTTP/2 POST request. Here are the reassembled contents of that file, including the "hello cs3 I am a malware" message:

-----------------------------54168074520069581482009826076
Content-Disposition: form-data; name="csrf_token_post"

MTU3MTgyMjg5OTFwcjBzODJaQ0NuUk9PT1B3ZTl0b20zdFg3ZkhXQ1R4
-----------------------------54168074520069581482009826076
Content-Disposition: form-data; name="submit_hidden"

submit_hidden
-----------------------------54168074520069581482009826076
Content-Disposition: form-data; name="paste_code"

hello cs3 I am a malware
-----------------------------54168074520069581482009826076
Content-Disposition: form-data; name="paste_format"

1
-----------------------------54168074520069581482009826076
Content-Disposition: form-data; name="paste_expire_date"

1H
-----------------------------54168074520069581482009826076
Content-Disposition: form-data; name="paste_private"

0
-----------------------------54168074520069581482009826076
Content-Disposition: form-data; name="paste_name"

malware traffic
-----------------------------54168074520069581482009826076--

Mallory80756920 logs in to Twitter

  • Frame: 24881
  • Protocol: HTTP/2 POST
  • Five tuple: 192.168.4.20:53210 104.244.42.65:80 TCP
Twitter credentials for Mallory80756920

Mallory80756920 posts a Tweet

  • Frame: 26993
  • Protocol: HTTP/2 POST
  • Five tuple: 192.168.4.20:53251 104.244.42.66:80 TCP

Mallory80756920 tweeted "Hello CS3! I'm in you!". The data was sent to twitter using an HTTP/2 POST request.

Twitter post in Wireshark Twitter post in NetworkMiner

Conclusions

A great deal of the interesting TLS traffic in the analyzed capture file is using the HTTP/2 protocol. This doesn't come as a surprise since more than half of all HTTPS traffic is using HTTP/2 nowadays (sources: server protocol statistics, client protocol statistics). It is therefore essential to be able to analyze HTTP/2 traffic if you have a TLS inspection (TLSI) solution in place. Unfortunately many TLSI products don't yet support the HTTP/2 protocol.

Wireshark was one of the first network traffic analysis tools to implement HTTP/2 support, much thanks to Alexis La Goutte. However, Wireshark's excellent "File > Export Objects" doesn't yet support extraction of files from HTTP/2 traffic. There are other ways to extract HTTP/2 file transfers with Wireshark, but they require a few additional steps in order to carve out the file to disk.

Luckily NetworkMiner extracts files from HTTP/2 as of version 2.5. In fact, we believe NetworkMiner is the first open source tool to support automatic HTTP/2 file extraction from PCAP.

Finally, I'd like to stress the point that modern malware use HTTPS, so you need to have a TLSI solution in place to analyze the malicious traffic. As the majority of all HTTPS traffic is using HTTP/2 you also need to ensure that you're able to analyze HTTP/2 traffic passing through your TLSI solution.

Posted by Erik Hjelmvik on Monday, 13 January 2020 12:45:00 (UTC/GMT)

Tags: #HTTP/2#http2#DoH#TLS#Google#decrypt#HTTPS#TLSI#TLS Inspection#TLS Interception#PolarProxy#NetworkMiner#Wireshark#CS3Sthlm#CS3#Forensics#PCAP#Video

Share: Facebook   Twitter   Reddit   Hacker News Short URL: https://netresec.com/?b=2015d89


NetworkMiner 2.5 Released

NetworkMiner 2.5

I am happy to announce the release of NetworkMiner 2.5 today! This new version includes new features like JA3 and parsers for the HTTP/2 and DoH protocols. We have also added support for a few older protocols that are still widely used, such as Kerberos and the CIFS browser protocol. Additionally, NetworkMiner can now parse PCAP files up to twice as fast as before!

Improving Passive TLS Analysis with JA3

Almost all web traffic is TLS encrypted nowadays, which prevents incident responders, analysts and investigators from inspecting otherwise unencrypted HTTP traffic for clues about malicious behavior or criminal intent. This requires analysts to use alternative approaches, such as looking at hostnames and X.509 certificates. This type of analysis is supported by NetworkMiner, since it parses Server Name Indication fields in client TLS handshakes and extracts X.509 certificates automatically when PCAP files are loaded.

In this release we’ve also added support for another passive TLS analysis technique called JA3, which is a method for fingerprinting TLS client implementations.

NetworkMiner leverages the JA3 fingerprint database from Trisul Network Analytics in order to match observed JA3 hashes to hashes of known malware and “normal” applications. This is what it looks like when the capture file “snort.log.1428364808”, from the FIRST 2015 “Hands-on Network Forensics” training (available here), has been loaded into NetworkMiner 2.5:

JA3 fingerprint of a Skype client

Image: JA3 fingerprint of a Skype client in NetworkMiner 2.5

The JA3 hash is also available in the “Parameters” tab, which is useful in order to find out what hosts that particular TLS implementation was reaching out to.

Filtering on JA3 hash 06207a1730b5deeb207b0556e102ded2 in NetworkMiner 2.5

Image: Filtering on JA3 hash 06207a1730b5deeb207b0556e102ded2

HTTP/2 and DoH Support

Passive analysis of TLS traffic, such as HTTPS, often doesn’t give sufficient visibility. Many organizations therefore use TLS proxies in order to decrypt the traffic going in and out from their networks. However, more than half of all HTTPS traffic is actually http2 (RFC 7540) nowadays. This has previously been an issue for users who wanted to analyze decrypted http2 traffic from their TLS intercepting proxies with NetworkMiner. We’re happy to announce that NetworkMiner now can parse http2 traffic, that has been decrypted by a TLS proxy, and extract files from the http2 transfers.

NetworkMiner 2.5 also supports the DNS over HTTPS (DoH) protocol (RFC 8484), which is a technique for sending DNS queries as http2 POST requests and parsing the returned data as DNS responses. We’ve incorporated the DoH data into NetworkMiner’s DNS tab, so that you can analyze it just like normal DNS traffic.

DoH traffic to mozilla.cloudflare-dns.com in NetworkMiner’s DNS tab

Image: DoH traffic to mozilla.cloudflare-dns.com in NetworkMiner’s DNS tab

Please note that NetworkMiner 2.5 does not perform TLS decryption. This means that NetworkMiner can only parse the contents of a TLS stream if it has been decrypted by a TLS proxy, such as PolarProxy.

Extracting Kerberos Hashes from PCAP

NetworkMiner’s support for the Kerberos protocol allows you to passively track which user accounts that are authenticating to what services, simply by monitoring network traffic. This is a feature is essential in order to track credential theft and lateral movement by adversaries inside your networks. After implementing kerberos username and hash extraction we realized that this feature could also be valuable for penetration testers. We therefore decided to present extracted Kerberos credentials in a format that is compatible with tools like hashcat and John the Ripper.

Kerberos krb5pa, krb5asrep and krb5tgs credentials extracted from the Wireshark sample capture file

Image: Kerberos krb5pa, krb5asrep and krb5tgs credentials extracted from the Wireshark sample capture file Krb-contrained-delegation.cap

For more information about Kerberos hashes, please see our Extracting Kerberos Credentials from PCAP blog post.

Even more NetBIOS and CIFS Artifacts!

NetworkMiner is a popular tool for extracting files transferred over SMB and SMB2 from capture files. It can also extract a great deal of information about the communicating hosts from protocols like NetBIOS and SMB/CIFS, but earlier this year Chris Raiter notified us about an important piece of information that was missing in NetworkMiner: NetBIOS Name Service (NBNS) lookups and responses!

Detection and export of NBNS packets request on twitter

A couple of months later Dan Gunter sent us another great feature request for another protocol that runs on top of NetBIOS: the CIFS Browser Protocol (aka MS-BRWS).

We’re happy to announce that NBNS queries and responses are now shown in NetworkMiner’s Parameters tab, and details like hostnames, domain names, Windows versions and uptime us extracted from the MS-BRWS protocol. See the screenshots below, which were created by loading the capture file “case09.pcap” from Richard Bejtlich’s TCP/IP Weapons School 2.0 Sample Lab into NetworkMiner 2.5. Thanks for sharing Richard!

Hostname, domain and Windows version extracted from MS-BRWS traffic

Image: Hostname, domain and Windows version extracted from MS-BRWS traffic

NBNS queries and responses in NetworkMiner’s Parameters tab

Image: NBNS queries and responses in NetworkMiner’s Parameters tab

Mono 5 Required for Linux and MacOS

Linux and MacOS users, who run NetworkMiner with help of Mono, will need to ensure they have Mono 5 (or later) installed in order to run NetworkMiner 2.5. We recommend using at least Mono 5.18.

Instructions for installing NetworkMiner on Linux can be found in our blog post ”HowTo install NetworkMiner in Ubuntu Fedora and Arch Linux”.

MacOS users can refer to our “Running NetworkMiner on Mac OS X” blog post.

Users who are unable to install Mono 5 are recommended to use the old NetworkMiner 2.4 release, which can be downloaded here:
https://www.netresec.com/?download=NetworkMiner_2-4

NetworkMiner Professional

Apart from the features mentioned so far, our commercial tool NetworkMiner Professional now comes with a few additional new features. One of these features is port independent identification of RDP traffic, so that mstshash credentials can be extracted from RDP sessions even if the service doesn’t run on port 3389. The OSINT lookup context menus in NetworkMiner Professional have also been enriched with the following online services:

Several new features have also been included in the command line tool NetworkMinerCLI, including:

  • Recursive loading of PCAP files with the "-R” switch.
  • Configurable export types (hosts, files, DNS etc) with the “-x” switch.
  • Relative paths in CSV, XML and JSON/CASE exports unless the “-- absolutePaths” switch is used.

Credits

I’d like to thank Dan Gunter, Chris Raiter, Chris Sistrunk and a few more (who I cannot mention here) for contributing with feature requests and bug reports that have helped improve NetworkMiner.

Upgrading to Version 2.5

Users who have purchased a license for NetworkMiner Professional 2.x can download a free update to version 2.5 from our customer portal, or use the “Help > Check for Updates” feature. Those who instead prefer to use the free and open source version can grab the latest version of NetworkMiner from the official NetworkMiner page.

Posted by Erik Hjelmvik on Thursday, 07 November 2019 11:45:00 (UTC/GMT)

Tags: #NetworkMiner#JA3#HTTP/2#http2#DoH#Kerberos#PCAP#hashcat#John#NetworkMinerCLI#OSINT

Share: Facebook   Twitter   Reddit   Hacker News Short URL: https://netresec.com/?b=19B4a1a


Raspberry PI WiFi Access Point with TLS Inspection

This is a how-to guide for setting up a Raspberry Pi as a WiFi Access Point, which acts as a transparent TLS proxy and saves the decrypted traffic in PCAP files.

Raspberry Pi 4 Model B running PolarProxy
Image: Raspberry Pi 4 Model B running PolarProxy

Step 1: Install PolarProxy for Linux ARM

We will start with installing PolarProxy, which will be used for the TLS decryption and re-encryption. The steps are almost identical to those in the official PolarProxy installation guide, except here we will download the "linux-arm" build of PolarProxy instead of the x64 version.

sudo adduser --system --shell /bin/bash proxyuser
sudo mkdir /var/log/PolarProxy
sudo chown proxyuser:root /var/log/PolarProxy/
sudo chmod 0775 /var/log/PolarProxy/
sudo su - proxyuser
mkdir ~/PolarProxy
cd ~/PolarProxy/
curl https://www.netresec.com/?download=PolarProxy_linux-arm | tar -xzf -
exit
sudo cp /home/proxyuser/PolarProxy/PolarProxy.service /etc/systemd/system/PolarProxy.service
sudo systemctl enable PolarProxy.service
sudo systemctl start PolarProxy.service

Note: The installation instructions above will fail on 64-bit ARM Linux OS's since the downloaded PolarProxy tarball is compiled for 32-bit ARM Linux. Luckily, we do have a linux-arm64 build as well, which is available here:
https://www.netresec.com/?download=PolarProxy_linux-arm64

Verify that the PolarProxy service is running as expected with these commands:

systemctl status PolarProxy.service
journalctl -t PolarProxy

Step 2: Set up your Pi as a WiFi AP

The Raspberry Pi Foundation have a great guide for "Setting up a Raspberry Pi as a Wireless Access Point". Follow the instructions in their guide for the NAT mode setup (first section), but replace the iptables config with this:

sudo iptables -t nat -A POSTROUTING -o eth0 -j MASQUERADE
sudo iptables -A INPUT -i wlan0 -p tcp --dport 10443 -m state --state NEW -j ACCEPT
sudo iptables -t nat -A PREROUTING -i wlan0 -p tcp --dport 443 -j REDIRECT --to 10443
Then save the iptables rules with:
sudo sh -c "iptables-save > /etc/iptables.ipv4.nat"
Finally, edit /etc/rc.local and add this iptables-restore command just above "exit 0" to install the rules on boot.
iptables-restore < /etc/iptables.ipv4.nat

Step 3: Configure the Clients

The final step is to connect the clients (phones, tablets or computers) to the Raspberry Pi WiFi Access Point and install the root CA from PolarProxy.

Follow the instructions for "Trusting the PolarProxy root CA" in the official PolarProxy setup guide to install the public certificate from the TLS proxy in your clients. The certificate can be downloaded from the Raspberry Pi by browsing to http://192.168.4.1:10080/polarproxy.cer.

PCAP PCAP PCAP

Your Raspberry Pi WiFi AP will now intercept all HTTPS traffic going to tcp/443 and save the decrypted traffic in PCAP files, one per hour. The PCAP files with decrypted TLS traffic can be found in the /var/log/PolarProxy/ directory of your Raspberry Pi.

pi@raspberrypi:/var/log/PolarProxy $ ls *.pcap
proxy-190925-075704.pcap proxy-190925-152902.pcap
proxy-190925-085704.pcap proxy-190925-162902.pcap
proxy-190925-095704.pcap proxy-190925-172902.pcap
proxy-190925-105704.pcap proxy-190925-182902.pcap
proxy-190925-115704.pcap proxy-190926-062902.pcap
proxy-190925-125704.pcap proxy-190926-072902.pcap
proxy-190925-132704.pcap proxy-190926-082902.pcap
proxy-190925-132902.pcap proxy-190926-092902.pcap
proxy-190925-142902.pcap proxy-190926-102902.pcap

HTTP/2 traffic to Facebook opened in Wireshark
Image: Decrypted HTTP/2 traffic to Facebook opened in Wireshark

Posted by Erik Hjelmvik on Thursday, 26 September 2019 11:37:00 (UTC/GMT)

Tags: #PolarProxy#PCAP#WiFi#TLS#SSL#HTTPS#Wireshark#http2

Share: Facebook   Twitter   Reddit   Hacker News Short URL: https://netresec.com/?b=199dc9a

2019 June

PolarProxy Released

X / twitter

NETRESEC on X / Twitter: @netresec

Mastodon

NETRESEC on Mastodon: @netresec@infosec.exchange