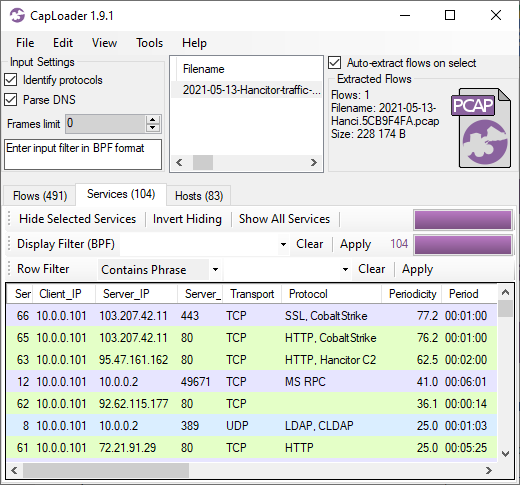
Forensic Timeline of an IcedID Infection
The BackConnect and VNC parsers that were added to NetworkMiner 2.8.1 provide a unique possibility to trace the steps of an attacker with help of captured network traffic from a hacked computer.
In this blog post I use the free and open source version of NetworkMiner to see how GzipLoader downloads IcedID, after which the attacker deploys BackConnect VNC to purchase an iPhone 14 with a stolen credit card and then drops Cobalt Strike on the victim PC.
The analyzed pcap is 2022-10-31-IcedID-with-DarkVNC-and-Cobalt-Strike-full-pcap-raw.pcap from Brad Duncan's malware-traffic-analysis.net blog.
Safety First
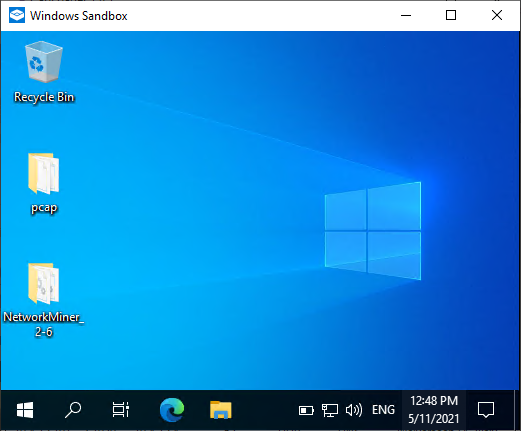
I ran NetworkMiner in a Windows Sandbox when analyzing this PCAP file to avoid accidentally infecting my computer with any of the malicious artifacts that NetworkMiner extracts from the network traffic.
Another safe way to analyze Windows malware is to run NetworkMiner in Linux or macOS.
14:47 GzipLoader
This infection starts with GzipLoader (aka “IcedID Downloader”) reaching out to its C2 server on vgiragdoffy[.]com (67.205.184.237:80) to download IcedID.
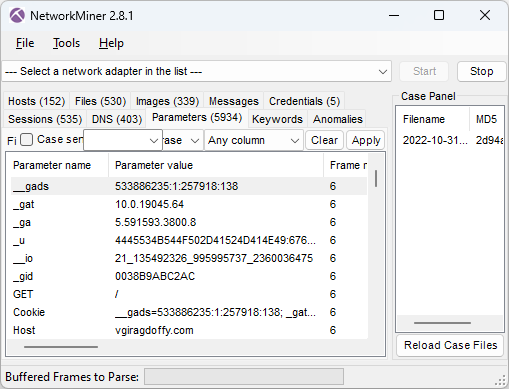
Image: Cookie parameters from GzipLoader request
The “_gat” cookie value in frame number 6 tells us that the victim machine is running a Windows 10 build 19045 (aka 22H2). The long “_u” value contains the victim’s username and hostname in hexadecimal representation and the “__io” value is the logged in user’s SID. NetworkMiner decodes these values from the GzipLoader request and displays them in the Hosts tab.
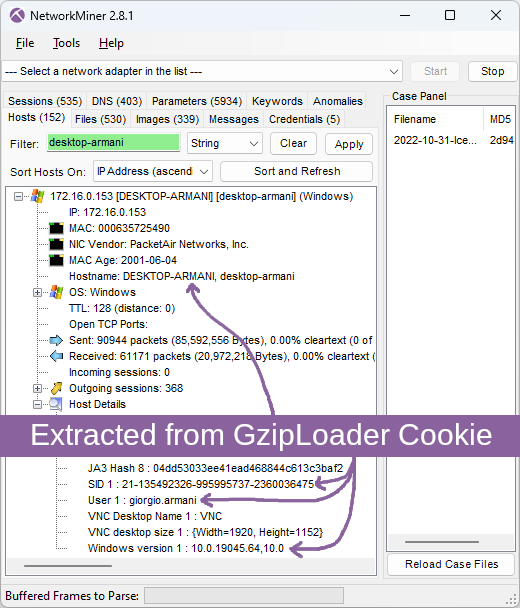
Image: Hostname, SID, username and Windows version extracted from GzipLoader cookie
For more info about the GzipLoader cookie, see IcedID PhotoLoader evolution by Jason Reaves and the eSentire blog post on Gootloader and IcedID.
The response for this GzipLoader request is a 550 kB file (MD5 700c602086590b05dde8df57933c7e68) with a fake gzip header. This file actually contains the IcedID DLL (Odwikp.dll) and license.dat files.
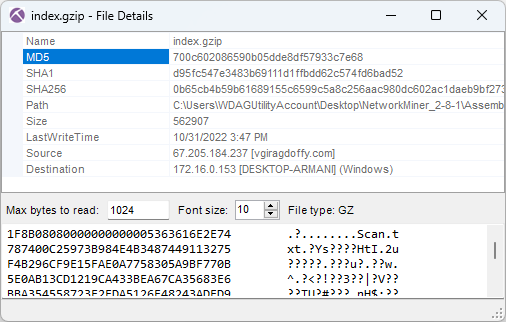
Image: Fake gzip file containing IcedID
14:47 IcedID
The banking trojan IcedID (aka BokBot) gets launched at 14:47:29 UTC (frame 641) after which it connects to these four IcedID servers used for payload delivery and C2:
- ringashopsu[.]com = 137.184.208.116
- sainforgromset[.]com = 138.68.255.102
- yeloypod[.]hair = 94.140.114.103
- airsaintol[.]beauty = 66.63.168.75
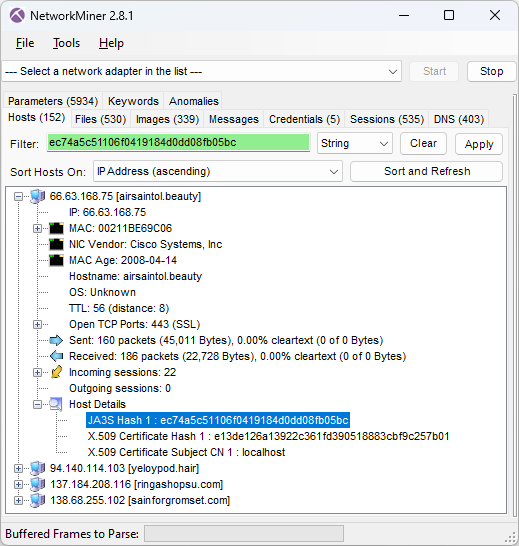
Image: JA3S hash of C2 server
These four IcedID servers all run TLS servers with self signed certificates issued for "localhost" and doing TLS handshakes with JA3S hash ec74a5c51106f0419184d0dd08fb05bc. Both these properties can be used as filters in NetworkMiner's Hosts tab to only display the IcedID C2 servers.
![Self-signed X.509 certificate issued to localhost from ringashopsu[.]com with thumbprint d14983ecbe0f97023721d0960f5dc98388809cc9](https://www.netresec.com/images/X-509_certificate_d14983ecbe0f97023721d0960f5dc98388809cc9_ringashopsu-com_405x515.png)
Image: Self-signed certificate from ringashopsu[.]com
14:59 BackConnect and Keyhole VNC
Shortly after the IcedID C2 traffic has been started the IcedID bot also initiates BackConnect C2 connections to 137.74.104.108 on TCP port 8080 (frame 4505 at 14:59:14 UTC).
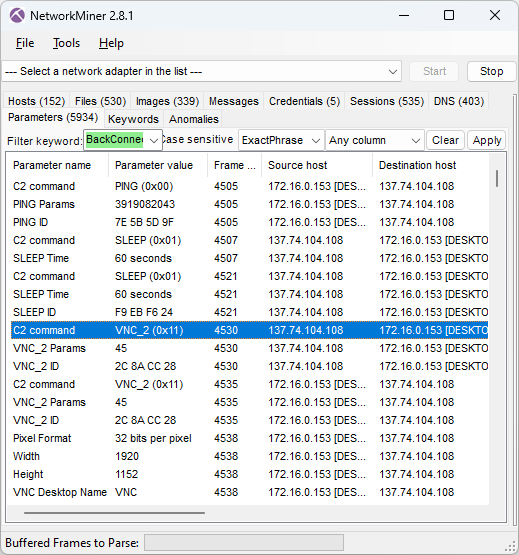
Image: IcedID BackConnect communication
The BackConnect C2 server tells the bot to sleep for 60 seconds two times before launching a reverse VNC session with command 0x11 (frame 4530 at 15:01.09 UTC).
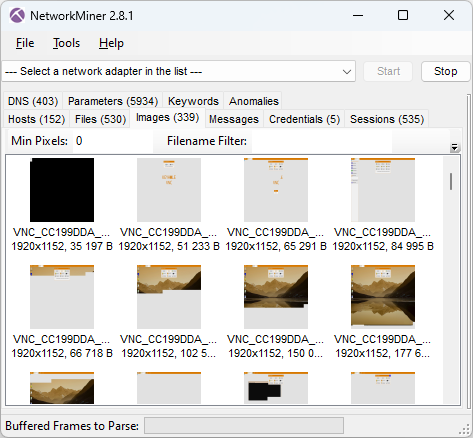
Image: BackConnect VNC screenshots

Image: Screenshot of attacker’s view of victim screen (Keyhole VNC)
15:06 Apple Store
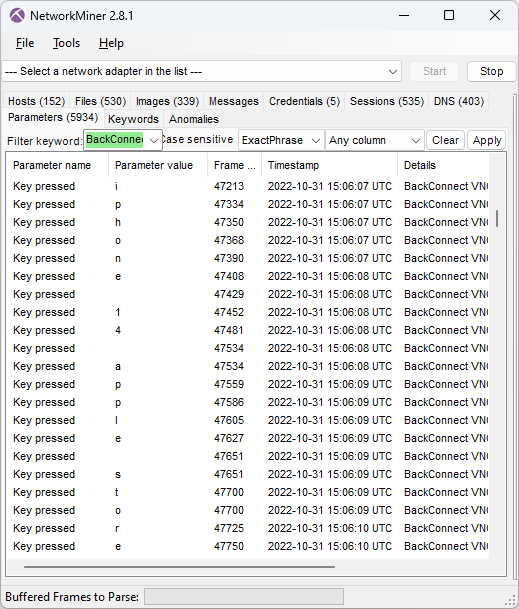
Image: Attacker’s keystrokes extracted from BackConnect VNC traffic
The keylog of the attacker above reveals that the attacker is typing “iphone 14 apple store buy”. The VNC graphics that NetworkMiner extracted from the PCAP file additionally reveal that this was a Google search query typed into an Edge browser.

Image: Google search results from reverse VNC session
15:10 Credit Card payment
The attacker proceeds to the Apple Store, puts a black iPhone 14 Plus for $987.99 into the shopping cart, enters a delivery address in West Hartford (US) and then inputs credit card details for the payment.

Image: Credit card details entered in Apple Store by attacker
Luckily, the transaction was denied by Apple Store.

Image: Payment authorization failed
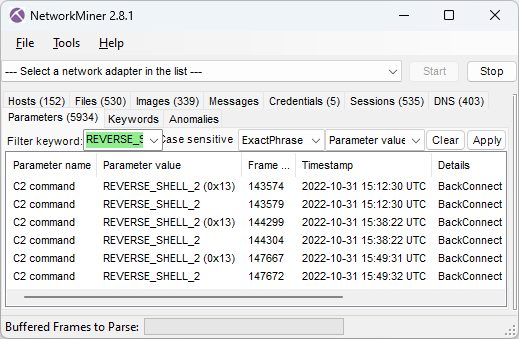
15:12 Reverse Shell
After having failed to buy an iPhone through the hacked computer the attacker instead deploys three reverse shell sessions using the BackConnect C2 channel.
These three commands are issued in the first reverse shell session:
arp -a
dir \\172.16.0.12\c$
In the second shell session the attacker first runs these three commands:
net group "domain admins" /dom
nltest /domain_trusts /all_trusts
...and then starts a file manager session through the BackConnect C2 channel.
15:40 Deploy Cobalt Strike
The BackConnect file manager is used to upload a Cobalt Strike binary called P2.dll to "C:\ProgramData\" on the victim computer in frame 144535.
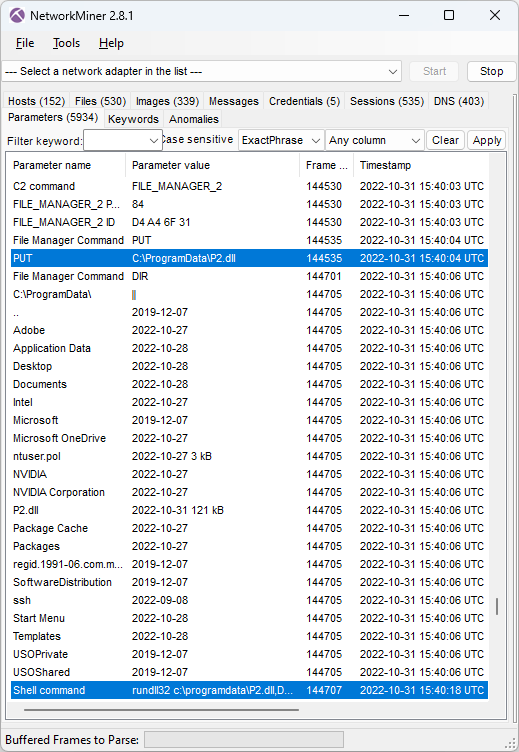
Image: CobaltStrike delivered to victim through BackConnect's File Manager
The uploaded P2.dll is then executed by running this command in the reverse shell session (frame 144707):
NetworkMiner extracts this uploaded DLL from the BackConnect network traffic.
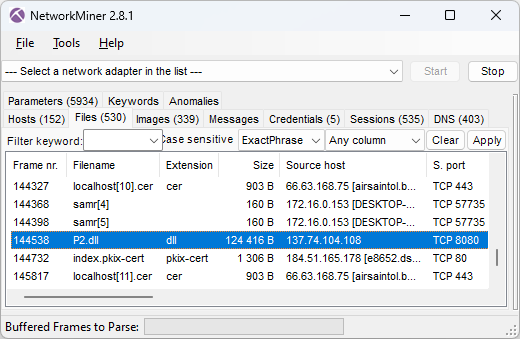
Image: Files extracted from network traffic
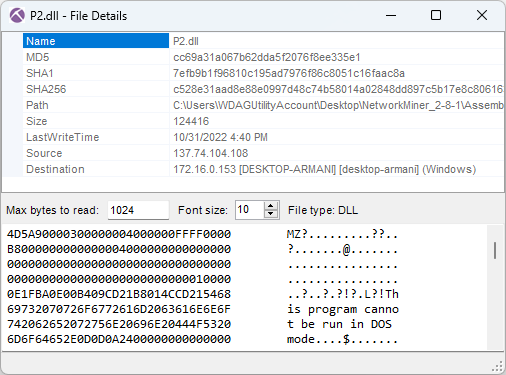
Image: Details for Cobalt Strike P2.dll
 As you can see in the screenshot above, the MD5 hash of P2.dll is cc69a31a067b62dda5f2076f8ee335e1. This file is flagged as malicious by most AV vendors (P2.dll on VT).
However, none of them label it as Cobalt Strike. Luckily I was able to use Triage's malware config extractor to verify that this was indeed Cobalt Strike (P2.dll on tria.ge). Triage also revealed that the CobaltStrike C2 URL was
As you can see in the screenshot above, the MD5 hash of P2.dll is cc69a31a067b62dda5f2076f8ee335e1. This file is flagged as malicious by most AV vendors (P2.dll on VT).
However, none of them label it as Cobalt Strike. Luckily I was able to use Triage's malware config extractor to verify that this was indeed Cobalt Strike (P2.dll on tria.ge). Triage also revealed that the CobaltStrike C2 URL was
clouditsoft[.]com:8008/static-directory/mg.jpg
After the DLL gets executed the victim PC establishes Cobalt Strike beacon C2 connections to clouditsoft[.]com on port 8008 (frame 144715).
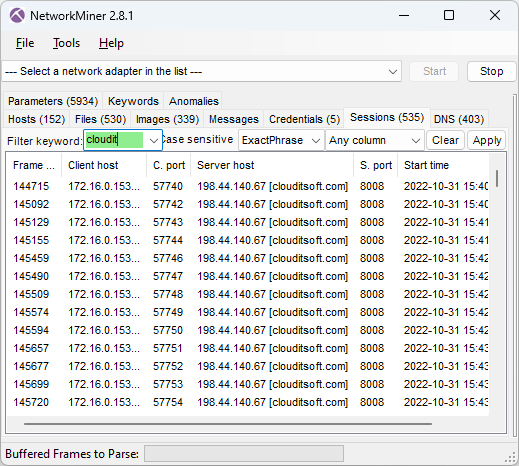
Image: Cobalt Strike beacon sessions
15:41 MOAR COBALT STRIKE
The BackConnect Reverse Shell log in NetworkMiner's Parameters tab shows that the attacker also attempted to download Cobalt Strike using PowerShell at 15:41:59 UTC (frame 145176) with this command:
IOC List
- IP:port 67.205.184.237:80 (GzipLoader)
- DNS vgiragdoffy[.]com (GzipLoader)
- MD5 700c602086590b05dde8df57933c7e68 (Fake gzip file)
- MD5 f57ab2e5e5720572d5eb19010ec8dcb4 (IcedID Odwikp.dll from fake gzip)
- MD5 57a9d9acb389bd74a7423a16ef81ac18 (IcedID license.dat from fake gzip)
- DNS ringashopsu[.]com (IcedID C2)
- DNS sainforgromset[.]com (IcedID C2)
- DNS yeloypod[.]hair (IcedID C2)
- DNS airsaintol[.]beauty (IcedID C2)
- IP:port 137.184.208.116:443 (IcedID C2)
- IP:port 138.68.255.102:443(IcedID C2)
- IP:port 94.140.114.103:443 (IcedID C2)
- IP:port 66.63.168.7:443 (IcedID C2)
- JA3S hash ec74a5c51106f0419184d0dd08fb05bc (IcedID C2)
- IP:port 137.74.104.108:8080 (IcedID BackConnect C2)
- MD5 cc69a31a067b62dda5f2076f8ee335e1 (CobaltStrike P2.dll)
- DNS clouditsoft[.]com (CobaltStrike C2)
- IP:port 198.44.140.67:8008 (CobaltStrike C2)
Posted by Erik Hjelmvik on Thursday, 12 October 2023 13:23:00 (UTC/GMT)
Tags: #NetworkMiner #IcedID #GzipLoader #BackConnect #VNC #CobaltStrike #Cobalt Strike #Windows Sandbox #ec74a5c51106f0419184d0dd08fb05bc #JA3S

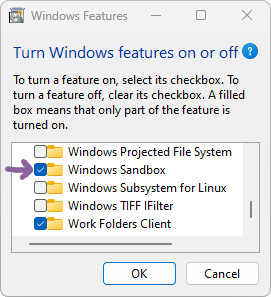 Follow these steps to install Windows Sandbox: