Showing blog posts from 2017

rss Google News

Don't Delete PCAP Files - Trim Them!

We are happy to release TrimPCAP today! TrimPCAP is a free open source tool that reduces the size of capture files in an intelligent way.

TrimPCAP

The retention period of a packet capture solution is typically limited by either legal requirements or available disk space. In the latter case the oldest capture files are simply removed when the storage starts getting full. This means that if there is a long ongoing session, such as a download of a large ISO file, streamed video or a reverse shell backdoor, then the start of this session will likely be removed.

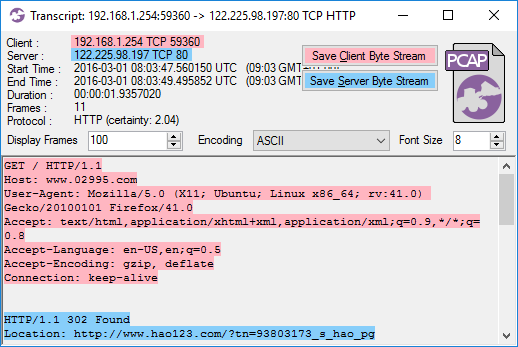
I know from experience that it’s painful to analyze network traffic where the start of a session is missing. The most important and interesting stuff generally happens in the beginning of each session, such as the HTTP GET request for an ISO file. As an analyst you don’t need to look at all the other packets in that ISO download (unless you believe the ISO contains malware), it’s enough to see that there is a GET request for the file and the server responds with a “200 OK”.

CapLoader Transcript of ISO download

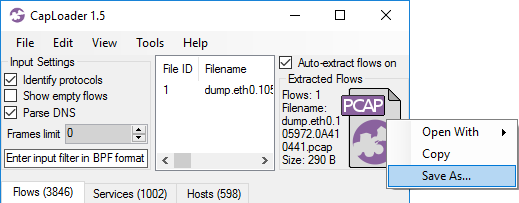
Image: CapLoader transcript of an ISO download

If that download had been truncated, so that only the last few packets were remaining, then it would be really difficult to know what was being downloaded. The same is true also for other protocols, including proprietary C2 protocols used by botnets and other types of malware.


  TrimPCAP  

TrimPCAP is designed to overcome the issue with truncated sessions by removing data from the end of sessions rather than from the beginning. This also comes with a great bonus when it comes to saving on disk usage, since the majority of the bytes transferred across the Internet are made up of big sessions (a.k.a “Elephant Flows”). Thus, by trimming a PCAP file so that it only contains the first 100kB of each TCP and UDP session it’s possible to significantly reduce required storage for that data.

The following command reduces the PCAP dataset used in our Network Forensics Training from 2.25 GB to just 223 MB:

user@so$ python trimpcap.py 102400 /nsm/sensor_data/so-eth1/dailylogs/*/*
Trimming capture files to max 102400 bytes per flow.
Dataset reduced by 90.30% = 2181478771 bytes
user@so$

A maximum session size (or "flow cutoff") of 100kB enables trimpcap.py to reduce the required storage for that dataset to about 10% of its original size, which will significantly extend the maximum retention period.


Putting TrimPCAP Into Practice

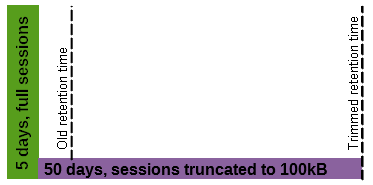
Let’s assume that your organization currently has a maximum full content PCAP retention period of 10 days and that trimming sessions to 100kB reduces the required storage to 10%. TrimPCAP will then enable you to store 5 days with full session data plus 50 additional days with trimmed sessions using the same disk space as before!

TrimPCAP retention period extension

A slightly more advanced scheme would be to have multiple trim limits, such as trimming to 1MB after 3 days, 100kB after 6 days and 10kB after 30 days. Such a setup would probably extend your total retention period from 10 days to over 100 days.

An even more advanced trimming scheme is implemented in our packet capture agent PacketCache. PacketCache constantly trims its PCAP dataset because it is designed to use only 1 percent of a PC’s RAM to store observed packets, in case they are needed later on for incident response. PacketCache uses a trim limit which declines individually for each observed TCP and UDP session depending on when they were last observed.


Downloading TrimPCAP

TrimPCAP is open source software and is released under the GNU General Public License version 2 (GPLv2). You can download your own copy of TrimPCAP from the official TrimPCAP page:
https://www.netresec.com/?page=TrimPCAP

Happy trimming!

✂- - - - - - - - -

Posted by Erik Hjelmvik on Tuesday, 05 December 2017 12:40:00 (UTC/GMT)

Tags: #PCAP#python#flow

Share: Facebook   Twitter   Reddit   Hacker News Short URL: https://netresec.com/?b=17Cf81f


CapLoader 1.6 Released

CapLoader 1.6

CapLoader is designed to simplify complex tasks, such as digging through gigabytes of PCAP data looking for traffic that sticks out or shouldn’t be there. Improved usability has therefore been the primary goal, when developing CapLoader 1.6, in order to help our users do their work even more efficiently than before.

Some of the new features in CapLoader 1.6 are:

  • Context aware selection and filter suggestions when right-clicking a flow, session or host.
  • Support for IPv6 addresses in the BPF syntax for Input Filter as well as Display Filter.
  • Flows that are inactive for more than 60 minutes are considered closed. This timeout is configurable in Tools > Settings.


Latency Measurements

CapLoader 1.6 also introduces a new column in the Flows tab labeled “Initial_RTT”, which shows the Round Trip Time (RTT) measured during the start of a session. The RTT is defined as “the time it takes for a signal to be sent plus the time it takes for an acknowledgment of that signal to be received”. RTT is often called “ping time” because the ping utility computes the RTT by sending ICMP echo requests and measuring the delay until a reply is received.

Initial RTT in CapLoader Flows Tab
Image: CapLoader 1.6 showing ICMP and TCP round trip times.

But using a PCAP file to measure the RTT between two hosts isn’t as straight forward as one might think. One complicating factor is that the PCAP might be generated by the client, server or by any device in between. If we know that the sniffing point is at the client then things are simple, because we can then use the delta-time between an ICMP echo request and the returning ICMP echo response as RTT. In lack of ping traffic the same thing can be achieved with TCP by measuring the time between a SYN and the returning SYN+ACK packet. However, consider the situation when the sniffer is located somewhere between the client and server. The previously mentioned method would then ignore the latency between the client and sniffer, the delta-time will therefore only show the RTT between the sniffer and the server.

This problem is best solved by calculating the Initial RTT (iRTT) as the delta-time between the SYN packet and the final ACK packet in a TCP three-way handshake, as shown here:

Initial Round Trip Time in PCAP Explained
Image: Initial RTT is the total time of the black/bold packet traversal paths.

Jasper Bongertz does a great job of explaining why and how to use the iRTT in his blog post “Determining TCP Initial Round Trip Time”, so I will not cover it in any more detail here. However, keep in mind that iRTT can only be calculated this way for TCP sessions. CapLoader therefore falls back on measuring the delta time between the first packet in each direction when it comes to transport protocols like UDP and ICMP.


Exclusive Features Not Available in the Free Trail

The new features mentioned so far are all available in the free 30 day CapLoader trial, which can be downloaded from our CapLoader product page (no registration required). But we’ve also added features that are only available in the commercial/professional edition of CapLoader. One such exclusive feature is the matching of hostnames against the Cisco Umbrella top 1 million domain list. CapLoader already had a feature for matching domain names against the Alexa top 1 million list, so the addition of the Umbrella list might seem redundant. But it’s actually not, the two lists are compiled using different data sources and therefore complement each other (see our blog post “Domain Whitelist Benchmark: Alexa vs Umbrella” for more details). Also, the Umbrella list contains subdomains (such as www.google.com, safebrowsing.google.com and accounts.google.com) while the Alexa list only contains main domains (like “google.com”). CapLoader can therefore do more fine-granular domain matching with the Umbrella list (requiring a full match of the Umbrella domain), while the Alexa list enables a more rough “catch ‘em all” approach (allowing *.google.com to be matched).

CapLoader Hosts tab with ASN, Alexa and Umbrella details

CapLoader 1.6 also comes with an ASN lookup feature, which presents the autonomous system number (ASN) and organization name for IPv4 and IPv6 addresses in a PCAP file (see image above). The ASN lookup is built using the GeoLite database created by MaxMind. The information gained from the MaxMind ASN database is also used to provide intelligent display filter CIDR suggestions in the context menu that pops up when right-clicking a flow, service or host.

CapLoader Flows tab with context menu for Apply as Display Filter
Image: Context menu suggests Display Filter BPF “net 104.84.152.0/17” based on the server IP in the right-clicked flow.

Users who have previously purchased a license for CapLoader can download a free update to version 1.6 from our customer portal.


Credits and T-shirts

We’d like to thank Christian Reusch for suggesting the Initial RTT feature and Daan from the Dutch Ministry of Defence for suggesting the ASN lookup feature. We’d also like to thank David Billa, Ran Tohar Braun and Stephen Bell for discovering and reporting bugs in CapLoader which now have been fixed. These three guys have received a “PCAP or it didn’t happen” t-shirt as promised in our Bug Bounty Program.

Got a t-shirt for crashing CapLoader

If you too wanna express your view of outlandish cyber attack claims without evidence, then please feel free to send us your bug reports and get rewarded with a “PCAP or it didn’t happen” t-shirt!

Posted by Erik Hjelmvik on Monday, 09 October 2017 08:12:00 (UTC/GMT)

Tags: #CapLoader#free#IPv6#BPF#CIDR#PCAP#Umbrella#Alexa

Share: Facebook   Twitter   Reddit   Hacker News Short URL: https://netresec.com/?b=17Aba35


Hunting AdwindRAT with SSL Heuristics

An increasing number of malware families employ SSL/TLS encryption in order to evade detection by Network Intrusion Detection Systems (NIDS). In this blog post I’m gonna have a look at Adwind, which is a cross-platform Remote Access Trojan (RAT) that has been using SSL to conceal it’s traffic for several years. AdwindRAT typically connects SSL sessions to seemingly random TCP ports on the C2 servers. Hence, a heuristic that could potentially be used to hunt for Adwind RAT malware is to look for SSL traffic going to TCP ports that normally don’t use SSL. However, relying on ONLY that heuristic would generate way too many false positives.

Brad Duncan did an interesting writeup about Adwind RAT back in 2015, where he wrote:

I saw the same certificate information used last week, and it continues this week.
  • commonName = assylias
  • organizationName = assylias.Inc
  • countryName = FR
Currently, this may be the best way to identify Adwind-based post-infection traffic. Look for SSL traffic on a non-standard TCP port using that particular certificate.

Unfortunately, Adwind RAT has evolved to use other CN’s in their new certificates, so looking for “assylias.Inc” will not cut it anymore. However, looking for SSL traffic on non-standard TCP ports still holds on the latest Adwind RAT samples that we’ve analyzed.

The PT Research Attack Detection Team (ADT) sent an email with IDS signatures for detecting AdwindRAT to the Emerging-Sigs mailing list a few days ago, where they wrote:

“We offer one of the ways to detect malicious AdwindRAT software inside the encrypted traffic. Recently, the detection of this malicious program in network traffic is significantly reduced due to encryption. As a result of the research, a stable structure of data fragments was created.”

Not only is it awesome that they were able to detect static patterns in the encrypted data, they also provided 25 PCAP files containing AdwindRAT traffic. I loaded these PCAP files into NetworkMiner Professional in order to have a look at the X.509 certificates. NetworkMiner Professional supports Port-Independent Protocol Identification (PIPI), which means that it will automatically identify the C2 sessions as SSL, regardless of which port that is used. It will also automatically extract the X.509 certificates along with any other parameters that can be extracted from the SSL handshake before the session goes encrypted.

X.509 certificates extracted from AdwindRAT PCAP by NetworkMiner 
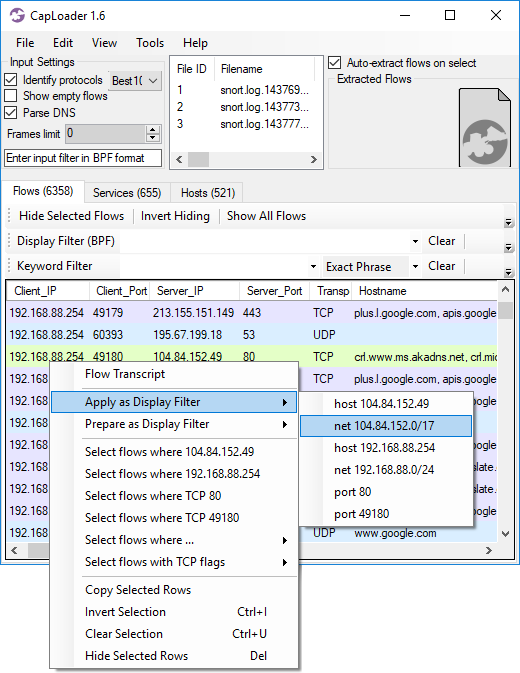
Image: Files extracted from ADT’s PCAP files that mach “Oracle” and “cer”.

In this recent campaign the attackers used X.509 certificates claiming to be from Oracle. The majory of the extracted certificates were exactly 1237 bytes long, so maybe they’re all identical? This is what the first extracted X.509 certificate looks like:

Self-signed Oracle America, Inc. X.509 certificate

The cert claims to be valid for a whopping 100 years!

Self-signed Oracle America, Inc. X.509 certificate

Self-signed, not trusted.

However, after opening a few of the other certificates it's clear that each C2 server is using a unique X.509 certificate. This can be quickly confirmed by opening the parameters tab in NetworkMiner Pro and showing only the Certificate Hash or Subject Key Identifier values.

NetworkMiner Parameters tab showing Certificate Hash values Image: Certificate Hash values found in Adwind RAT’s SSL traffic

I also noted that the CN of the certificates isn’t constant either; these samples use CN’s such as “Oracle America”, “Oracle Tanzania”, “Oracle Arusha Inc.”, “Oracle Leonardo” and “Oracle Heaven”.

The CN field is normally used to specify which domain(s) the certificate is valid for, together with any additinoal Subject Alternative Name field. However, Adwind RAT’s certificates don’t contain any domain name in the CN field and they don’t have an Alternative Name record. This might very well change in future versions of this piece of malware though, but I don’t expect the malware authors to generate a certificate with a CN matching the domain name used by each C2 server. I can therefore use this assumption in order to better hunt for Adwind RAT traffic.

But how do I know what public domain name the C2 server has? One solution is to use passive DNS, i.e. to capture all DNS traffic in order to do passive lookups locally. Another solution is to leverage the fact that the Adwind RAT clients use the Server Name Indication (SNI) when connecting to the C2 servers.

TLS Server Name (aka SNI) and Subject CN values don’t match for AdwindRAT Image: TLS Server Name (aka SNI) and Subject CN values don’t match for AdwindRAT

TLS Server Name (SNI) with matching Subject CN from Google Image: TLS Server Name (SNI) with matching Subject CN from Google.

My conclusion is therefore that Brad’s recommendations from 2015 are still pretty okay, even for the latest wave of Adwind RAT traffic. However, instead of looking for a fix CN string I’d prefer to use the following heuristics to hunt for this type of C2 traffic:

  • SSL traffic to non-standard SSL port
  • Self signed X.509 certificate
  • The SNI domain name in the Client Hello message does not match the CN or Subject Alternative Name of the certificate.

These heuristics will match more than just Adwind RAT traffic though. You’ll find that the exact same heuristics will also help identify other pieces of SSL-enabled malware as well as Tor traffic.

Posted by Erik Hjelmvik on Monday, 04 September 2017 19:01:00 (UTC/GMT)

Tags: #NetworkMiner#SSL#TLS#port#PCAP#PIPI#X.509#certificate#extract

Share: Facebook   Twitter   Reddit   Hacker News Short URL: https://netresec.com/?b=1798dc3


NetworkMiner 2.2 Released

NetworkMiner 2.2 = Harder Better Faster Stronger

NetworkMiner 2.2 is faster, better and stronger than ever before! The PCAP parsing speed has more than doubled and even more details are now extracted from analyzed packet capture files.

The improved parsing speed of NetworkMiner 2.2 can be enjoyed regardless if NetworkMiner is run in Windows or Linux, additionally the user interface is more responsive and flickers way less when capture files are being loaded.

User Interface Improvements

The keyword filter available in the Files, Messages, Sessions, DNS and Parameters tabs has been improved so that the rows now can be filtered on a single column of choice by selecting the desired column in a drop-down list. There is also an “Any column” option, which can be used to search for the keyword in all columns.

Keyword drop-down in NetworkMiner's Parameters tab

The Messages tab has also received an additional feature, which allows the filter keyword to be matched against the text in the message body as well as email headers when the “Any column” option is selected. This allows for an efficient analysis of messages (such as emails sent/received through SMTP, POP3 and IMAP as well as IRC messages and some HTTP based messaging platforms), since the messages can be filtered just like in a normal e-mail client.

We have also given up on using local timestamp formats; timestamps are now instead shown using the yyyy-MM-dd HH:mm:ss format with time zone explicitly stated.

Protocol Parsers

NetworkMiner 2.2 comes with a parser for the Remote Desktop Protocol (RDP), which rides on top of COTP and TPKT. The RDP parser is primarily used in order to extract usernames from RDP cookies and show them on the Credentials tab. This new version also comes with better extraction of SMB1 and SMB2 details, such as NTLM SSP usernames.

RDP Cookies extracted with NetworkMiner 2.2

One big change that has been made behind the scenes of NetworkMiner is the move from .NET Framework 2.0 to version 4.0. This move doesn’t require any special measures to be taken for most Microsoft Windows users since the 4.0 Framework is typically already installed on these machines. If you’re running NetworkMiner in Linux, however, you might wanna check out our updated blog post on how to install NetworkMiner in Linux.

We have also added an automatic check for new versions of NetworkMiner, which runs every time the tool is started. This update check can be disabled by adding a --noupdatecheck switch to the command line when starting NetworkMiner.

NetworkMiner.exe --noupdatecheck capturefile.pcap

NetworkMiner Professional

Even though NetworkMiner 2.2 now uses ISO-like time representations NetworkMiner still has to decide which time zone to use for the timestamps. The default decision has always been to use the same time zone as the local machine, but NetworkMiner Professional now additionally comes with an option that allows the user to select whether to use UTC (as nature intended), the local time zone or some other custom time zone for displaying timestamps. The time zone setting can be found in the “Tools > Settings” menu.

UPDATE: With the release of NetworkMiner 2.3 the default time zone is now UTC unless the user has specifically selected a different time zone.

The Port-Independent-Protocol-Detection (PIPI) feature in NetworkMiner Pro has been improved for more reliable identification of HTTP, SSH, SOCKS, FTP and SSL sessions running on non-standard port numbers.

CASE / JSON-LD Export

We are happy to announce that the professional edition of NetworkMiner 2.2 now has support for exporting extracted details using the Cyber-investigation Analysis Standard Expression (CASE) format, which is a JSON-LD format for digital forensics data. The CASE export is also available in the command line tool NetworkMinerCLI.

We would like to thank Europol for recommending us to implement the CASE export format in their effort to adopt CASE as a standard digital forensic format. Several other companies in the digital forensics field are currently looking into implementing CASE in their tools, including AccessData, Cellebrite, Guidance, Volatility and XRY. We believe the CASE format will become a popular format for exchanging digital forensic data between tools for digital forensics, log correlation and SIEM solutions.

We will, however, still continue supporting and maintaining the CSV and XML export formats in NetworkMiner Professional and NetworkMinerCLI alongside the new CASE format.

Credits

I would like to thank Sebastian Gebhard and Clinton Page for reporting bugs in the Credentials tab and TFTP parsing code that now have been fixed. I would also like to thank Jeff Carrell for providing a capture file that has been used to debug an issue in NetworkMiner’s OpenFlow parser. There are also a couple of users who have suggested new features that have made it into this release of NetworkMiner. Marc Lindike suggested the powerful deep search of extracted messages and Niclas Hirschfeld proposed a new option in the PCAP-over-IP functionality that allows NetworkMiner to receive PCAP data via a remote netcat listener.

Upgrading to Version 2.2

Users who have purchased a license for NetworkMiner Professional 2.x can download a free update to version 2.2 from our customer portal.

Those who instead prefer to use the free and open source version can grab the latest version of NetworkMiner from the official NetworkMiner page.

Posted by Erik Hjelmvik on Tuesday, 22 August 2017 11:37:00 (UTC/GMT)

Tags: #pcap#CASE#PIPI#HTTP#SOCKS#FTP#SSL#port#forensics

Share: Facebook   Twitter   Reddit   Hacker News Short URL: https://netresec.com/?b=17888cb


Network Forensics Training in London

The Flag of the United States by Sam Howzit (CC BY 2.0)

People sometimes ask me when I will teach my network forensics class in the United States. The US is undoubtedly the country with the most advanced and mature DFIR community, so it would be awesome to be able to give my class there. However, not being a U.S. person and not working for a U.S. company makes it rather difficult for me to teach in the United States (remember what happened to Halvar Flake?).

So if you’re from the Americas and would like to take my network forensics class, then please don’t wait for me to teach my class at a venue close to you – because I probably won’t. My recommendation is that you instead attend my upcoming training at 44CON in London this September.

London Red Telephone Booth Long Exposure by negativespace.co (CC0)

The network forensics training in London will cover topics such as:

  • Analyzing a web defacement
  • Investigating traffic from a remote access trojan (njRAT)
  • Analyzing a Man-on-the-Side attack (much like QUANTUM INSERT)
  • Finding a backdoored application
  • Identifying botnet traffic through whitelisting
  • Rinse-Repeat Threat Hunting

The first day of training will focus on analysis using only open source tools. The second day will primarily cover training on commercial software from Netresec, i.e. NetworkMiner Professional and CapLoader. All students enrolling in the class will get a full 6 month license for both these commercial tools.

Hope to see you at the 44CON training in London!

Posted by Erik Hjelmvik on Tuesday, 25 April 2017 14:33:00 (UTC/GMT)

Tags: #Netresec#Network Forensics

Share: Facebook   Twitter   Reddit   Hacker News Short URL: https://netresec.com/?b=174efe8


Domain Whitelist Benchmark: Alexa vs Umbrella

Alexa vs Umbrella

In November last year Alexa admitted in a tweet that they had stopped releasing their CSV file with the one million most popular domains.

Yes, the top 1m sites file has been retired

Members of the Internet measurement and infosec research communities were outraged, surprised and disappointed since this domain list had become the de-facto tool for evaluating the popularity of a domain. As a result of this Cisco Umbrella (previously OpenDNS) released a free top 1 million list of their own in December the same year. However, by then Alexa had already announced that their “top-1m.csv” file was back up again.

The file is back for now. We'll post an update before it changes again.

The Alexa list was unavailable for just about a week but this was enough for many researchers, developers and security professionals to make the move to alternative lists, such as the one from Umbrella. This move was perhaps fueled by Alexa saying that the “file is back for now”, which hints that they might decide to remove it again later on.

We’ve been leveraging the Alexa list for quite some time in NetworkMiner and CapLoader in order to do DNS whitelisting, for example when doing threat hunting with Rinse-Repeat. But we haven’t made the move from Alexa to Umbrella, at least not yet.


Malware Domains in the Top 1 Million Lists

Threat hunting expert Veronica Valeros recently pointed out that there are a great deal of malicious domains in the Alexa top one million list.

Researchers using Alexa top 1M as legit, you may want to think twice about that. You'd be surprised how many malicious domains end there.

I often recommend analysts to use the Alexa list as a whitelist to remove “normal” web surfing from their PCAP dataset when doing threat hunting or network forensics. And, as previously mentioned, both NetworkMiner and CapLoader make use of the Alexa list in order to simplify domain whitelisting. I therefore decided to evaluate just how many malicious domains there are in the Alexa and Umbrella lists.

hpHosts EMD (by Malwarebytes)

Alexa Umbrella
Whitelisted malicious domains: 1365 1458
Percent of malicious domains whitelisted: 0.89% 0.95%

Malware Domain Blocklist

Alexa Umbrella
Whitelisted malicious domains: 84 63
Percent of malicious domains whitelisted: 0.46% 0.34%

CyberCrime Tracker

Alexa Umbrella
Whitelisted malicious domains: 15 10
Percent of malicious domains whitelisted: 0.19% 0.13%

The results presented above indicate that Alexa and Umbrella both contain roughly the same number of malicious domains. The percentages also reveal that using Alexa or Umbrella as a whitelist, i.e. ignore all traffic to the top one million domains, might result in ignoring up to 1% of the traffic going to malicious domains. I guess this is an acceptable number of false negatives since techniques like Rinse-Repeat Intrusion Detection isn’t intended to replace traditional intrusion detection systems, instead it is meant to be use as a complement in order to hunt down the intrusions that your IDS failed to detect. Working on a reduced dataset containing 99% of the malicious traffic is an acceptable price to pay for having removed all the “normal” traffic going to the one million most popular domains.


Sub Domains

One significat difference between the two lists is that the Umbrella list contains subdomains (such as www.google.com, safebrowsing.google.com and accounts.google.com) while the Alexa list only contains main domains (like “google.com”). In fact, the Umbrella list contains over 1800 subdomains for google.com alone! This means that the Umbrella list in practice contains fewer main domains compared to the one million main domains in the Alexa list. We estimate that roughly half of the domains in the Umbrella list are redundant if you only are interested in main domains. However, having sub domains can be an asset if you need to match the full domain name rather than just the main domain name.


Data Sources used to Compile the Lists

The Alexa Extension for Firefox
Image: The Alexa Extension for Firefox

The two lists are compiled in different ways, which can be important to be aware of depending on what type of traffic you are analyzing. Alexa primarily receives web browsing data from users who have installed one of Alexa’s many browser extensions (such as the Alexa browser toolbar shown above). They also gather additional data from users visiting web sites that include Alexa’s tracker script.

Cisco Umbrella, on the other hand, compile their data from “the actual world-wide usage of domains by Umbrella global network users”. We’re guessing this means building statistics from DNS queries sent through the OpenDNS service that was recently acquired by Cisco.

This means that the Alexa list might be better suited if you are only analyzing HTTP traffic from web browsers, while the Umbrella list probably is the best choice if you are analyzing non-HTTP traffic or HTTP traffic that isn’t generated by browsers (for example HTTP API communication).


Other Quirks

As noted by Greg Ferro, the Umbrella list contains test domains like “www.example.com”. These domains are not present in the Alexa list.

We have also noticed that the Umbrella list contains several domains with non-authorized gTLDs, such as “.home”, “.mail” and “.corp”. The Alexa list, on the other hand, only seem to contain real domain names.


Resources and Raw Data

Both the Alexa and Cisco Umbrella top one million lists are CSV files named “top-1m.csv”. The CSV files can be downloaded from these URL’s:

The analysis results presented in this blog post are based on top-1m.csv files downloaded from Alexa and Umbrella on March 31, 2017. The malware domain lists were also downloaded from the three respective sources on that same day.

We have decided to share the “false negatives” (malware domains that were present in the Alexa and Umbrella lists) for transparency. You can download the lists with all false negatives from here:
https://www.netresec.com/files/alexa-umbrella-malware-domains_170331.zip


Hands-on Practice and Training

If you wanna learn more about how a list of common domains can be used to hunt down intrusions in your network, then please register for one of our network forensic trainings. The next training will be a pre-conference training at 44CON in London.

Posted by Erik Hjelmvik on Monday, 03 April 2017 14:47:00 (UTC/GMT)

Tags: #Alexa#Umbrella#domain#Threat Hunting#DNS#malware

Share: Facebook   Twitter   Reddit   Hacker News Short URL: https://netresec.com/?b=1743fae


CapLoader 1.5 Released

CapLoader 1.5 Logo

We are today happy to announce the release of CapLoader 1.5. This new version of CapLoader parses pcap and pcap-ng files even faster than before and comes with new features, such as a built-in TCP stream reassembly engine, as well as support for Linux and macOS.

Support for ICMP Flows

CapLoader is designed to group packets together that belong to the same bi-directional flow, i.e. all UDP, TCP and SCTP packets with the same 5-tuple (regardless of direction) are considered being part of the same flow.

5-tuple
/fʌɪv ˈtjuːp(ə)l/
noun

A combination of source IP, destination IP, source port, destination port and transport protocol (TCP/UDP/SCTP) used to uniquely identify a flow or layer 4 session in computer networking.

The flow concept in CapLoader 1.5 has been extended to also include ICMP. Since there are no port numbers in the ICMP protocol CapLoader sets the source and destination port of ICMP flows to 0. The addition of ICMP in CapLoader also allows input filters and display filters like “icmp” to be leveraged.

Flows tab in CapLoader 1.5 with display filter BPF 'icmp'
Image: CapLoader 1.5 showing only ICMP flows due to display filter 'icmp'.

TCP Stream Reassembly

One of the foundations for making CapLoader a super fast tool for reading and filtering PCAP files is that it doesn’t attempt to reassemble TCP streams. This means that CapLoader’s Transcript view will show out-of-order segments in the order they were received and retransmitted segments will be displayed twice.

The basic concept has been to let other tools do the TCP reassembly, for example by exporting a PCAP for a flow from CapLoader to Wireshark or NetworkMiner.

The steps required to reassemble a TCP stream to disk with Wireshark are:

  1. Right-click a TCP packet in the TCP session of interest.
  2. Select “Follow > TCP Stream”.
  3. Choose direction in the first drop-down-list (client-to-server or server-to-client).
  4. Change format from “ASCII” to “Raw” in the next drop-down-menu.
  5. Press the “Save as...” button to save the reassembled TCP stream to disk.

Follow TCP Stream window in Wireshark

Unfortunately Wireshark fails to properly reassemble some TCP streams. As an example the current stable release of Wireshark (version 2.2.5) shows duplicate data in “Follow TCP Stream” when there are retransmissions with partially overlapping segments. We have also noticed some additional  bugs related to TCP stream reassembly in other recent releases of Wireshark. However, we’d like to stress that Wireshark does perform a correct reassembly of most TCP streams; it is only in some specific situations that Wireshark produces a broken reassembly. Unfortunately a minor bug like this can cause serious consequences, for example when the TCP stream is analyzed as part of a digital forensics investigation or when the extracted data is being used as input for further processing. We have therefore decided to include a TCP stream reassembly engine in CapLoader 1.5. The steps required to reassemble a TCP stream in CapLoader are:

  1. Double click a TCP flow of interest in the “Flows” tab to open a flow transcript.
  2. Click the “Save Client Byte Stream” or “Save Server Byte Stream” button to save the data stream for the desired direction to disk.

Transcript window in CapLoader 1-5

Extracting TCP streams from PCAP files this way not only ensures that the data stream is correctly reassembled, it is also both faster and simpler than having to pivot through Wireshark’s Follow TCP Stream feature.

PCAP Icon Context Menu

CapLoader 1.5 PCAP icon Save As...

The PCAP icon in CapLoader is designed to allow easy drag-and-drop operations in order to open a set of selected flows in an external packet analysis tool, such as Wireshark or NetworkMiner. Right-clicking this PCAP icon will bring up a context menu, which can be used to open a PCAP with the selected flows in an external tool or copy the PCAP to the clipboard. This context menu has been extended in CapLoader 1.5 to also include a “Save As” option. Previous versions of CapLoader required the user to drag-and-drop from the PCAP icon to a folder in order to save filtered PCAP data to disk.

Faster Parsing with Protocol Identification

CapLoader can identify over 100 different application layer protocols, including HTTP, SSL, SSH, RTP, RTCP and SOCKS, without relying on port numbers. The protocol identification has previously slowed down the analysis quite a bit, which has caused many users to disable this powerful feature. This new release of of CapLoader comes with an improved implementation of the port-independent protocol identification feature, which enables PCAP files to be loaded twice as fast as before with the “Identify protocols” feature enabled.

Works in Linux and macOS

One major improvement in CapLoader 1.5 is that this release is compatible with the Mono framework, which makes CapLoader platform independent. This means that you can now run CapLoader on your Mac or Linux machine if you have Mono installed. Please refer to our previous blog posts about how to run NetworkMiner in various flavors of Linux and macOS to find out how to install Mono on your computer. You will, however, notice a performance hit when running CapLoader under Mono instead of using Windows since the Mono framework isn't yet as fast as Microsoft's .NET Framework.

CapLoader 1.5 running in Linux with Mono
Image: CapLoader 1.5 running in Linux (Xubuntu).

Credits

We’d like to thank Sooraj for reporting a bug in the “Open With” context menu of CapLoader’s PCAP icon. This bug has been fixed in CapLoader 1.5 and Sooraj has been awarded an official “PCAP or it didn’t happen” t-shirt for reporting the bug.

PCAP or it didn't happen t-shirt
Image: PCAP or it didn't happen t-shirt

Have a look at our Bug Bounty Program if you also wanna get a PCAP t-shirt!

Downloading CapLoader 1.5

Everything mentioned in this blog post, except for the protocol identification feature, is available in our free trial version of CapLoader. To try it out, simply grab a copy here:
https://www.netresec.com/?page=CapLoader#trial (no registration needed)

All paying customers with an older version of CapLoader can download a free update to version 1.5 from our customer portal.

Posted by Erik Hjelmvik on Tuesday, 07 March 2017 09:11:00 (UTC/GMT)

Tags: #CapLoader#PCAP#pcap-ng#Follow TCP Stream#Wireshark#Linux#Mac#macOS#RTP#SOCKS#Mono#Flow

Share: Facebook   Twitter   Reddit   Hacker News Short URL: https://netresec.com/?b=1738eba


Enable file extraction from PCAP with NetworkMiner in six steps

NetworkMiner can reassemble files transferred over protocols such as HTTP, FTP, TFTP, SMB, SMB2, SMTP, POP3 and IMAP simply by reading a PCAP file. NetworkMiner stores the extracted files in a directory called “AssembledFiles” inside of the NetworkMiner directory.

NetworkMiner 2.1.1 with Files tab open.
Files extracted by NetworkMiner from the DFRWS 2008 challenge file suspect.pcap

NetworkMiner is a portable tool that is delivered as a zip file. The tool doesn’t require any installation, you simply just extract the zip file to your PC. We don’t provide any official guidance regarding where to place NetworkMiner, users are free to place it wherever they find it most fitting. Some put the tool on the Desktop or in “My Documents” while others prefer to put it in “C:\Program Files”. However, please note that normal users usually don’t have write permissions to sub-directories of %programfiles%, which will prevent NetworkMiner from performing file reassembly.

Unfortunately, previous versions of NetworkMiner didn’t alert the user when it failed to write to the AssembledFiles directory. This means that the tool would silently fail to extract any files from a PCAP file. This behavior has been changed with the release of NetworkMiner 2.1. Now the user gets a windows titled “Insufficient Write Permissions” with a text like this:

User is unauthorized to access the following file:
C:\Program Files\NetworkMiner_2-1-1\AssembledFiles\cache\FILENAME

File(s) will not be extracted!

Follow these steps to set adequate write permissions to the AssembledFiles directory in Windows:

  1. Open the Properties window for the AssembledFiles directory
  2. Open the “Security” tab
  3. Press “Edit” to change permissions
  4. Select the user who will be running NetworkMiner
  5. Check the “Allow”checkbox for Write permissions
  6. Press the OK button

Press Edit to change permissions for AssembledFiles folder

If you are running NetworkMiner under macOS (OS X) or Linux, then please make sure to follow our installation instructions, which include this command:

sudo chmod -R go+w AssembledFiles/

Once you have set up the appropriate write permissions you should be able to start NeworkMiner and open a PCAP file in order to have the tool automatically extract files from the captured network traffic.

Posted by Erik Hjelmvik on Friday, 03 March 2017 09:44:00 (UTC/GMT)

Tags: #NetworkMiner#PCAP#NSM

Share: Facebook   Twitter   Reddit   Hacker News Short URL: https://netresec.com/?b=173588e

2017 February

10 Years of NetworkMiner

2017 January

Network Forensics Training at TROOPERS 2017

NetworkMiner 2.1 Released

X / twitter

NETRESEC on X / Twitter: @netresec

Mastodon

NETRESEC on Mastodon: @netresec@infosec.exchange