NETRESEC Network Security Blog - Tag : NSM

rss Google News

Detecting Cobalt Strike and Hancitor traffic in PCAP

This video shows how Cobalt Strike and Hancitor C2 traffic can be detected using CapLoader.

I bet you’re going:

😱 OMG he’s analyzing Windows malware on a Windows PC!!!

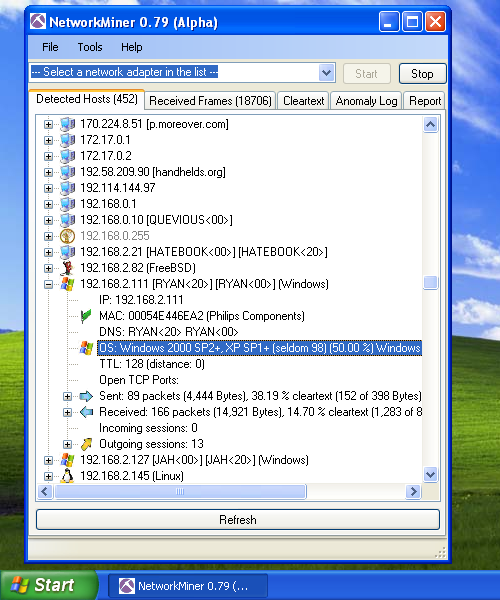
Relax, I know what I’m doing. I have also taken the precaution of analyzing the PCAP file in a Windows Sandbox, which just takes a couple of seconds to deploy and run.

The capture file I’m looking at is called “2021-05-13-Hancitor-traffic-with-Ficker-Stealer-and-Cobalt-Strike.pcap” and can be downloaded from here: https://malware-traffic-analysis.net/2021/05/13/index.html

CapLoader’s Services tab shows us that the connections to TCP 80 and 443 on 103.207.42.11 are very periodic, with a detected period of exactly 1 minute. CapLoader successfully identifies the protocols for these two services as Cobalt Strike over HTTP and Cobalt Strike over SSL, respectively. The third service in this list is also very periodic, that’s the Hancitor trojan beaconing to its C2 server every two minutes.

Services tab in CapLoader

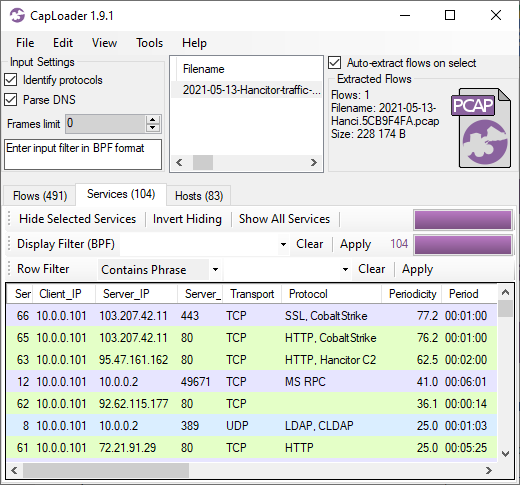
CapLoader uses machine learning to identify the application layer protocol based on the behavior of the traffic, not the port number. This means that there can be false positives, i.e. the protocol classification that CapLoader gives a flow or service might be wrong. It is more common, however, for CapLoader to yield false negatives, which means that it can't identify the protocol. The detection of Cobalt Strike inside of HTTP and SSL traffic was recently introduced in the latest 1.9 release of CapLoader. I expected this feature to detect Cobalt Strike traffic in HTTP, but I was delighted to see that CapLoader often detects even TLS encrypted Cobalt Strike beaconing with really good precision!

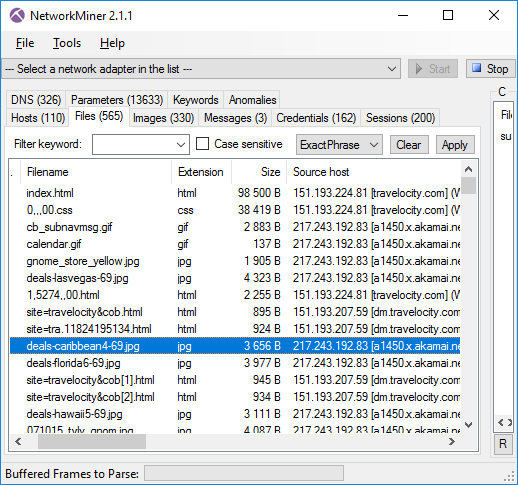
As shown in the video, the Cobalt Strike beacon config can easily be extracted from the network traffic using NetworkMiner and Didier Stevens’ 1768 K python script.

The output from Didier’s 7868.py tool looks something like this:

0x0001 payload type 0 windows-beacon_http-reverse_http
0x0002 port 80
0x0003 sleeptime 60000
0x0004 maxgetsize 1048576
0x0005 jitter 0
0x0007 publickey 30819f30[...]
0x0008 server,get-uri '103.207.42.11,/ca'
[...]

As you can see, it uses HTTP for transport with a “sleeptime” of 1 minute (60000 ms) and 0% jitter. This means that a new connection will be made to the Cobalt Strike C2 server every minute. The fact that there was no jitter is what gives this service such a high value in CapLoader’s “Periodicity” column.

Network Forensics Training

Are you interested in learning more about how to analyze network traffic from Cobalt Strike and other backdoors, malware and hacker tools? Then take a look at the live online network forensics classes I will be teaching in September and October!

Posted by Erik Hjelmvik on Monday, 31 May 2021 08:30:00 (UTC/GMT)

Tags: #Netresec#Cobalt Strike#CobaltStrike#periodicity#Protocol Identification#PIPI#CapLoader#1768.py#Windows Sandbox#PCAP#NSM#video#videotutorial

Share: Facebook   Twitter   Reddit   Hacker News Short URL: https://netresec.com/?b=21536fc


Examining Malware Redirects with NetworkMiner Professional

This network forensics video tutorial covers analysis of a malware redirect chain, where a PC is infected through the RIG Exploit Kit. A PCAP file, from Brad Duncan's malware-traffic-analysis.net website, is opened in NetworkMiner Professional in order to follow a redirect chain via a couple of hacked websites before delivering malware to the PC.

Resources
https://www.malware-traffic-analysis.net/2014/11/16/index.html
Meadgive on VirusTotal
CVE-2014-0569 Flash Exploit on VirusTotal
CVE-2012-0507 Java Exploit on VirusTotal
NetworkMiner Professional

IOCs
www.ciniholland.nl
24corp-shop.com
stand.trustandprobaterealty.com
793b698a82d999f1eb75525d050ebe16
f8482f5c4632fe237d062451b42393498a8d628ed9dee27147251f484e837a42
7b3baa7d6bb3720f369219789e38d6ab
e2e33b802a0d939d07bd8291f23484c2f68ccc33dc0655eb4493e5d3aebc0747
1e34fdebbf655cebea78b45e43520ddf
178be0ed83a7a9020121dee1c305fd6ca3b74d15836835cfb1684da0b44190d3

Check out our series of network forensic video tutorials for more tips and tricks on how to analyze captured network traffic.

Posted by Erik Hjelmvik on Monday, 26 February 2018 11:19:00 (UTC/GMT)

Tags: #Netresec#Professional#NetworkMiner#malware_traffic#malware#NSM#PCAP#videotutorial#video#tutorial

Share: Facebook   Twitter   Reddit   Hacker News Short URL: https://netresec.com/?b=1829909


Zyklon Malware Network Forensics Video Tutorial

We are releasing a series of network forensics video tutorials throughout the next few weeks. First up is this analysis of a PCAP file containing network traffic from the "Zyklon H.T.T.P." malware.

Analyzing a Zyklon Trojan with Suricata and NetworkMiner

Resources
https://www.malware-traffic-analysis.net/2017/07/22/index.html
https://github.com/Security-Onion-Solutions/security-onion
https://www.arbornetworks.com/blog/asert/wp-content/uploads/2017/05/zyklon_season.pdf
http://doc.emergingthreats.net/2017930

IOCs
service.tellepizza.com
104.18.40.172
104.18.41.172
Mozilla/5.0 (Windows; U; Windows NT 5.1; en-US; rv:1.8.1.3pre) Gecko/20070302 BonEcho/2.0.0.3pre
gate.php
.onion
98:1F:D2:FF:DC:16:B2:30:1F:11:70:82:3D:2E:A5:DC
65:8A:5C:76:98:A9:1D:66:B4:CB:9D:43:5C:DE:AD:22:38:37:F3:9C
E2:50:35:81:9F:D5:30:E1:CE:09:5D:9F:64:75:15:0F:91:16:12:02:2F:AF:DE:08:4A:A3:5F:E6:5B:88:37:D6

Posted by Erik Hjelmvik on Monday, 05 February 2018 07:30:00 (UTC/GMT)

Tags: #Netresec#PCAP#Trojan#video#tutorial#videotutorial#NetworkMiner#SecurityOnion#Suricata#malware#network#forensics#NSM#malware_traffic

Share: Facebook   Twitter   Reddit   Hacker News Short URL: https://netresec.com/?b=182b4ac


Enable file extraction from PCAP with NetworkMiner in six steps

NetworkMiner can reassemble files transferred over protocols such as HTTP, FTP, TFTP, SMB, SMB2, SMTP, POP3 and IMAP simply by reading a PCAP file. NetworkMiner stores the extracted files in a directory called “AssembledFiles” inside of the NetworkMiner directory.

NetworkMiner 2.1.1 with Files tab open.
Files extracted by NetworkMiner from the DFRWS 2008 challenge file suspect.pcap

NetworkMiner is a portable tool that is delivered as a zip file. The tool doesn’t require any installation, you simply just extract the zip file to your PC. We don’t provide any official guidance regarding where to place NetworkMiner, users are free to place it wherever they find it most fitting. Some put the tool on the Desktop or in “My Documents” while others prefer to put it in “C:\Program Files”. However, please note that normal users usually don’t have write permissions to sub-directories of %programfiles%, which will prevent NetworkMiner from performing file reassembly.

Unfortunately, previous versions of NetworkMiner didn’t alert the user when it failed to write to the AssembledFiles directory. This means that the tool would silently fail to extract any files from a PCAP file. This behavior has been changed with the release of NetworkMiner 2.1. Now the user gets a windows titled “Insufficient Write Permissions” with a text like this:

User is unauthorized to access the following file:
C:\Program Files\NetworkMiner_2-1-1\AssembledFiles\cache\FILENAME

File(s) will not be extracted!

Follow these steps to set adequate write permissions to the AssembledFiles directory in Windows:

  1. Open the Properties window for the AssembledFiles directory
  2. Open the “Security” tab
  3. Press “Edit” to change permissions
  4. Select the user who will be running NetworkMiner
  5. Check the “Allow”checkbox for Write permissions
  6. Press the OK button

Press Edit to change permissions for AssembledFiles folder

If you are running NetworkMiner under macOS (OS X) or Linux, then please make sure to follow our installation instructions, which include this command:

sudo chmod -R go+w AssembledFiles/

Once you have set up the appropriate write permissions you should be able to start NeworkMiner and open a PCAP file in order to have the tool automatically extract files from the captured network traffic.

Posted by Erik Hjelmvik on Friday, 03 March 2017 09:44:00 (UTC/GMT)

Tags: #NetworkMiner#PCAP#NSM

Share: Facebook   Twitter   Reddit   Hacker News Short URL: https://netresec.com/?b=173588e


10 Years of NetworkMiner

I released the first version of NetworkMiner on February 16, 2007, which is exactly 10 years ago today.

NetworkMiner 0.79 in Windows XP

One of the main uses of NetworkMiner today is to reassemble file transfers from PCAP files and save the extracted files to disk. However, as you can see in the screenshot above, the early versions of NetworkMiner didn’t even have a Files tab. In fact, the task that NetworkMiner was originally designed for was simply to provide an inventory of the hosts communicating on a network.

How it all started

So, why did I start designing a passive asset detection system when I could just as well have used a port scanner like Nmap to fingerprint the devices on a network? Well, I was working with IT security at the R&D department of a major European energy company at the time. As part of my job I occasionally performed IT security audits of power plants. During these audits I typically wanted to ensure that there were no rouge or unknown devices on the network. The normal way of verifying this would be to perform an Nmap scan of the network, but that wasn’t an option for me since I was dealing with live industrial control system networks. I knew from personal experience that a network scan could cause some of the industrial control system devices to drop their network connections or even crash, so active scanning wasn’t a viable option. Instead I chose to setup a SPAN port at a central point of the network, or even install a network TAP, and then capture network traffic to a PCAP file during a few hours. I found the PCAP files being a great source, not only for identifying the hosts present at a network, but also in order to discover misconfigured devices. However, I wasn’t really happy with the tools available for visualizing the devices on the network, which is why I stated developing NetworkMiner in my spare time.

Network Forensics

As I continued improving NetworkMiner I pretty soon ended up writing my own TCP reassembly engine as well as parsers for HTTP and the CIFS protocol (a.k.a SMB). With these protocols in place I was able to extract files downloaded through HTTP or SMB to disk with NetworkMiner, which turned out to be a killer feature.

Monthly downloads of NetworkMiner from SourceForge
Image: Monthly downloads of NetworkMiner from SourceForge

With the ability to extract file transfers from PCAP files NetworkMiner steadily gained popularity as a valuable tool in the field of network forensics, which motivated me to make the tool even better. Throughout these past 10 years I have single-handedly implemented over 60 protocols in NetworkMiner, which has been a great learning experience for me.

NetworkMiner Milestones

Looking Forward

People sometimes ask me what I’m planning to add to the next version of NetworkMiner. To be honest; I never really know. In fact, I’ve realized that those with the best ideas for features or protocols to add to NetworkMiner are those who use NetworkMiner as part of their jobs, such as incident responders and digital forensics experts across the globe.

I therefore highly value feedback from users, so if you have requests for new features to be added to the next version, then please feel free to reach out and let me know!

Posted by Erik Hjelmvik on Thursday, 16 February 2017 09:11:00 (UTC/GMT)

Tags: #Netresec#NetworkMiner#NSM#ICS

Share: Facebook   Twitter   Reddit   Hacker News Short URL: https://netresec.com/?b=17218c7


PacketCache lets you Go Back in Time

PacketCache logo

Have you ever wanted to go back in time to get a PCAP of something strange that just happened on a PC?
I sure have, many times, which is why we are now releasing a new tool called PacketCache. PacketCache maintains a hive of the most important and recent packets, so that they can be retrieved later on, if there is a need.

Network forensics and incident response is performed post-event, but requires that packet have already been captured during the event to be analyzed. Starting a network sniffer after a suspected intrusion might provide useful insight on what the intruders are up to, but it is much better to be able to go back in time to observe how they gained access to the network and what they did prior to being detected. Many companies and organizations combat this problem by setting up one or several solutions for centralized network packet capturing. These sniffers are typically installed at choke-points on the network, such as in-line with a firewall. However, this prevents the sniffers from capturing network traffic going between hosts on the same local network. Intruders can therefore often perform lateral movement on a compromised network without risk getting their steps captured by a packet sniffer.

Logo for Back to the Future series logo - public domain

USB broadband modem, credit: Game Gavel (cc-by-sa-3.0)
Image by Game Gavel
We're now trying to improve the situation for the defenders by releasing PacketCache, which is a free (Creative Commons licensed) Windows service that is designed to continuously monitor the network interfaces of a computer and store the captured packets in memory (RAM). PacketCache monitors all IPv4 interfaces, not just the one connected to the corporate network. This way traffic will be captured even on public WiFi networks and Internet connections provided through USB broadband modems (3G/4G).

By default PacketCache reserves 1% of a computer's total physical memory for storing packets. A computer with 4 GB of RAM will thereby allow up to 40 MB of packets to be kept in memory. This might not seem like much, but PacketCache relies on a clever technique that allows it to store only the most important packets. With this technique just 40 MB of storage can be enough to store several days worth of “important” packets.

The “clever technique” we refer to is actually a simple way of removing packets from TCP and UDP sessions as they get older. This way recent communication can be retained in full, while older data us truncated at the end (i.e. only the last packets are removed from a session).

PacketCache services in services.msc

To download PacketCache or learn more about this new tool, please visit the official PacketCache page:
https://www.netresec.com/?page=PacketCache

PCAP or it didn't happen!

Posted by Erik Hjelmvik on Wednesday, 28 September 2016 11:45:00 (UTC/GMT)

Tags: #PacketCache#PCAP#NSM#forensics#Windows#sniffer#memory#DFIR

Share: Facebook   Twitter   Reddit   Hacker News Short URL: https://netresec.com/?b=169d0d2


Analyzing Web Browsing Activity

NetworkMiner logo HTTP GET

One of the features included in the newly released version 2.0 of NetworkMiner Professional is a new tab called “Browsers”. This tab shows web browsing requests and reponses in a hierarchical tree view, with the identified web browsers as root nodes.

The idea of tracking browser activity this way was suggested to me by Steffen Thorkildsen way back in 2009. I'm therefore happy to finally have this feature implemented in NetworkMiner!

At first glance, the Browser tab looks somewhat like the Hosts tab. One difference is that there can be multiple browsers per host, since each unique HTTP User-Agent is considered a separate browser.

NetworkMiner Professional 2.0 Browsers tab

The web pages (URLs) visited by a browser can be analyzed by expanding the node of that browser. The URLs are organized in a hierarchical structure, so that all URLs visited by clicking a link on a web page are placed under the node of that web page. This enables the analyst to see how a user ended up at a particular URL. NetworkMiner primarily uses the HTTP referer header (the misspelling of referrer stems back to RFC1945) to backtrack the pages visited before landing at a particular page.

NetworkMiner Professional 2.0 Browsers tab - Bing search
Image: Bing search for “create bitcoin address” that led the user to www.btcpedia.com

The browser tree view also shows HTTP redirects, such as “302 Found” and “301 moved permanently”. These redirects can be used in order to see encrypted HTTPS URLs that a user is redirected to, for example when logging in at a website.

NetworkMiner Professional 2.0 Browsers tab - 302 Moved Temporarily
Image: Microsoft responding with a “302 Moved Temporarily" redirect

The icons that show up at some web servers are favicon images that have been passively extracted from the analyzed PCAP file.

NetworkMiner Professional 2.0 Browsers tab - Favicon
Image: Website icons extracted from favicon.ico downloads

We hope the Browser tab can be of help in criminal investigations in order to show whether or not a suspect visited a particular website intentionally. This feature can also be used to track the activity of malware that uses HTTP for command-and-control (C2) as well as to analyze redirect chains used for malware downloads.

NetworkMiner Professional 2.0 Browsers tab - Redirect Chain
Image: PCAP file containing a redirect chain leading to malware downloads

The PCAP file loaded in the screenshot above originally comes from malware-traffic-analysis.net. Note that our analysis was done by running NetworkMiner in Linux to prevent accidental malware infection. The events shown in NetworkMiner's browser tab matches the description of the redirect chain provided at malware-traffic-analysis.net:

162.144.66.10 port 80 - www.crowdfundingformybusiness.com - Compromised website
185.14.30.37 port 80 - goog1eanalitics.pw - First redirect
178.32.173.105 port 80 - 178.32.173.105 - Second redirect
46.101.59.201 port 80 - osooraudie.co.vu - Nuclear EK

The redirect chain leads to a Nuclear Exploit Kit (SWF file with MD5 695a07cbcac3ca64010e168fe495ff4a, VirusTotal). Later on the Nuclear EK retrieves the file “kernel1.exe”, which seems to be related to the Kelihos botnet.

Posted by Erik Hjelmvik on Thursday, 18 February 2016 13:37:00 (UTC/GMT)

Tags: #NetworkMiner#HTTP#browser#favicon#redirect#malware#NSM#PCAP

Share: Facebook   Twitter   Reddit   Hacker News Short URL: https://netresec.com/?b=162ef93


Rinse-Repeat Intrusion Detection

I am a long time skeptic when it comes to blacklists and other forms of signature based detection mechanisms. The information security industry has also declared the signature based anti-virus approach dead several times during the past 10 years. Yet, we still rely on anti-virus signatures, IDS rules, IP blacklists, malware domain lists, YARA rules etc. to detect malware infections and other forms of intrusions in our networks. This outdated approach puts a high administrative burden on IT and security operations today, since we need to keep all our signature databases up to date, both when it comes to end point AV signatures as well as IDS rules and other signature based detection methods and threat feeds. Many organizations probably spend more time and money on updating all these blacklists and signature databases than actually investigating the security alerts these detection systems generate. What can I say; the world is truly upside down...

Shower image by Nevit Dilmen Image: Shower by Nevit Dilmen.

I would therefore like to use this blog post to briefly describe an effective blacklist-free approach for detecting malware and intrusions just by analyzing network traffic. My approach relies on a combination of whitelisting and common sense anomaly detection (i.e. not the academic statistical anomaly detection algorithms that never seem to work in reality). I also encourage CERT/CSIRT/SOC/SecOps units to practice Sun Tzu's old ”know yourself”, or rather ”know your systems and networks” approach.

Know your enemy and know yourself and you can fight a hundred battles without disaster.
- Sun Tzu in The Art of War
Art of War in Bamboo by vlasta2
Image: Art of War in Bamboo by vlasta2

My method doesn't rely on any dark magic, it is actually just a simple Rinse-Repeat approach built on the following steps:

  1. Look at network traffic
  2. Define what's normal (whitelist)
  3. Remove that
  4. GOTO 1.

After looping through these steps a few times you'll be left with some odd network traffic, which will have a high ratio of maliciousness. The key here is, of course, to know what traffic to classify as ”normal”. This is where ”know your systems and networks” comes in.


What Traffic is Normal?

I recently realized that Mike Poor seems to be thinking along the same lines, when I read his foreword to Chris Sanders' and Jason Smith's book Applied NSM:

The next time you are at your console, review some logs. You might think... "I don't know what to look for". Start with what you know, understand, and don't care about. Discard those. Everything else is of interest.

Applied NSM

Following Mike's advice we might, for example, define“normal” traffic as:

  • HTTP(S) traffic to popular web servers on the Internet on standard ports (TCP 80 and 443).
  • SMB traffic between client networks and file servers.
  • DNS queries from clients to your name server on UDP 53, where the servers successfully answers with an A, AAAA, CNAME, MX, NS or SOA record.
  • ...any other traffic which is normal in your organization.

Whitelisting IP ranges belonging to Google, Facebook, Microsoft and Akamai as ”popular web servers” will reduce the dataset a great deal, but that's far from enough. One approach we use is to perform DNS whitelisting by classifying all servers with a domain name listed in Alexa's Top 1 Million list as ”popular”.

You might argue that such a method just replaces the old blacklist-updating-problem with a new whitelist-updating-problem. Well yes, you are right to some extent, but the good part is that the whitelist changes very little over time compared to a blacklist. So you don't need to update very often. Another great benefit is that the whitelist/rinse-repeat approach also enables detection of 0-day exploits and C2 traffic of unknown malware, since we aren't looking for known badness – just odd traffic.


Threat Hunting with Rinse-Repeat

Mike Poor isn't the only well merited incident handler who seems to have adopted a strategy similar to the Rinse-Repeat method; Richard Bejtlich (former US Air Force CERT and GE CIRT member) reveal some valuable insight in his book “The Practice of Network Security Monitoring”:

I often use Argus with Racluster to quickly search a large collection of session data via the command line, especially for unexpected entries. Rather than searching for specific data, I tell Argus what to omit, and then I review what’s left.

In his book Richard also mentions that he uses a similar methodology when going on “hunting trips” (i.e. actively looking for intrusions without having received an IDS alert):

Sometimes I hunt for traffic by telling Wireshark what to ignore so that I can examine what’s left behind. I start with a simple filter, review the results, add another filter, review the results, and so on until I’m left with a small amount of traffic to analyze.

The Practice of NSM

I personally find Rinse-Repeat Intrusion Detection ideal for threat hunting, especially in situations where you are provided with a big PCAP dataset to answer the classic question “Have we been hacked?”. However, unfortunately the “blacklist mentality” is so conditioned among incident responders that they often choose to crunch these datasets through blacklists and signature databases in order to then review thousands of alerts, which are full of false positives. In most situations such approaches are just a huge waste of time and computing power, and I'm hoping to see a change in the incident responders' mindsets in the future.

I teach this “rinse-repeat” threat hunting method in our Network Forensics Training. In this class students get hands-on experience with a dataset of 3.5 GB / 40.000 flows, which is then reduced to just a fraction through a few iterations in the rinse-repeat loop. The remaining part of the PCAP dataset has a very high ratio of hacking attacks as well as command-and-control traffic from RAT's, backdoors and botnets.


UPDATE 2015-10-07

We have now published a blog post detailing how to use dynamic protocol detection to identify services running on non-standard ports. This is a good example on how to put the Rinse-Repeat methodology into practice.

Posted by Erik Hjelmvik on Monday, 17 August 2015 08:45:00 (UTC/GMT)

Tags: #Rinse-Repeat#PCAP#NSM#PCAP#Intrusion Detection#IDS#network forensics

Share: Facebook   Twitter   Reddit   Hacker News Short URL: https://netresec.com/?b=1582D1D

2015 June

Two-day Network Forensics Class in Stockholm

2014 November

Observing the Havex RAT

X / twitter

NETRESEC on X / Twitter: @netresec

Mastodon

NETRESEC on Mastodon: @netresec@infosec.exchange