NETRESEC Network Security Blog - Tag : SOCKS

rss Google News

NetworkMiner 2.8 Released

NetworkMiner 2.8

I am happy to announce the release of NetworkMiner 2.8 today! This new version comes with an improved user interface, better parsing of IEC-104 traffic and decapsulation of CAPWAP traffic. The professional edition of NetworkMiner additionally adds port-independent detection of SMTP and SOCKS traffic, which enables extraction of emails and tunneled traffic even when non-standard ports are used.

User Interface Improvements

The first thing you see when starting NetworkMiner is the Hosts tab, which now has been updated to include a filter text box. This text box can be used to filter the displayed hosts based on the property fields they contain. By entering “Android” into the filter box NetworkMiner will show only the hosts having a property containing the string “Android”, for example in the OS classification or User-Agent string. Other properties you might find useful to filter on are hostname, JA3 hash and MAC address. If you’re running NetworkMiner Professional then you’ll also be able to filter on Country thanks to the MaxMind GeoLite2 feature included in the Pro edition.

NetworkMiner with Hosts filter Android

It’s now also possible to copy text from most tabs in NetworkMiner with Ctrl+C or by right-clicking and selecting “Copy selected rows”. A maximum of 10 rows can be copied at a time using the free version of NetworkMiner, while the Professional version allows all rows to be copied in one go.

The content based file type identification introduced in NetworkMiner 2.7 has been improved to also differentiate between EXE and DLL files as of version 2.8.

Matanbuchus malware download in NetworkMiner
Malicious AutoIt binary extracted from network traffic by NetworkMiner

IEC 60870-5-104

NetworkMiner’s parser for the SCADA protocol IEC 60870-5-104 (IEC-104) has been significantly improved in version 2.8. NetworkMiner now supports more IEC-104 commands and the commands are presented on the Parameters tab in a clearer way than before.

IEC-104 traffic in NetworkMiner

Image: IEC-104 commands sent by the Industroyer2 malware

I’m also proud to announce that NetworkMiner 2.8 now extracts files transferred over the IEC-104 protocol. More details about that particular feature is available in our IEC-104 File Transfer Extraction blog post.

CAPWAP Decapsulation

NetworkMiner 2.8 can read IEEE 802.11 packets inside CAPWAP tunnels between WLAN Controllers and Access Points. This feature allows WiFi traffic to be analyzed without having to capture packets in the air.

Reading PCAP from a Named Pipe

NetworkMiner previously allowed packets to be read from PacketCache over a named pipe. This feature has been upgraded to allow a PCAP stream to be read from any named pipe, not just from PacketCache. Here’s an example showing how to capture packets from localhost for 10 seconds with RawCap and make those packets available via a named pipe called “RawCap”:

RawCap.exe -s 10 127.0.0.1 \\.\pipe\RawCap

RawCap will start capturing packets once a PCAP reader connects to the “RawCap” named pipe, which now can be done with NetworkMiner by clicking “Read from Named Pipe” on the File menu.

Read PCAP from Named Pipe

Bug Fixes

NetworkMiner previously produced incorrect JA3S signatures for TLS servers if they sent Session ID values in Server Hello messages or listed only one supported TLS version using the Supported Versions extension. These bugs have now been fixed in NetworkMiner 2.8.

NetworkMiner’s live sniffing feature has been improved to better handle huge packets caused by Large Send Offload (LSO). NetworkMiner previously crashed with an error message saying that the received packet was “larger than the internal message buffer” when attempting to capture a too large packet.

TCP sessions occasionally didn’t show up in NetworkMiner’s Sessions tab previously if the application layer protocol was unknown. This bug has now been fixed in version 2.8.

New Features in NetworkMiner Professional

NetworkMiner Professional includes a feature for port independent protocol detection of protocols like FTP, HTTP, IRC, Meterpreter, SSH and TLS, which enables extraction of artifacts from those protocols even though the service is running on a non-standard port. This new release adds two additional protocols to the collection of identified protocols, namely SMTP and SOCKS. This allows analysts to extract emails from spam runs sent to ports other than 25 or 587, as well as to see what goes on inside covert SOCKS tunnels running on non-standard ports.

SMTP usernames and passwords extracted from SMTP traffic

Image: SMTP credentials extracted from spam run to non-standard SMTP port

In addition to allowing hosts to be filtered using string and regex matching, NetworkMiner Professional also allows the discovered hosts to be filtered on IP address using CIDR notation, such as “192.168.1.0/24” or “10.0.0.0/8”.

NetworkMiner with CIDR filter 192.168.88.0/24

Image: NetworkMiner Professional with CIDR filter 192.168.88.0/24

Here are some IPv4 and IPv6 CIDR filters that you might find useful:

  • 224.0.0.0/4 = IPv4 multicast (224/4 is also supported)
  • 127.0.0.0/8 = IPv4 loopback (127/8 is also supported)
  • fe80::/10 = IPv6 link-local addresses
  • ff00::/8 = IPv6 multicast
  • 0.0.0.0/0 = IPv4 hosts (0/0 is also supported)
  • 0::/0 = IPv6 hosts

Credits

We’d like to thank René Perraux, Matt Smith and Anand Kumar Singh for reporting bugs that have been fixed in this new release.

Upgrading to Version 2.8

Users who have purchased NetworkMiner Professional can download a free update to version 2.8 from our customer portal, or use the “Check for Updates” feature from NetworkMiner's Help menu. Those who instead prefer to use the free and open source version can grab the latest version of NetworkMiner from the official NetworkMiner page.

Posted by Erik Hjelmvik on Monday, 02 January 2023 08:00:00 (UTC/GMT)

Tags: #NetworkMiner#IEC-104#SMTP#SOCKS#PIPI#CIDR

Share: Facebook   Twitter   Reddit   Hacker News Short URL: https://netresec.com/?b=231d523


IcedID BackConnect Protocol

This is a follow-up to my Hunting for C2 Traffic video. But I didn't have time to record a short video this time, so I wrote a long blog post instead.

UPDATE 2022-11-02

Brad Duncan has released a new pcap file on malware-traffic-analysis.net, which contains an additional C2 command (0x12). Our analysis indicates that this command launches a file manager. This blog post has now been updated with details about this finding.

UPDATE 2022-11-09

Lenny Hansson has released IDS signatures that detect BackConnect traffic. More details further down in this blog post.

UPDATE 2022-12-05

Lenny has updated his IDS signatures to alert on BackConnect C2 traffic from port 443 in addition to 8080. The signatures in this blog post have now been updated to Lenny's new rev:2 signatures.

UPDATE 2023-04-14

Brad Duncan made the following suggestion in a toot yesterday:

If the protocol for this VNC traffic from Qakbot looks the same as the BackConnect traffic from IcedID infections, perhaps we can just call it BackConnect Protocol without specifying "IcedID"

This is an excellent idea, since IcedID, QakBot as well as Bazar have all been seen using the same BackConnect protocol. We will therefore refer to the protocol described in this blog post as just the “BackConnect Protocol” from now on. This blog post has also been updated accordingly.

UPDATE 2023-10-02

The release of NetworkMiner 2.8.1 adds a BackConnect protocol parser to NetworkMiner.

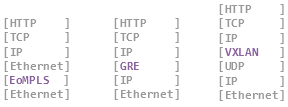
IcedID BackConnect C2 Packet Structure

The BackConnect (BC) module uses a proprietary command-and-control (C2) protocol that is pretty straight forward. Both client (bot) and the C2 server typically send commands and responses as 13 byte packets using the following structure:

  • Auth: 4 bytes
  • Command: 1 byte
  • Params: 4 bytes
  • ID: 4 bytes

Auth Field

The "Auth" field is presumably used by the bot and C2 server to verify that the other party is communicating using the same protocol and version.

As mentioned by Group-IB and xors the Auth field is typically 0x974F014A (little endian), but we prefer to use the network byte order representation "4a 01 4f 97".

In their IcedID blog post from 2020 Group-IB say:

the auth field that has not changed since at least version 5 of the IcedID core is the constant 0x974F014A

Nevertheless, we recently noticed another BackConnect Auth field being used in the wild. But more on that later.

Commands

The following list of BackConnect C2 commands has been compiled by combining those mentioned by Group-IB with our own analysis of the BackConnect protocol:

  • 0x00 = Bot queries for a task
  • 0x01 = Set sleep timer
  • 0x02 = Bot error
  • 0x03 = Reconnect
  • 0x04 = Start SOCKS
  • 0x05 = Start VNC

We've also discovered these additional commands in BackConnect C2 traffic that uses the Auth value "1f 8b 08 08":

  • 0x11 = Start VNC
  • 0x12 = Start file manager
  • 0x13 = Start reverse shell

Commands 0x04, 0x05, 0x11, 0x12 and 0x13 all cause the bot to connect back to the C2 server using a new BackConnect session, which will be used to wrap either SOCKS, VNC, file manager or reverse shell traffic.

Command 0x01: Set Sleep Timer

The set sleep timer command is issued by the C2 server to instruct the bot to sleep for a certain amount of time before requesting a new task from the C2 server again. The sleep time is defined in the four bytes following directly after the 0x01 command. This value is a 32-bit little endian value indicating the number of seconds the bot should sleep, i.e. "3c 00 00 00" = 0x0000003c = 60 seconds. The most common sleep value seems to be 60 seconds, which is why you'll often see byte sequences like this in IcedID C2 sessions:

zz zz zz zz 01 3c 00 00 00 xx xx xx xx

The following Wireshark display filter will show BackConnect C2 packets, where the bot is configured to sleep for 60 seconds before querying the C2 server for a new command:

tcp.len == 13 and tcp.payload[4:5] == 01:3c:00:00:00

Command 0x04: Start SOCKS

The SOCKS command (0x04) instructs the bot to start the SOCKS module. As an example, the following byte sequence was sent by the IcedID C2 server 91.238.50.80:8080 in Brad Duncan's 2022-06-28 TA578 IcedID pcap on malware-traffic-analysis.net (see frame #10231):

4a 01 4f 97 04 09 00 00 00 8c a2 b1 09

The first four bytes are the auth value, followed by the Start SOCKS command (04).

After receiving this command the bot established a new TCP connection back to the C2 server, where it echoed back the server's "Start SOCKS" command and then started acting like a SOCKS server.

Except for initially echoing the BackConnect Start SOCKS command the SOCKS module actually seems to be compliant with RFC1928, which defines the SOCKS5 protocol. This means that the C2 server can supply an IP address and port number to the bot's SOCKS proxy in order to relay a connection to that host through the bot.

SOCKS packet from IcedID in Wireshark

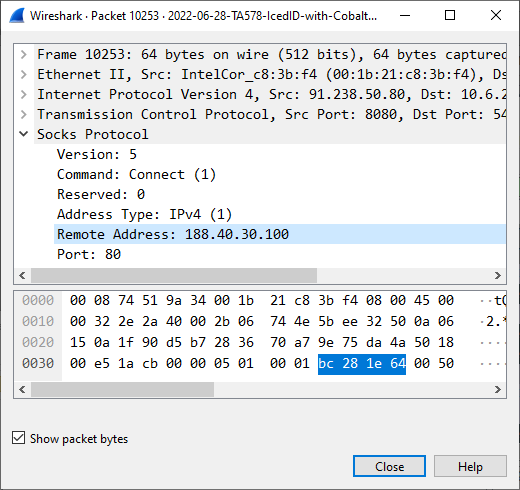
Image: C2 server instructs bot to relay a connection to 188.40.30.100:80

After receiving a Start SOCKS command an IcedID bot immediately establishes a new TCP connection to the specified IP and port, and relays the application layer data back to the C2 server through the SOCKS connection.

Update check of Advanced Port Scanner

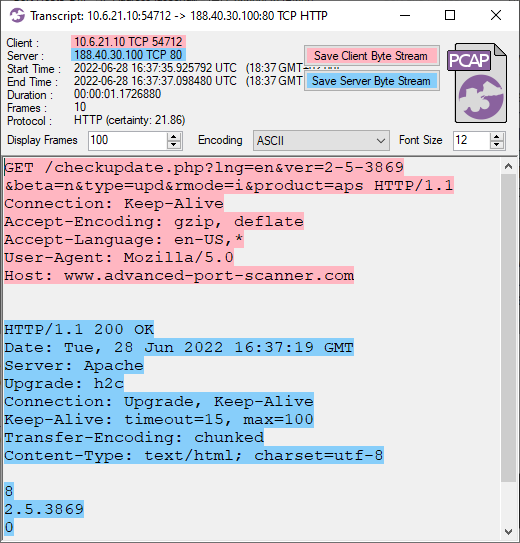
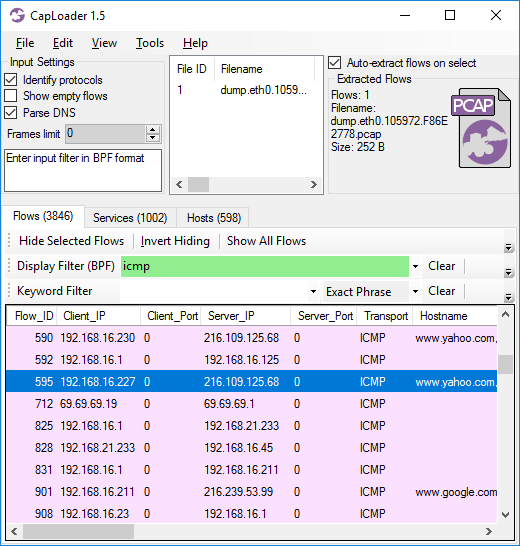
Image: Update check of Advanced Port Scanner relayed through the infected machine

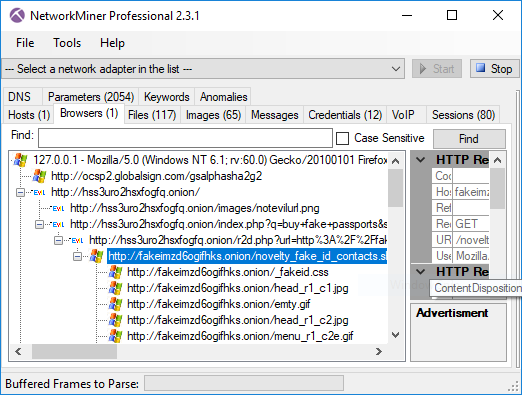
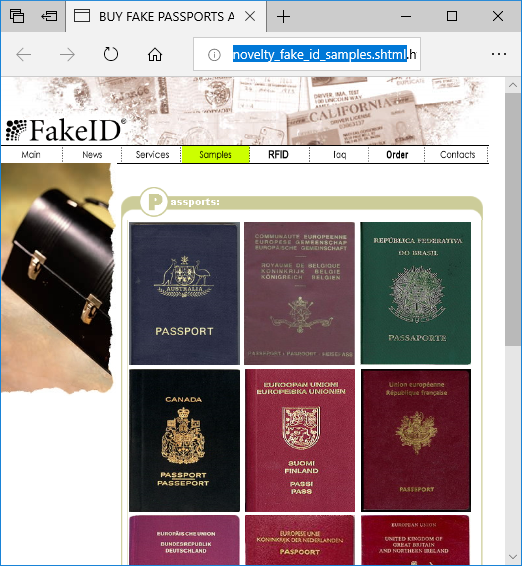
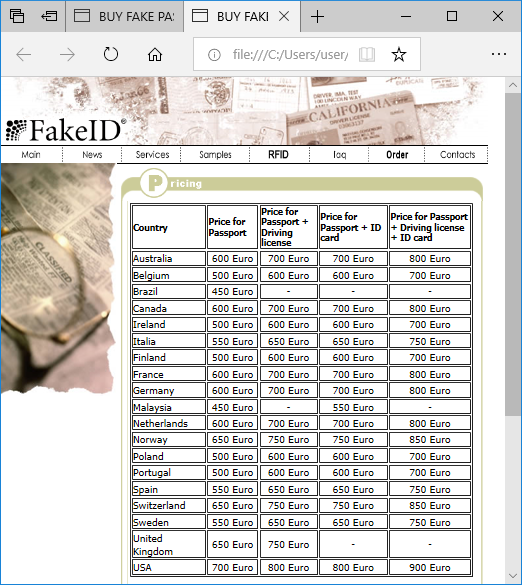
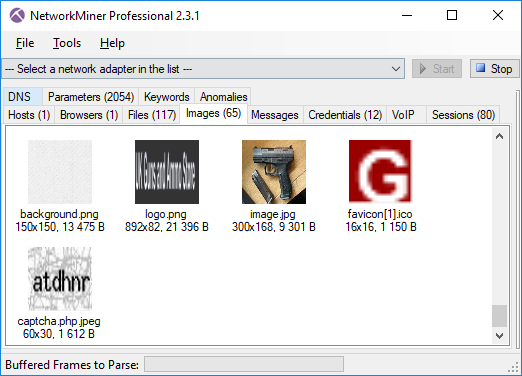
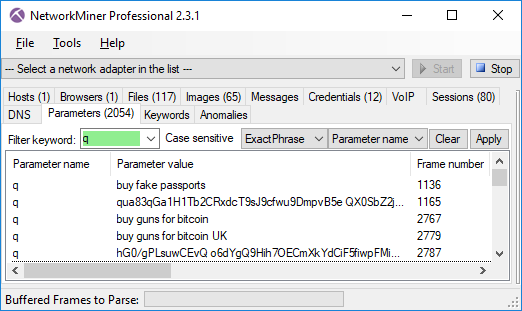
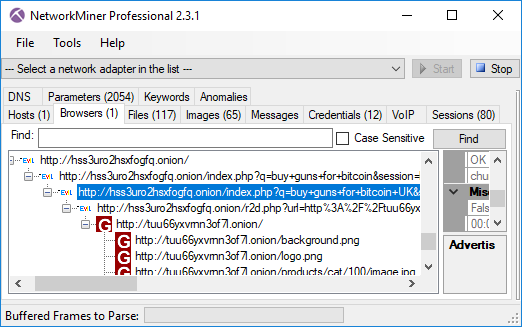
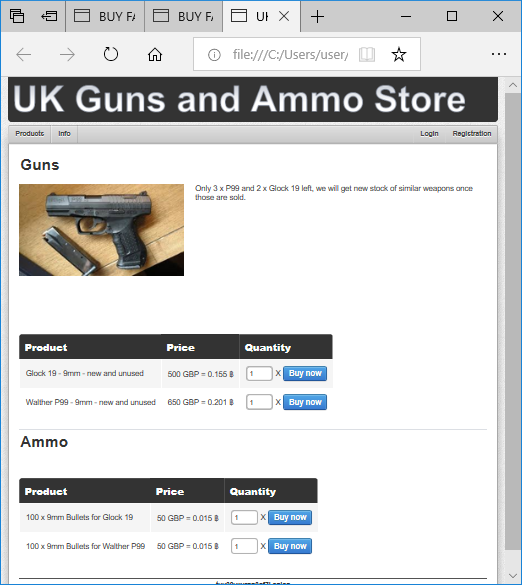
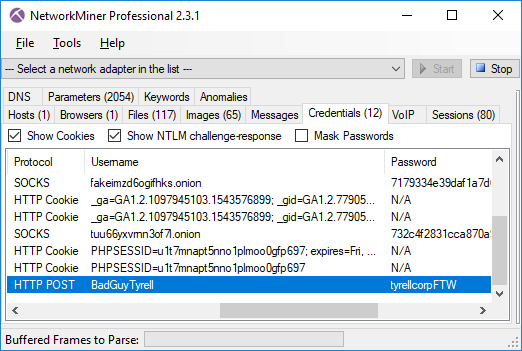
In the 2022-06-28 TA578 IcedID pcap the attacker used multiple SOCKS connections to scan the 10.6.21.0/24 network for services running on TCP ports 21, 80, 445 and 4899. That last port (TCP 4899) is typically used by Radmin VPN, which just so happens to be created by the outfit "Famatech" who also develop the "Advanced Port Scanner". The attacker also used the SOCKS module to make several HTTPS connections to servers like 18.204.62.252 (tlx.3lift[.]com), 23.94.138.115 (cmd5[.]org) and 74.119.118.137 (cat.da.us.criteo[.]com). The attacker also proxied connections to 40.97.120.242 and 52.96.182.162 (outlook.live.com) through the infected bot.

NetworkMiner Hosts tab

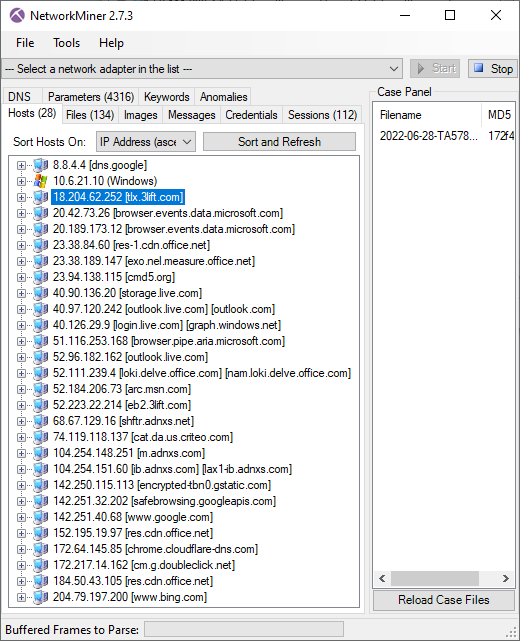
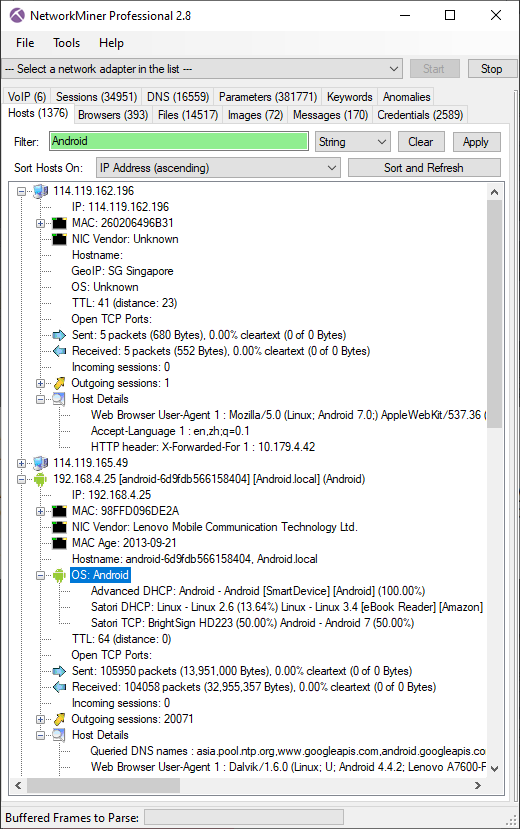
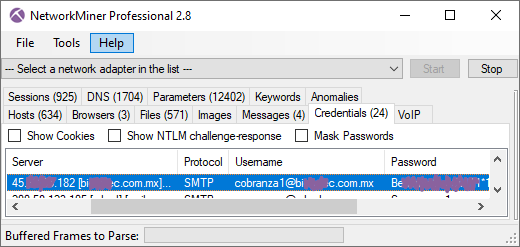
NetworkMiner showing hosts that the bot proxied TLS traffic to

JA3 Fingerprints from Proxied Traffic

Since the SOCKS proxy doesn't touch the application layer data we know that the client TLS handshake packets are coming from the C2 server rather than from the bot that's running the SOCKS proxy. This means that we can fingerprint the actual TLS client using JA3.

JA3 hashes in CapLoader

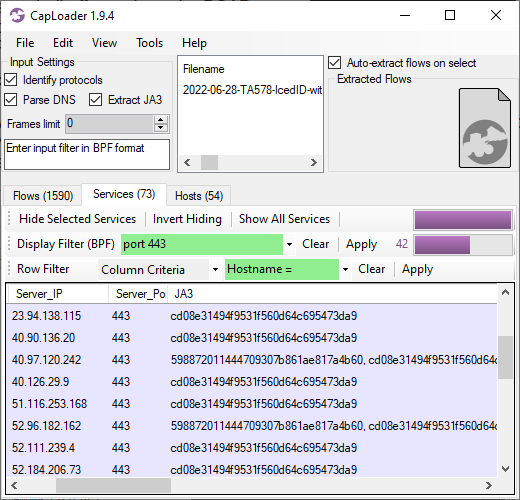
As you can see in the CapLoader screenshot above, most proxied TLS sessions use the cd08e31494f9531f560d64c695473da9 JA3 hash, but two of them use the rare JA3 hash 598872011444709307b861ae817a4b60. That rare JA3 hash was used only when connecting to outlook.live.com.

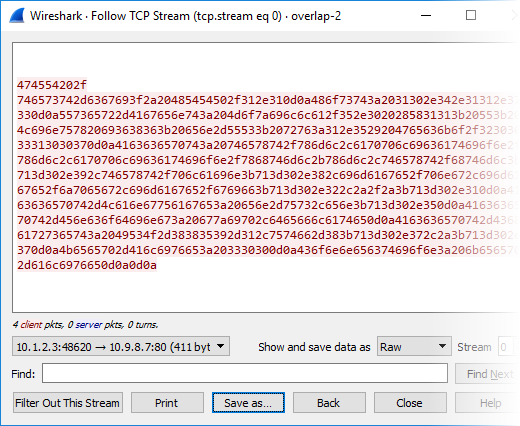
Command 0x05 or 0x11: VNC

Brad Duncan's 2022-06-28 TA578 IcedID pcap also contains the "Start VNC" command 0x05.

Flow transcript of Start VNC command

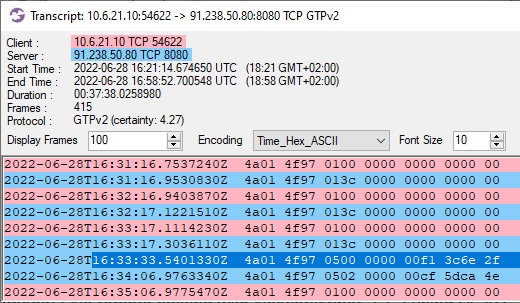
Image: Flow transcript of Start VNC command

As can be seen in the CapLoader screenshot above, Start VNC commands were sent at 16:33:33 and 16:34:06 UTC. And just like the SOCKS command, this caused the bot to establish a new connection back to the C2 server, echo the "Start VNC" command and then proceed with the VNC traffic.

Flow transcript of IcedID VNC traffic in ASCII encoding

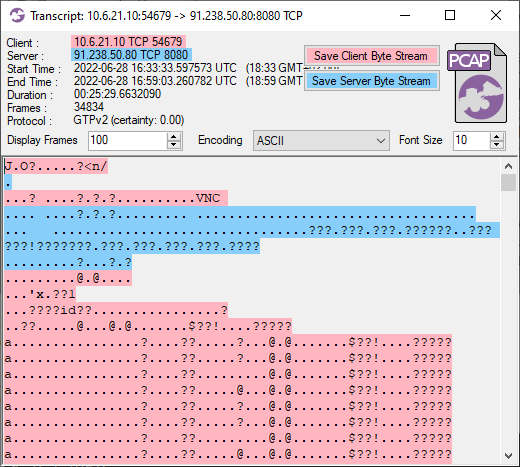
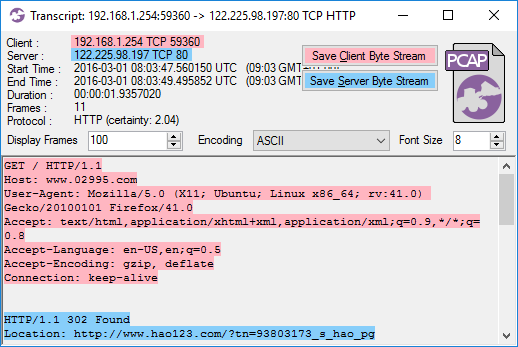
Image: Flow transcript of IcedID VNC traffic in ASCII encoding

Command 0x13: Reverse Shell

Brad posted a new capture file with network traffic from another IcedID infection last week (2022-10-04). He also noted that the traffic to 51.89.201.236:8080 was different from normal IcedID post-infection traffic.

I've sometimes seen DarkVNC over TCP port 8080 with IcedID infections, but this traffic definitely is -not- DarkVNC

After looking at this C2 traffic I discovered that it was in fact using the IcedID BackConnect protocol outlined in this blog post, but the Auth field "4a 01 4f 97" had been replaced with "1f 8b 08 08".

That exact byte sequence is a common file header for gzip compressed files (RFC1952), where

  • 1f 8b = GZIP magic
  • 08 = DEFLATE compression
  • 08 = Original file name header present

IcedID has previously been seen using fake gzip file headers in payloads, but this time even the C2 packets include the gzip header!

Transcript of TCP session to 51.89.201.236:8080

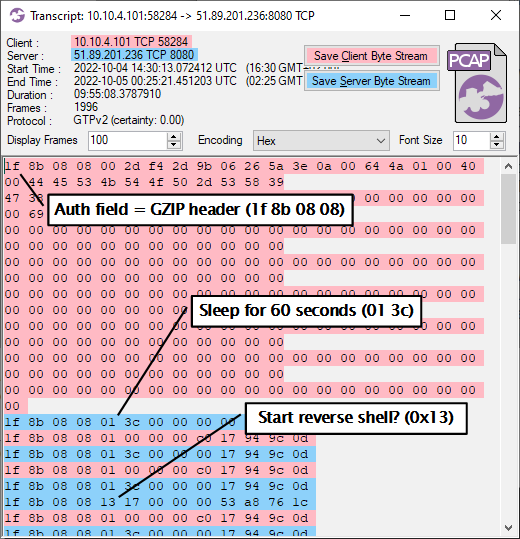
Image: Transcript of TCP session to 51.89.201.236:8080

The C2 traffic also contained the command 0x13, which I hadn't seen before. Just like the SOCKS and VNC commands, this one triggered the bot to establish a new connection back to the C2 server. But the bot sent a task query command (00) this time, instead of echoing the C2 server's command (0x13). The new TCP session then transitioned into what looks like a reverse shell session.

PowerShell download from https://aicsoftware[.]com:757/coin

Image: Transcript of reverse shell traffic from IcedID BackConnect session

The reverse shell traffic reveals that the attackers retrieved a list of domain admin users and then executed a PowerShell script from aicsoftware[.]com. This PowerShell script was used to install CobaltStrike beacon on the victim's PC.

Command 0x12: File Manager

We discovered the file manager command after this blog post was published. This section has therefore been added after the original publication of this blog post.

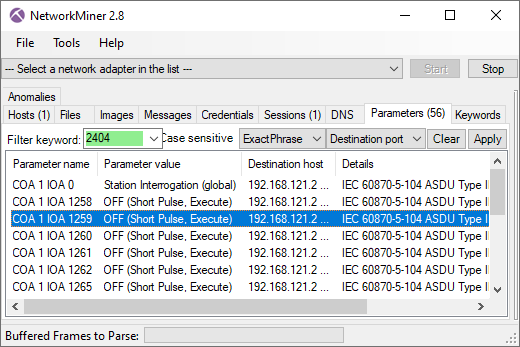
The following Wireshark display filter can be used to find file manager commands (0x12) in BackConnect C2 traffic that uses the "1f 8b 08 08" auth value:

tcp.len == 13 and tcp.payload[0:5] == 1f:8b:08:08:12

Wireshark display filter to identify IcedID C2 file manager commands

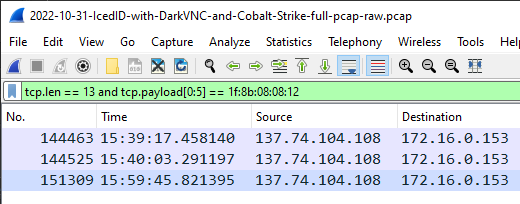
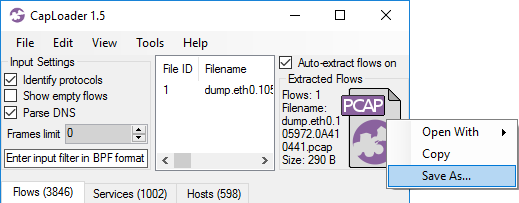
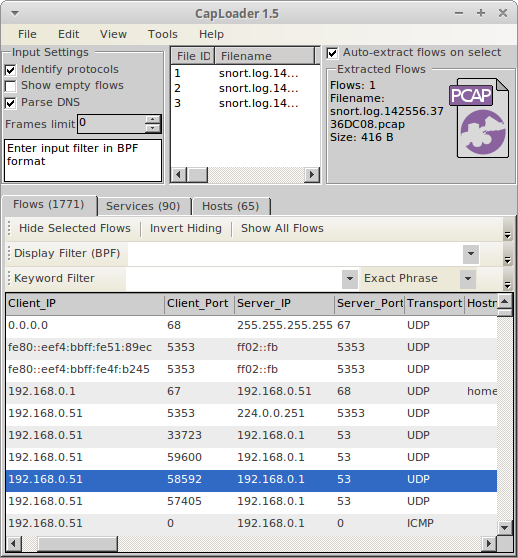
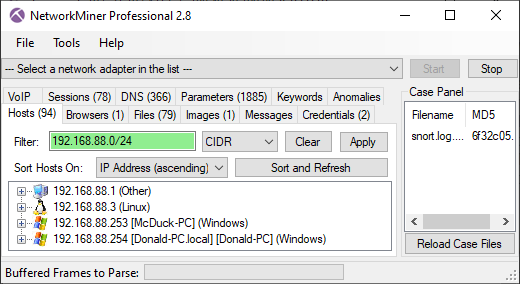
Image: File manager commands in BackConnect C2

The screenshot above shows that the file manager command was issued three times in 2022-10-31-IcedID-with-DarkVNC-and-Cobalt-Strike-full-pcap-raw.pcap.

IcedID File Manager sessions in CapLoader's Flows view

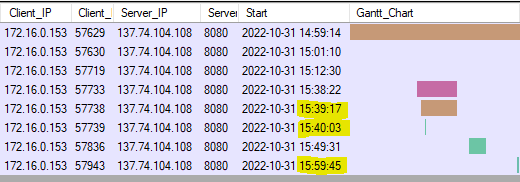
Image: BackConnect TCP sessions in CapLoader's Flows view

As you can see in the two screenshots above, each time a file manager command was issued in the C2 session (Wireshark screenshot) the bot established a new TCP connection back to the C2 server (CapLoader screenshot).

The file manager sessions use a proprietary protocol to perform tasks such as listing disks, changing directory and uploading files.

IcedID File Manager session in CapLoader's Flows Transcript

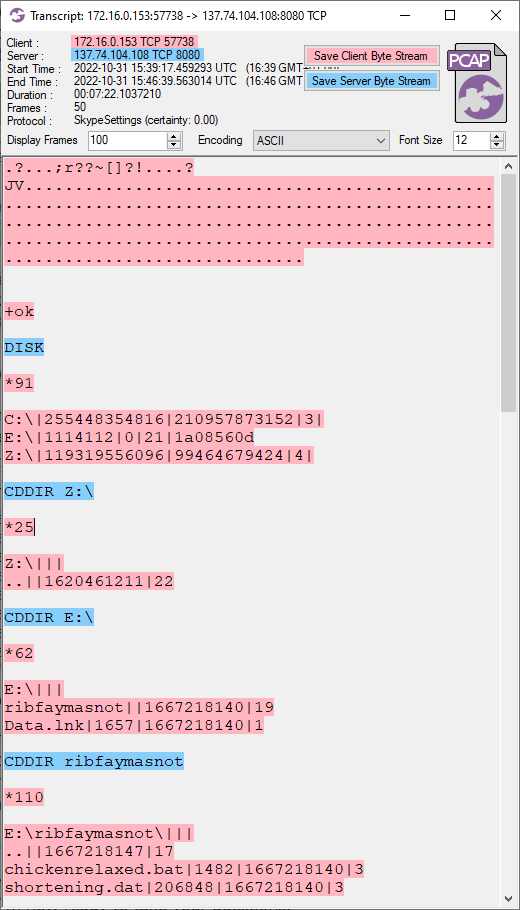
We've identified the following file manager commands:

  • DISK = List drives
  • CDDIR <path> = Change directory
  • PWD = Show current directory
  • DIR = List current directory
  • PUT <path> = Upload file

IDS Signatures

Lenny Hansson has released IDS signatures that can detect IcedID (and QakBot) BackConnect traffic. I'd like to highlight four of Lenny's signatures here.

Alert on "sleep 60 seconds" C2 command, regardless of Auth value:

alert tcp $EXTERNAL_NET [443,8080] -> $HOME_NET 1024: (msg:"NF - Malware IcedID BackConnect - Wait Command"; flow:established; flags:AP; dsize:13; content:"|01 3c 00 00 00|"; offset:4; depth:5; reference:url,networkforensic.dk; metadata:02112022; classtype:trojan-activity; sid:5006006; rev:3;)

Alert on "start VNC" C2 command with "4a 01 4f 97" Auth:

alert tcp $EXTERNAL_NET [443,8080] -> $HOME_NET 1024: (msg:"NF - Malware IcedID BackConnect - Start VNC command"; flow:established; flags:AP; dsize:13; content:"|4a 01 4f 97 05|"; offset:0; depth:5; reference:url,networkforensic.dk; metadata:03112022; classtype:trojan-activity; sid:5006007; rev:2;)

Alert on "start VNC" C2 command with "1f 8b 08 08" Auth:

alert tcp $EXTERNAL_NET [443,8080] -> $HOME_NET 1024: (msg:"NF - Malware IcedID BackConnect - Start VNC command - 11"; flow:established; flags:AP; dsize:13; content:"|1f 8b 08 08 11|"; offset:0; depth:5; reference:url,networkforensic.dk; metadata:03112022; classtype:trojan-activity; sid:5006011; rev:2;)

Alert on "start file manager" C2 command with "1f 8b 08 08" Auth:

alert tcp $EXTERNAL_NET [443,8080] -> $HOME_NET 1024: (msg:"NF - Malware IcedID BackConnect - Start file manager command"; flow:established; flags:AP; dsize:13; content:"|1f 8b 08 08 12|"; offset:0; depth:5; reference:url,networkforensic.dk; metadata:03112022; classtype:trojan-activity; sid:5006008; rev:2;)

A zip file containing Lenny's Snort rules can be downloaded from networkforensic.dk.

Questions and Answers

Allright, that's all I had to say about the IcedID BackConnect C2 protocol. I'm now ready to take your questions.

Q: Is IcedID's BackConnect VNC traffic the same thing as DarkVNC?

No, DarkVNC traffic doesn't use the BackConnect C2 Packet Structure described in this blog post. Also, one characteristic behavior DarkVNC is that the first C2 packet contains a string that looks like one of these:

  • (COMPUTERNAME)_ADDITIONAL_ID-DARKVNC
  • BOT-COMPUTERNAME(USERNAME)_ID-REFnnn
  • USR-COMPUTERNAME(USERNAME)_ID-REFnnn
Additionally, the first four bytes in the DarkVNC packets containing one of the strings above is a 32 bit little endian length field. For more details on DarkVNC, see the archived blog post A short journey into DarkVNC attack chain from REAQTA.

Q: Is IcedID's BackConnect VNC traffic the same thing as hVNC?

Almost. hVNC means "hidden VNC" and includes any type of malicious VNC server running on a victim's PC, including IcedID's VNC module as well as DarkVNC.

Q: How did you get Wireshark to decode the SOCKS traffic from IcedID BackConnect?

  1. Open the pcap file from 2022-06-28 TA578 IcedID
  2. Apply display filter: tcp.port eq 8080
  3. Right-click, Decode As, TCP port 8080 = SOCKS
  4. Display filter: tcp.dstport eq 8080 and tcp.len eq 13 and tcp.payload[0:5] eq 4a:01:4f:97:04
  5. Select all packets (Ctrl+A)
  6. Edit, Ignore Packets (Ctrl+D)
  7. Display filter: socks.dst

Q: Can CapLoader's Protocol Identification feature detect the BackConnect protocol?

The version used in this blog post (1.9.4) doesn't have a protocol model for the BackConnect protocol, but later versions can identify IcedID's BackConnect protocol regardless of port. CapLoader version 1.9.5 (and later) also alerts on BackConnect traffic.

Posted by Erik Hjelmvik on Wednesday, 12 October 2022 18:24:00 (UTC/GMT)

Tags: #IcedID#QakBot#QBot#TA578#BackConnect#SOCKS#SOCKS5#VNC#JA3#gzip#PowerShell

Share: Facebook   Twitter   Reddit   Hacker News Short URL: https://netresec.com/?b=22A38f9


PolarProxy in Windows Sandbox

In this video I demonstrate how PolarProxy can be run in a Windows Sandbox to intercept and decrypt outgoing TLS communication. This setup can be used to inspect otherwise encrypted traffic from malware or suspicious Windows applications, which communicate over HTTPS or some other TLS encrypted protocol.

The Windows Sandbox WSB file used in the demo can be downloaded from here: https://www.netresec.com/?download=PolarProxySandbox

Note: Windows Pro or Enterprise is required to run WSB files

Parsing Decrypted TLS Traffic with NetworkMiner

This sandbox also includes NetworkMiner, primarily because it can be used to read a real-time PCAP-over-IP stream with decrypted traffic from PolarProxy. As shown in the video, this feature can be used in order to extract files, images or parameters from the decrypted TLS traffic in near real-time.

Images extracted from decrypted HTTP/2 traffic shown in NetworkMiner

For more info about how to run NetworkMiner in Windows Sandbox, please see our blog post Running NetworkMiner in Windows Sandbox.

Configuring a Proxy Server in Windows Sandbox

Windows’ built-in proxy settings are unfortunately not available in Windows Sandbox, which is why I installed a third-party proxy client that redirects all outgoing network traffic to PolarProxy’s SOCKS server. I used Proxifier in the video, which has the additional benefit of being able to redirect all traffic to the proxy, even from applications that aren’t proxy aware. This feature is crucial when attempting to intercept and decrypt TLS traffic from malware that doesn’t respect the proxy settings configured in the operating system.

Command Log

Start PolarProxy with a PCAP-over-IP listener on TCP 57012, SOCKS server on TCP 1080, HTTP proxy on 8080 and a transparent TLS proxy on port 443:

PolarProxy --pcapoverip 57012 -x ..\proxyroot.cer --socks 1080 --httpconnect 8080 --nontls allow -p 443,80

Test PolarProxy’s SOCKS server by sending an unencrypted HTTP request through the proxy:

curl --socks4 localhost http://www.netresec.com

Test PolarProxy’s SOCKS server by sending an HTTPS request through the proxy:

curl --insecure --socks4 localhost https://www.netresec.com

Test PolarProxy’s HTTP CONNECT proxy server by sending an HTTPS request through the proxy:

curl --insecure --proxy localhost:8080 https://www.netresec.com

Start Menu Search

As shown in the video, text typed into Windows’ start menu gets sent to Microsoft. For more information about this behavior, and how it can be disabled, check out our Start Menu Search video and blog post.

Posted by Erik Hjelmvik on Monday, 31 January 2022 09:50:00 (UTC/GMT)

Tags: #PolarProxy#NetworkMiner#SOCKS#proxy#Windows Sandbox#Sandbox#PCAP-over-IP#pcapoverip#Windows#TLS#HTTPS

Share: Facebook   Twitter   Reddit   Hacker News Short URL: https://netresec.com/?b=221d46b


PolarProxy 0.9 Released

PolarProxy 0.9

PolarProxy was previously designed to only run as a transparent TLS proxy. But due to popular demand we’ve now extended PolarProxy to also include a SOCKS proxy and a HTTP CONNECT proxy. PolarProxy automatically decrypts all proxied SSL and TLS traffic, regardless if the remote server is running on TCP 443 or some other port, as long as the traffic passes through PolarProxy. As from now we also release a Windows build of PolarProxy, alongside the Linux x64, ARM and ARM64 builds.

SOCKS Proxy

Use the command line argument “--socks [port]” to start PolarProxy’s SOCKS proxy server. This SOCKS proxy supports multiple versions of the SOCKS protocol, including SOCKS 4, SOCKS 4a, SOCKS 5 and SOCKS 5h.

As an example, the command below starts a SOCKS server on TCP port 1080 and passes a copy of the decrypted TLS traffic as a PCAP stream to tshark.

PolarProxy --socks 1080 -w - | tshark -r - -d tcp.port==443,http2
Note: The “-d tcp.port==443,http2” argument in the command above is used to tell tshark to parse traffic to port 443 as HTTP/2 instead of TLS. An alternative method would be to instead configure PolarProxy to output decrypted 443 traffic as if it was port 80, by supplying the “-p 443,80” argument to PolarProxy.

You can then use curl to run some HTTPS traffic through the SOCKS proxy:

curl --insecure --socks4 localhost https://www.netresec.com

After doing this you should see the decrypted HTTP/2 traffic in tshark’s output.

HTTP CONNECT Proxy

We’ve also added a HTTP proxy to PolarProxy 0.9, but it only supports the CONNECT request method. This means that normal unencrypted HTTP requests, like GET or POST requests, will be rejected by PolarProxy. Most web traffic is TLS encrypted nowadays anyway, so we don't consider this limitation to be a big issue.

The HTTP CONNECT proxy service is activated with the “--httpconnect” argument. Decrypted TLS traffic from PolarProxy’s HTTP CONNECT proxy can be forwarded to tshark just like in the SOCKS example, but the traffic from these proxies can also be accessed through PCAP-over-IP like this:

PolarProxy --httpconnect 8080 -p 443,80 --pcapoverip 57012

You can then connect to PolarProxy’s PCAP-over-IP service with NetworkMiner by clicking File, Receive PCAP over IP, select “Connect to IP/port”, enter “localhost” and click the “Start Receiving” button. You’ll now be able to see a real-time feed of all the traffic that PolarProxy decrypts. As an example, let’s download the PolarProxy logo over HTTPS to see if NetworkMiner can extract it from PolarProxy’s decrypted PCAP-over-IP stream:

curl --insecure --proxy localhost:8080 https://www.netresec.com/images/PolarProxy_313x313.png

The PolarProxy logo immediately shows up in NetworkMiner’s images tab:

NetworkMiner reading PCAP-over-IP from PolarProxy

Port-Independent TLS Protocol Detection

When PolarProxy is running as a transparent TLS proxy all incoming traffic can be expected to be TLS. But that’s not the case when, for example, PolarProxy is running as a SOCKS proxy. We have therefore added port-independent TLS protocol detection for proxied traffic, so that TLS traffic can be detected and decrypted even when it runs on other ports than the standard 443, 465, 853, 990, 993, 995 and 5061 ones.

There is one crucial limitation to the automatic SSL/TLS protocol detection though, it doesn’t support explicit TLS traffic that relies on opportunistic encryption features like STARTTLS, which bootstraps TLS into an already established application layer session.

Allow Non-TLS Traffic

SOCKS and HTTP CONNECT proxies can both be used to transport other protocols than TLS. PolarProxy blocks all non-TLS traffic by default, but this setting can be overridden with the “--nontls allow” argument to allow any traffic to be proxied. The allow non-TLS override has no effect on PolarProxy’s transparent proxy though, because it will need to see a valid SNI field in order to know whereto the traffic should be forwarded.

Windows Build

There wasn’t much need for a Windows build of PolarProxy prior to the release of version 0.9, because the Windows firewall can’t be configured to redirect outgoing port 443 traffic to a local service. However, now that PolarProxy also includes SOCKS and HTTP CONNECT services, the situation is completely different. There are many ways to configure a Windows PC, as well as web browsers and other applications, to use a local proxy server.

You can use the Proxy settings window in Windows 10 and 11 to enable a local HTTP proxy like this:

Windows 10 Proxy Settings

Another option is to run “inetcpl.cpl” (Internet Options), open the “Connections” tab and click the “LAN settings” button to configure an HTTP proxy.

Windows Internet Options LAN Proxy Settings

You can, of course, also configure your browser to use a local SOCKS or HTTP proxy in Windows, just as you’d do on any other operating system.

But don’t forget to configure your OS and/or browser to trust your PolarProxy instance’s root CA certificate first, as explained in the “Trusting the PolarProxy root CA” section of our PolarProxy documentation.

The Windows version of PolarProxy is a .NET framework-dependent application, which requires the .NET 6 runtime to be installed. The PolarProxy releases for other platforms (Linux x64, ARM and ARM64) are all self-contained applications, which are published with the .NET runtime built-in.

Visit our PolarProxy page to download and install PolarProxy.

Posted by Erik Hjelmvik on Thursday, 13 January 2022 10:15:00 (UTC/GMT)

Tags: #PolarProxy#proxy#SOCKS#SOCKS5#TLS#SSL#decrypt#Windows#PCAP-over-IP#pcapoverip

Share: Facebook   Twitter   Reddit   Hacker News Short URL: https://netresec.com/?b=221953b


TorPCAP - Tor Network Forensics

PcapTor

Unencrypted network traffic, destined for the Tor network, is sent between localhost TCP sockets on computers running Tor clients, such as the Tor Browser. In this blog post I show how anonymous Tor browsing can be visualized, by loading a PCAP file with localhost traffic into NetworkMiner. We call this technique TorPCAP.

Tor is a secure platform that enables users to browse the web anonymously. The Tor Project website describes the tool as:

“Tor is free software and an open network that helps you defend against traffic analysis”

It is also possible to host anonymous “onion services” on the Dark Web using Tor:

“Tor makes it possible for users to hide their locations while offering various kinds of services, such as web publishing or an instant messaging server. Using Tor "rendezvous points," other Tor users can connect to these onion services, formerly known as hidden services, each without knowing the other's network identity.”

Capturing Tor Traffic Before it gets Encrypted

Tor installations include a SOCKS proxy listening on TCP port 9150 on localhost (127.0.0.1). This local SOCKS proxy is used by the Tor Browser, which connects to the proxy in order to have its traffic encrypted and forwarded to the Tor network. This means that by sniffing traffic on localhost it’s actually possible to create a solid forensic trail of all traffic a PC sends to and from the Tor network.

Tor Browser and SOCKS

You can use tcpdump to capture the localhost traffic on PCs running the Tails OS or Tor Browser in MacOS or Linux. If you’re running the Tor Browser in Windows, then we recommend using RawCap to sniff the localhost traffic (RawCap is a portable standalone tool that doesn’t need WinPcap or NDIS drivers to work).

In order to make sense of the captured traffic you need a tool that can parse the SOCKS protocol (RFC 1928). NetworkMiner includes a SOCKS parser since version 2.1, which can be used to extract and reassemble data going to and from the Tor network.


   Image Credit: Ken Edge    Eldon by @kenedgeiscool

Demo: Analysing TorPCAP Network Traffic

A user, let’s call him “Eldon”, used Tor for some dark-web activity on November 30, 2018. Eldon was using the Tor Browser on a Windows PC and RawCap was used to capture the localhost network traffic from Eldon’s computer. A PCAP file with the captured packets from Eldon’s PC can be accessed here. Please feel free to open this capture file with NetworkMiner, in order to follow along in this analysis.


File   : rawcap-localhost-tor.pcap
Size   : 1.47 MB
SHA256 : 9134FA542B388498C2A58A2E1424FCD4AF466CE7117DBE9AAFD0A031CC8209B8


The “Files” tab in NetworkMiner contains a list of all files that have been reassembled from the analyzed PCAP file. This file listing reveals that Eldon used the “not Evil” search engine (hss3uro2hsxfogfq[.]onion) to search for “buy fake passports” in frame 1136.

NetworkMiner's Files tab with not Evil search

The search result page from not Evil has been reassemled by NetworkMiner as “index.php.CB66877E.html”. By opening this HTML document in a browser we can see which search results Eldon got (no Internet connection is needed to open the reassembled html).

not Evil search in Tor

The “Browsers” tab in NetworkMiner Professional shows that Eldon followed the link for entry #2 in his search results (BUY FAKE PASSPORTS [...]), leading him to the “fakeimz[...].onion” website.

HTML document in Edge reassembled by NetworkMiner

Eldon then proceeded to list the available passports (see the reassembled file “novelty_fake_id_samples.shtml” in frame 1837) and chose the UK passport (“pp-uk-open-big.jpg”).

novelty_fake_id_samples.shtml NetworkMiner Professional Images tab with pp-uk-open-big.jpg

As Eldon proceeded he got a price list for the fake passports offered at this site (“novelty_fake_id_pricing.shtml”), but we don’t see any evidence of him actually completing a purchase of a fake UK passport.

HTML file reassembled by NetworkMiner opened in Edge browser

If we go back to the Images tab in NetworkMiner, and scroll a bit further down we see a picture of a gun. Let’s see where it comes from.

NetworkMiner Images tab with gun pic

It turns out Eldon also searched for “buy guns for bitcoin UK”. You can list all search engine queries by looking for entries in the “Parameters” tab with parameter name “q”. This technique is applicable for the “not Evil” search engine as well as most clearnet search engines, like Google, Bing, Yahoo! and DuckDuckGo (disregarding the fact that they use TLS).

NetworkMiner Parameters tab with web searches

The Browsers tab shows us that Eldon clicked on a link to the “UK Guns and Ammo Store” (tuu66[...].onion).

not Evil search in NetworkMiner Professional Browsers tab

This website has also been passively reassembled by NetworkMiner and can be opened offline in a browser (see “index[2].html”).

UK Guns and Ammo Store (dark web)

The Credentials tab in NetworkMiner shows the username and password used by Eldon to log into the website:

Credentials tab in NetworkMiner Professional 2.3.1 showing username and password sent over Tor to an onion service

After logging in, Eldon puts two items in his shopping cart (see “cart.php[1].html”), but gets a message saying “Not enough balance for this order” when clicking the “Continue to Checkout” link. It seems Eldon’s account at the dark-web weapons store doesn’t have any Bitcoins (see “wallet.php.html”)

UK Guns and Ammo Store - Shopping Cart (dark web) UK Guns and Ammo Store - Bitcoin Wallet (dark web)

Side Note - Web Trackers and Tor

It is considered bad practice to use clear-net tracking services, like Google Analytics, to track users visiting an onion service. However, we noticed that the fake passports website uses a Google Analytics script with tracking ID “UA-19359933-1”.

Dark Web HTML with Googla Analytics ID UA-19359933-1

Googling this ID led us to this very similar website:
hxxp://www.buypassportsfake[.]cc

hxxp://www.buypassportsfake[.]cc

Posted by Leon Kowalski on Wednesday, 12 December 2018 09:33:00 (UTC/GMT)

Tags: #Tor#PCAP#NetworkMiner#RawCap#SOCKS#127.0.0.1

Share: Facebook   Twitter   Reddit   Hacker News Short URL: https://netresec.com/?b=18C38eb


NetworkMiner 2.2 Released

NetworkMiner 2.2 = Harder Better Faster Stronger

NetworkMiner 2.2 is faster, better and stronger than ever before! The PCAP parsing speed has more than doubled and even more details are now extracted from analyzed packet capture files.

The improved parsing speed of NetworkMiner 2.2 can be enjoyed regardless if NetworkMiner is run in Windows or Linux, additionally the user interface is more responsive and flickers way less when capture files are being loaded.

User Interface Improvements

The keyword filter available in the Files, Messages, Sessions, DNS and Parameters tabs has been improved so that the rows now can be filtered on a single column of choice by selecting the desired column in a drop-down list. There is also an “Any column” option, which can be used to search for the keyword in all columns.

Keyword drop-down in NetworkMiner's Parameters tab

The Messages tab has also received an additional feature, which allows the filter keyword to be matched against the text in the message body as well as email headers when the “Any column” option is selected. This allows for an efficient analysis of messages (such as emails sent/received through SMTP, POP3 and IMAP as well as IRC messages and some HTTP based messaging platforms), since the messages can be filtered just like in a normal e-mail client.

We have also given up on using local timestamp formats; timestamps are now instead shown using the yyyy-MM-dd HH:mm:ss format with time zone explicitly stated.

Protocol Parsers

NetworkMiner 2.2 comes with a parser for the Remote Desktop Protocol (RDP), which rides on top of COTP and TPKT. The RDP parser is primarily used in order to extract usernames from RDP cookies and show them on the Credentials tab. This new version also comes with better extraction of SMB1 and SMB2 details, such as NTLM SSP usernames.

RDP Cookies extracted with NetworkMiner 2.2

One big change that has been made behind the scenes of NetworkMiner is the move from .NET Framework 2.0 to version 4.0. This move doesn’t require any special measures to be taken for most Microsoft Windows users since the 4.0 Framework is typically already installed on these machines. If you’re running NetworkMiner in Linux, however, you might wanna check out our updated blog post on how to install NetworkMiner in Linux.

We have also added an automatic check for new versions of NetworkMiner, which runs every time the tool is started. This update check can be disabled by adding a --noupdatecheck switch to the command line when starting NetworkMiner.

NetworkMiner.exe --noupdatecheck capturefile.pcap

NetworkMiner Professional

Even though NetworkMiner 2.2 now uses ISO-like time representations NetworkMiner still has to decide which time zone to use for the timestamps. The default decision has always been to use the same time zone as the local machine, but NetworkMiner Professional now additionally comes with an option that allows the user to select whether to use UTC (as nature intended), the local time zone or some other custom time zone for displaying timestamps. The time zone setting can be found in the “Tools > Settings” menu.

UPDATE: With the release of NetworkMiner 2.3 the default time zone is now UTC unless the user has specifically selected a different time zone.

The Port-Independent-Protocol-Detection (PIPI) feature in NetworkMiner Pro has been improved for more reliable identification of HTTP, SSH, SOCKS, FTP and SSL sessions running on non-standard port numbers.

CASE / JSON-LD Export

We are happy to announce that the professional edition of NetworkMiner 2.2 now has support for exporting extracted details using the Cyber-investigation Analysis Standard Expression (CASE) format, which is a JSON-LD format for digital forensics data. The CASE export is also available in the command line tool NetworkMinerCLI.

We would like to thank Europol for recommending us to implement the CASE export format in their effort to adopt CASE as a standard digital forensic format. Several other companies in the digital forensics field are currently looking into implementing CASE in their tools, including AccessData, Cellebrite, Guidance, Volatility and XRY. We believe the CASE format will become a popular format for exchanging digital forensic data between tools for digital forensics, log correlation and SIEM solutions.

We will, however, still continue supporting and maintaining the CSV and XML export formats in NetworkMiner Professional and NetworkMinerCLI alongside the new CASE format.

Credits

I would like to thank Sebastian Gebhard and Clinton Page for reporting bugs in the Credentials tab and TFTP parsing code that now have been fixed. I would also like to thank Jeff Carrell for providing a capture file that has been used to debug an issue in NetworkMiner’s OpenFlow parser. There are also a couple of users who have suggested new features that have made it into this release of NetworkMiner. Marc Lindike suggested the powerful deep search of extracted messages and Niclas Hirschfeld proposed a new option in the PCAP-over-IP functionality that allows NetworkMiner to receive PCAP data via a remote netcat listener.

Upgrading to Version 2.2

Users who have purchased a license for NetworkMiner Professional 2.x can download a free update to version 2.2 from our customer portal.

Those who instead prefer to use the free and open source version can grab the latest version of NetworkMiner from the official NetworkMiner page.

Posted by Erik Hjelmvik on Tuesday, 22 August 2017 11:37:00 (UTC/GMT)

Tags: #pcap#CASE#PIPI#HTTP#SOCKS#FTP#SSL#port#forensics

Share: Facebook   Twitter   Reddit   Hacker News Short URL: https://netresec.com/?b=17888cb


CapLoader 1.5 Released

CapLoader 1.5 Logo

We are today happy to announce the release of CapLoader 1.5. This new version of CapLoader parses pcap and pcap-ng files even faster than before and comes with new features, such as a built-in TCP stream reassembly engine, as well as support for Linux and macOS.

Support for ICMP Flows

CapLoader is designed to group packets together that belong to the same bi-directional flow, i.e. all UDP, TCP and SCTP packets with the same 5-tuple (regardless of direction) are considered being part of the same flow.

5-tuple
/fʌɪv ˈtjuːp(ə)l/
noun

A combination of source IP, destination IP, source port, destination port and transport protocol (TCP/UDP/SCTP) used to uniquely identify a flow or layer 4 session in computer networking.

The flow concept in CapLoader 1.5 has been extended to also include ICMP. Since there are no port numbers in the ICMP protocol CapLoader sets the source and destination port of ICMP flows to 0. The addition of ICMP in CapLoader also allows input filters and display filters like “icmp” to be leveraged.

Flows tab in CapLoader 1.5 with display filter BPF 'icmp'
Image: CapLoader 1.5 showing only ICMP flows due to display filter 'icmp'.

TCP Stream Reassembly

One of the foundations for making CapLoader a super fast tool for reading and filtering PCAP files is that it doesn’t attempt to reassemble TCP streams. This means that CapLoader’s Transcript view will show out-of-order segments in the order they were received and retransmitted segments will be displayed twice.

The basic concept has been to let other tools do the TCP reassembly, for example by exporting a PCAP for a flow from CapLoader to Wireshark or NetworkMiner.

The steps required to reassemble a TCP stream to disk with Wireshark are:

  1. Right-click a TCP packet in the TCP session of interest.
  2. Select “Follow > TCP Stream”.
  3. Choose direction in the first drop-down-list (client-to-server or server-to-client).
  4. Change format from “ASCII” to “Raw” in the next drop-down-menu.
  5. Press the “Save as...” button to save the reassembled TCP stream to disk.

Follow TCP Stream window in Wireshark

Unfortunately Wireshark fails to properly reassemble some TCP streams. As an example the current stable release of Wireshark (version 2.2.5) shows duplicate data in “Follow TCP Stream” when there are retransmissions with partially overlapping segments. We have also noticed some additional  bugs related to TCP stream reassembly in other recent releases of Wireshark. However, we’d like to stress that Wireshark does perform a correct reassembly of most TCP streams; it is only in some specific situations that Wireshark produces a broken reassembly. Unfortunately a minor bug like this can cause serious consequences, for example when the TCP stream is analyzed as part of a digital forensics investigation or when the extracted data is being used as input for further processing. We have therefore decided to include a TCP stream reassembly engine in CapLoader 1.5. The steps required to reassemble a TCP stream in CapLoader are:

  1. Double click a TCP flow of interest in the “Flows” tab to open a flow transcript.
  2. Click the “Save Client Byte Stream” or “Save Server Byte Stream” button to save the data stream for the desired direction to disk.

Transcript window in CapLoader 1-5

Extracting TCP streams from PCAP files this way not only ensures that the data stream is correctly reassembled, it is also both faster and simpler than having to pivot through Wireshark’s Follow TCP Stream feature.

PCAP Icon Context Menu

CapLoader 1.5 PCAP icon Save As...

The PCAP icon in CapLoader is designed to allow easy drag-and-drop operations in order to open a set of selected flows in an external packet analysis tool, such as Wireshark or NetworkMiner. Right-clicking this PCAP icon will bring up a context menu, which can be used to open a PCAP with the selected flows in an external tool or copy the PCAP to the clipboard. This context menu has been extended in CapLoader 1.5 to also include a “Save As” option. Previous versions of CapLoader required the user to drag-and-drop from the PCAP icon to a folder in order to save filtered PCAP data to disk.

Faster Parsing with Protocol Identification

CapLoader can identify over 100 different application layer protocols, including HTTP, SSL, SSH, RTP, RTCP and SOCKS, without relying on port numbers. The protocol identification has previously slowed down the analysis quite a bit, which has caused many users to disable this powerful feature. This new release of of CapLoader comes with an improved implementation of the port-independent protocol identification feature, which enables PCAP files to be loaded twice as fast as before with the “Identify protocols” feature enabled.

Works in Linux and macOS

One major improvement in CapLoader 1.5 is that this release is compatible with the Mono framework, which makes CapLoader platform independent. This means that you can now run CapLoader on your Mac or Linux machine if you have Mono installed. Please refer to our previous blog posts about how to run NetworkMiner in various flavors of Linux and macOS to find out how to install Mono on your computer. You will, however, notice a performance hit when running CapLoader under Mono instead of using Windows since the Mono framework isn't yet as fast as Microsoft's .NET Framework.

CapLoader 1.5 running in Linux with Mono
Image: CapLoader 1.5 running in Linux (Xubuntu).

Credits

We’d like to thank Sooraj for reporting a bug in the “Open With” context menu of CapLoader’s PCAP icon. This bug has been fixed in CapLoader 1.5 and Sooraj has been awarded an official “PCAP or it didn’t happen” t-shirt for reporting the bug.

PCAP or it didn't happen t-shirt
Image: PCAP or it didn't happen t-shirt

Have a look at our Bug Bounty Program if you also wanna get a PCAP t-shirt!

Downloading CapLoader 1.5

Everything mentioned in this blog post, except for the protocol identification feature, is available in our free trial version of CapLoader. To try it out, simply grab a copy here:
https://www.netresec.com/?page=CapLoader#trial (no registration needed)

All paying customers with an older version of CapLoader can download a free update to version 1.5 from our customer portal.

Posted by Erik Hjelmvik on Tuesday, 07 March 2017 09:11:00 (UTC/GMT)

Tags: #CapLoader#PCAP#pcap-ng#Follow TCP Stream#Wireshark#Linux#Mac#macOS#RTP#SOCKS#Mono#Flow

Share: Facebook   Twitter   Reddit   Hacker News Short URL: https://netresec.com/?b=1738eba


NetworkMiner 2.1 Released

NetworkMiner 2.1 Logo

We are releasing a new version of NetworkMiner today. The latest and greatest version of NetworkMiner is now 2.1.

Yay! /throws confetti in the air


Better Email Parsing

I have spent some time during 2016 talking to digital forensics experts at various law enforcement agencies. I learned that from time to time criminals still fail to use encryption when reading their email. This new release of NetworkMiner therefore comes with parsers for POP3 and IMAP as well as an improved SMTP parser. These are the de facto protocols used for sending and receiving emails, and have been so since way back in the 90’s.

Messages tab in NetworkMiner 2.1 showing extracted emails

Not only does NetworkMiner show the contents of emails within the tool, it also extracts all attachments to disk and even saves each email as an .eml file that can be opened in an external email reader in order to view it as the suspect would.

Extracted email Get_free_s.eml opened in Mozilla Thunderbird
Extracted email ”Get_free_s.eml” opened in Mozilla Thunderbird

Encapsulation Protocols

There are several protocols that can be used to provide logical separation of network traffic, in order to avoid using multiple physical networks to keep various network segments, security domains or users apart. Some of these techniques for logical separation rely on tagging or labeling, while others are tunneling the encapsulated traffic. Nevertheless, it’s all pretty much the same thing; an encapsulation protocol is used in order to wrap protocol X inside protocol Y, usually while adding some metadata in the process.

NetworkMiner has been able to parse the classic encapsulation protocols 802.1Q, GRE and PPPoE since 2011, but we now see an increased use of protocols that provide logical separation for virtualization and cloud computing environments. We have therefore added parsers in NetworkMiner 2.1 for VXLAN and OpenFlow, which are the two most widely used protocols for logical separation of traffic in virtualized environments. We have also added decapsulation of MPLS and EoMPLS (Ethernet-over-MPLS) to NetworkMiner 2.1.

Encapsulation examples for MPLS GRE and VXLAN

The new release additionally comes with support for the SOCKS protocol, which is an old school encapsulation protocol used by administrators as well as hackers in order to bypass firewalls or provide anonymous Internet access. The SOCKS parser in NetworkMiner can even be used to read network traffic from Tor in cleartext before it enters the Tor network. However, in order to capture Tor’s SOCKS traffic you’ll have to sniff traffic from the Tor client’s localhost interface on TCP port 9150.

PacketCache Logo

PacketCache

NetworkMiner 2.1 can read packets directly from a local PacketCache service by clicking ”File > Read from PacketCache”. This eliminates the need to run a PowerShell script in order to dump a PCAP file with packets recently captured by PacketCache.

HTTP Partial Content / Range Requests

Byte serving is a feature in HTTP that makes it possible to retrieve only a segment of a file, rather than the complete file, by using the “Range” HTTP header. This feature is often used by BITS in order to download updates for Windows. But we have also seen malware use byte serving, for example malware droppers that attempt to download malicious payloads in a stealthy manner. See Ursnif and Dridex for examples of malware that utilize this technique.

NetworkMiner has previously only reassembled the individual segments of a partial content download. But as of version 2.1 NetworkMiner has the ability to piece together the respective parts into a complete file.

SSL/TLS and X.509 Certificates

NetworkMiner has been able to extract X.509 certificates to disk for many years now, simply by opening a PCAP file with SSL traffic. However, in the 2.1 release we’ve added support for parsing out the SSL details also from FTP’s “AUTH TLS” (a.k.a explicit TLS or explicit SSL) and STARTTLS in SMTP.

NetworkMiner now also extracts details from the SSL handshake and X.509 certificate to the Parameters tab, such as the requested SNI hostname and the Subject CN from the certificate.

SSL and certificate information extracted by NetworkMiner from PCAP
SSL handshake details and certificate info passively extracted from captured HTTPS session to mega.co.nz

NetworkMiner Professional

The new features mentioned so far are all part of the free open source version of NetworkMiner. But we have also added a few additional features to the Professional edition of NetworkMiner as part of the 2.1 release.

The “Browsers” tab of NetworkMiner Professional has been extended with a feature for tracking online ads and web trackers. We are using EasyList and EasyPrivacy from easylist.to in order to provide an up-to-date tracking of ads and trackers. HTTP requests related to ads are colored red, while web tracker requests are blue. These colors also apply to the Files tab and can be modified in the Settings menu (Tools > Settings).

NetworkMiner Professional 2.1 showing Advertisments (red) and Trackers (blue)
NetworkMiner Professional 2.1 showing advertisments (red) and Internet trackers (blue).

The reason why NetworkMiner Pro now tracks ads and trackers is because these types of requests can make up almost half of the HTTP requests that a normal user makes while surfing the web today. Doing forensics on network traffic from a suspect criminal can be a very time consuming task, we therefore hope that being able to differentiate between what traffic that is initiated by the user rather than being triggered by an online advertisement service or internet tracker can save time for investigators.

The RIPE database previously contained a bug that prevented NetworkMiner Professional from properly leveraging netname info from RIPE. This bug has now been fixed, so that the Host Details can be enriched with details from RIPE for IP addresses in Europe. To enable the RIPE database you’ll first have to download the raw data by clicking Tools > Download RIPE DB.

Host Details with RIPE netname
Host Details enriched with RIPE description and netname

We have also extended the exported details about the hosts in the CSV and XML files from NetworkMiner Professional and the command line tool NetworkMinerCLI. The exported information now contains details such as IP Time-to-Live and open ports.

Upgrading to version 2.1

Users who have purchased a license for NetworkMiner Professional 2.0 can download a free update to version 2.1 from our customer portal.

Those who instead prefer to use the free and open source version can grab the latest version of NetworkMiner from the official NetworkMiner page.

Credits

There are several persons I would like to thank for contributing with feature requests and bug reports that have been used to improve NetworkMiner. I would like to thank Dietrich Hasselhorn, Christian Reusch, Jasper Bongertz, Eddi Blenkers and Daniel Spiekermann for their feedback that have helped improve the SMB, SMB2 and HTTP parsers as well as implementing various encapsulation protocols. I would also like to thank several investigators at the Swedish, German and Dutch police as well as EUROPOL for the valuable feedback provided by them.

Posted by Erik Hjelmvik on Wednesday, 11 January 2017 14:30:00 (UTC/GMT)

Tags: #NetworkMiner#POP3#SMTP#IMAP#VXLAN#X.509#PCAP

Share: Facebook   Twitter   Reddit   Hacker News Short URL: https://netresec.com/?b=17124c4

X / twitter

NETRESEC on X / Twitter: @netresec

Mastodon

NETRESEC on Mastodon: @netresec@infosec.exchange